Even if you’re not overly geeky, you probably have a rough idea of how much memory and what sort of processor your computer has. But what about its other statistics? For example, do you know your RAM bus speed? This may sound esoteric, but if you’re thinking of upgrading your RAM, it’s something you really need to know. Then again, if you are a serious geek, you may be in need of a tool you can tote around on a USB stick for diagnosing hardware on friends’ and colleagues’ machines.
CPU-Z is a free and powerful hardware detection tool that can do just that, and it’s available as a portable version, too. In fact, it’s so good, we featured it on our Best Portable Apps list.
Downloading The Portable Version
Sometimes you have to get an application’s portable version from an unofficial source. With CPU-Z, this is not so: The portable version is available right on the CPU-Z Download page:

Once you grab the ZIP file for the language and Windows version you want, it’s just a matter of unpacking it somewhere, and running the CPU-Z executable. It will ask you for Administrator privileges to run, though.
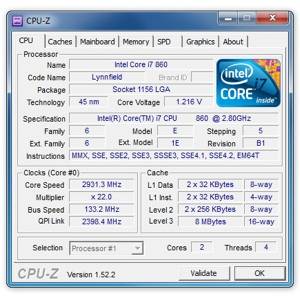
Using CPU-Z

Being a classic utility, CPU-Z’s interface is, well, utilitarian. After running through a quick startup sequence where it diagnoses all of your hardware, you will get a series of tabs showing main system aspects. The CPU tab, shown above, shows far more than just the name of the CPU (yes, I’m writing this on an ancient laptop). You can also see the CPU’s package (or socket), which can be handy for upgrading it.
The mainboard tab is equally interesting:

You can see your BIOS version and revision date, which is, again, excellent for figuring out if there’s an available upgrade from the BIOS maker without having to shut down your computer and write down the BIOS information on a piece of paper. The same goes for the motherboard, especially if you have a desktop computer: I have a Gigabyte motherboard on my desktop, and have had to install updated drivers for it several times to resolve various issues. Knowing the exact make and model of the motherboard makes it easy to find up-to-date drivers.
The memory and SPD tabs both shows information regarding your system’s RAM, with the SPD tab the more interesting of the two:

What’s great about this tab is that it lets you see memory sizes on a per-slot basis. For example, I remembered that once upon a time I upgraded this laptop’s RAM – but I wasn’t really sure how I went about it. Now I know that I have a 2GB DIMM module in one slot, and a 512MB DIMM in the other. That’s handy, because now I know that the only practical upgrade for this machine would be getting another 1GB or 2GB stick, but it must be a single stick (not that I’m ever going to upgrade this old Toshiba workhorse, but still, it’s nice to know).
The SPD tab also lists each DIMM’s max bandwidth, so now I know that my 512MB DIMM is slowing everything down because it’s 333MHz, while my 2GB one is capable of 400MHz. Not a huge difference, but still, it’s good to know that the smaller DIMM is also making things slower. Also, if your RAM is giving you trouble, you can see its serial number and manufacturing date (week and year), as well as its maker. This is great for figuring out whether or not it’s still under warranty.
Run This On a New Computer
One case where CPU-Z will be really invaluable is right when you get a new computer. Mistakes (real or otherwise) have been known to happen, where people order one specification and get a somewhat different (lower-quality) system from the store or maker. So when you get a new computer, you can just run CPU-Z portable on it and quickly see exactly what you got, to make sure it is indeed what you paid for.
All in all, CPU-Z doesn’t have many frills, but packs a ton of useful information into a compact, sensible interface. Naturally, there's also a Windows installer if you choose to use it instead of the portable version. Definitely recommended.
Have you investigated the contents of your computer? How did you go about finding out the specifications of your computer's components?