The living room game console has become a central media hub for many, which can mean large movie downloads. Despite all the controversy surrounding DRM, digital game downloads have finally arrived too - nowadays, you can download premium AAA titles on launch day without having to wait for a piece of plastic to arrive in the mail. And if you're a PlayStation Plus subscriber, you have gigabytes of new games literally thrown at you every month. On environmental grounds, I couldn't be happier about the move to digital - but it means local storage needs are growing rapidly. The days of having a slot-in memory cartridge are far gone - a few hundred gigabytes would be modest by today's standards. Let's upgrade.
Luckily, Sony made it really easy and user-serviceable to upgrade the internal storage drive - unlike Microsoft, who locked it down and demanded you buy first-party approved models only. Upgrading your PS3 drive will not void the warranty.
Why Upgrade?
I recently bought a new PS3 Super Slim - the latest model - but it only came with a measly 12 GB flash storage. I could have purchased the one that came with a 500 GB drive - but that was another $80, a waste given that I have a few 2.5-inch SATA drives sitting at home from past projects.
It must be said that if you don't already have a spare drive you're looking to use, you're not going to save any by going the DIY route if you're buying a new console. A new drive will set you back around $60, plus another $20 for the mounting plate required in the new Super Slim model - you may as well as just buy it complete with drive from the start.
If you own an older PS3, such as the original 40gb or 80 GB "fat" models, you'll certainly be looking to upgrade. As I mentioned, all you'll need is a new drive - 500 GB will set you back about $60. Read on.
NOTE: If you are just adding a drive to a 12 GB Super Slim model, you don't need to back up or re-install system software. Just follow the guide section below to open it up, add a drive mounting bracket, and throw the drive in. The 12 GB of internal flash storage transfers over to the new drive - that's it. The rest of these instructions only apply to case of upgrades from one physical drive to another.
Which Drive to Buy? Anything Else I Need?
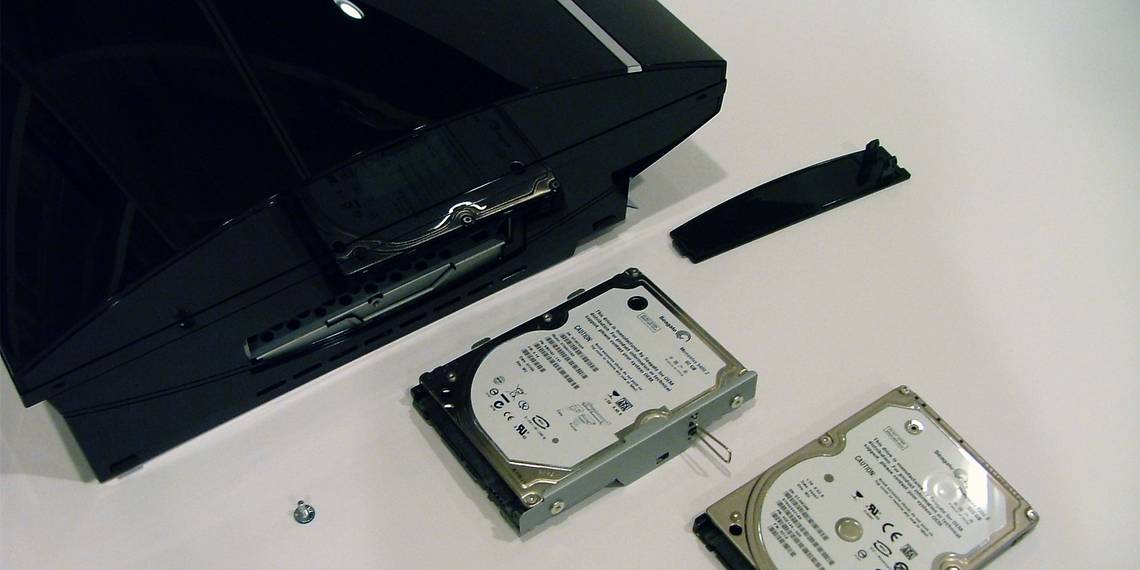
PlayStation 3 requires a SATA drive, 2.5-inch form factor - the same as you find in laptops, not desktops. You can use either an SSD or a traditional spinning drive, but I would suggest going for the largest you can afford. Particularly thick drives - 12.5 mm - may require a case mod, so you may find some 1 TB drives do not fit.
EuroGamer found that in terms of performance gains for game installs, the limiting factor appeared to be the Blu-ray drive - having an SSD didn't seem to help much for most games. In terms of load times, Gran Turismo 5 took twice as long (around 30 seconds) to load a particular level on a 5400 rpm drive compared to an SSD; however, other games saw little to no benefit. In conclusion, you're not going to see a noticeable difference. The best balance between price and performance seems lie in a 7200 rpm drive.
If you wish to save your current data, you'll need another external hard drive with USB connection, as long as it has at least the capacity of your current drive, there is no problem with physical size.

There's are no Torx screw involved in the upgrade process, so all you need is a small cross head screwdriver, and in some cases, a flat head screwdriver to pry off case parts.
Step One: Backup
Assuming you want to keep your current game saved states and profiles, you'll need to perform a full system backup first. A few important points to note:
- This will not back up games and media downloaded from the store - these will need to be re-downloaded on your upgraded system.
- Trophies not associated with a PSN account cannot be backed up, so it's recommended you create a PSN account for every user first.
- Copy-protected game saves will be backed up, but they cannot be used on another system. So long as you are restoring to the same PS3, you should be fine.
- The drive you're currently using is encrypted - you cannot simply plug it into a PC and copy across files later, it must be done using the backup utility.
- The drive is keyed to your PS3 - you cannot give it to a friend and have them access your files, it will ask to be formatted when they insert it into their PS3.
Before backing up, the external USB drive must be formatted with FAT32, not NTFS. Your existing data will not be overwritten.

Start the backup from System Settings -> Backup. The data will be saved in the PS3 -> EXPORT -> BACKUP folder.

Before continuing, it's also important to download the latest firmware install. After ensuring you're running the latest system software on your PS3, visit this website to download the system install files needed to get a base system running. The link is somewhat hidden - it's a black button labelled DOWNLOAD NOW in tiny text at the end of the steps under the heading "Update data download procedure".

Place it on your drive in the PS3 -> UPDATE folder. The file should be called PS3UPDAT.PUP. If you make a mistake or change the naming system, your PS3 isn't going to be able to to read the update.

Upgrade Guide: Super Slim (Newest)
The Super Slim 12 GB is fitted with flash memory, so there is no internal drive and you will not need to back up or restore. In order to add a drive to this model, you'll need to purchase a replacement drive mounting caddy. The caddy for the Super Slim is incompatible with older models, so check before you buy.

The drive area can be found on the right side of the device (looking from the front), next to the CD tray. Slide the plastic panel toward the back of the device to remove.

Fit your drive to the bracket using four supplied screws that should have come with it. Slot in carefully, aligning the SATA connectors and secure with the blue screw.

Go ahead and boot up - the system will detect a new drive, and ask if you wish to use this to store system data and saves etc. Note that once you've done this, the internal flash memory will no longer be used - you cannot choose to download games to one or the other.
Upgrade Guide: Slim (Older)
The drive is accessed from the underside, laid flat. You'll find a rectangular cover on the left-center; lift and twist this to reveal a blue screw which secures the drive tray.

Next, there's a black plastic drive cover on the front bezel under the Blu-ray drive; slide this to the side, and the drive caddy can be pulled out. This video from IGN explains the process.
Upgrade Guide: Fat (Oldest)
You'll find the drive slot on the underside of the device (when standing upright). Removing the drive cover is a simple affair, and inside there's a single blue screw holding the metal drive mount to the PS3.
(Please excuse the dirty PS3 below - I fished this out from the trash; it doesn't work, the chip is burnt out and reflowing didn't fix it)

Unscrew that, then slide toward the front of the device (where the buttons and drive tray are), and it should unlock. You can now slide out the drive.

The drive itself is secured to the mount with the usual selection of four screws.

Re-Install
Upon first booting the system, you'll be greeted with an error. Plug in the external drive to install the system software first, then once you're up and running, proceed to restore your old data, again from System -> Backup utility. All done!
This has been a long article, and may seem kind of complicated at first, but it's really not. Sony has made it really simple to upgrade, and for that we must thank them. Backup; change drives; install software; restore from backup - it's is about as simple as it can get, really.
Have you ever run into problems upgrading your drive? Did you buy a newer drive that was incompatible and can share your story? Let us know in the comments, and share this article if you found it useful!
Image Credits: PS3 HDD Via Flickr