Laptops are not as easy to upgrade as desktops. Many components are simply soldered on to the motherboard and others, though technically replaceable, are restricted by technical skill and cost.
There are, however, two upgrades you can perform that will improve your laptop. One is beefing up the RAM, and the second is replacing the hard drive – preferably with a solid state drive. These enhancements can add life to your system. Better still, most laptops allow the replacement of these components with nothing more than a Phillips-head screwdriver.
Acquiring Hardware
I’m going to assume that you have already done the research needed to find out what would be a proper upgrade for your laptop. This is not a hardware buying tutorial. MakeUseOf Answers can be a good source of help if you’re unsure about what to buy. I also recommend reading the latest hardware reviews from top sites like PC Perspective, The Tech Report and Anandtech
Preparing For Work
Before you make any upgrade it’s wise to create a backup. This is obviously true for a hard drive upgrade, as you’ll re-install your operating system anyway. But it’s also true for RAM. There’s always the tiny, small, ever-so-slight chance of something going wrong. You don’t want to lose your data if that something happens.
Once you’ve made the backup find a nice, dry, level place to do your work. A kitchen table works well if properly swept free of crumbs. A desk works well if it’s large enough. Make sure you can have your tools nearby and that there’s nothing above or beside your work space that might leak.
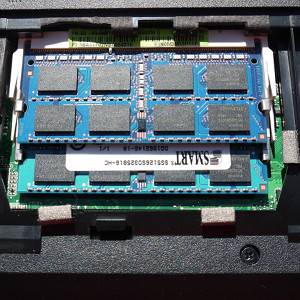
Opening Up The Laptop

When you flip your laptop over you’ll see a site similar to the one above. You’ll notice that the battery is at the top of the laptop and secured by a latch. At the bottom is a panel secured by a screw. That’s where the RAM and hard drive is located.
First remove the battery. Slide the latch or latches (some laptops have two) into their unlocked position, then pushed the battery out and lift it away from the chassis. Be gentle with it. You shouldn’t need to use much force. If you do, it’s probably because the latches are not entirely open.

Now grab a Phillips-head screwdriver and unscrew the panel covering the RAM and hard drive. The laptop in this example has one panel for both, but some laptops will have two separate panels. A rare few lack easy access panels, a situation I’ll address later.

The panel will probably still be secure after you’ve removed the screw. Use a sharp knife to pry the panel away from the rest of the laptop’s chassis. Firm, even force is the name of the game.

Move around the panel in a clockwise fashion, prying up the plastic every inch or so, until the entire panel comes loose.
Replacing RAM
Now you should see the RAM and/or hard drive. Most laptops will have just two DIMM slots for RAM, and they’ll lay one over the other. You have to remove the top DIMM to access the bottom one. Note that since you usually only have two slots, and they are usually both occupied, you can only upgrade RAM in most laptops by purchasing two new RAM DIMMs of larger capacity.

Removable requires that you press down the tabs on each side of the RAM slot. They may vary a bit in color, but will be generally similar to the white tabs in these photos. Push outwards on both sides simultaneously to release the first stick of RAM.

It will probably rise up to an approximately 30-degree angle on its own. This means it is free and you can remove it.

Perform the same steps with the second DIMM. Installing the new RAM is easy as pie. Just place them into the slot, then push down until they lock in to the brackets and stay flat.

Again, not much force is needed. If the RAM doesn’t want to stay it’s probably because you’re trying to install the RAM in the wrong position. The notch on the DIMM needs to line up with the notch on the socket.
Replacing The Hard Drive

The exact method used to secure a hard drive differs a bit from one laptop to the next, but most use between two and four screws. They will be apparent, as they are in the picture above, and probably Phillips-head. Just unscrew them.

Now lift up on the tab attached to the hard drive, as shown above. You will first need to slide the drive out a half-inch so that it detaches from the SATA socket, then you can lift it away. The drive will still be sitting in its hard drive cage, so you need to unscrew it before completely removing it.

Installing a new drive just requires a reversal of these steps. Put the drive in the hard drive cage and secure it with screws. Then slide the drive cage back into the laptop and replace those screws. Make sure all the screws-hole line up well. If they aren’t, it’s probably because you did not slide the drive entirely into its SATA connection or you may have installed the drive into the drive cage backwards.
Powering Up
Once you’ve replaced the component you wanted, re-install the plastic access panel, re-attach all screws and replace the battery. Now you’re ready to power up.
RAM is basically a plug-and-play solution. No drivers need to be installed. It should just be detected and used automatically. If your computer refuses to turn on, re-check that the RAM was properly seated and make sure you purchased the correct RAM for your laptop.
The hard drive of course requires you install an operating system, but otherwise it too won’t require any special drivers. Solid state drives can be an exception – some ship with useful custom software including TRIM support. Make sure you install the drivers, if applicable.
The entire process of removing and replacing either of these components can be done in five minutes or less. It’s not difficult – once you have an understanding of what you need to do.