With less than 4 GB of storage remaining on my Windows 8 tablet – and the majority of useful applications, cloud storage and games installed on my external USB 3.0 drive – I decided that it was time to upgrade the tiny 64 GB mSATA SSD.
The mSATA SSD is essentially a tiny card, upon which several storage modules are mounted, was now too small for my purposes. Without the advantage of an SD card slot on my Acer Iconia W7 series tablet, opening the device and replacing the mSATA SSD card with a high capacity replacement was really the only option, short of buying a new computer.
However doing this would present me with several problems, some of which I could predict (such as how to install Windows 8 when I was done) to a minor issue that resulted in some drastic action.
Why Would You Upgrade?
Many Windows 8 tablets ship with 64 GB configurations. While the wisdom of this isn't quite clear, it is probably an attempt to enable an introductory price for the hardware for interested customers who don't want to pay full whack.

With Windows 8 installed, a cloud drive and some sync software (perhaps iTunes) sharing images to your tablet, you will probably find that onboard storage decreases pretty quickly. Although using external drives (I employ an external USB 3.0 HDD and a USB 3.0 docking station) is a good workaround, if there is no SD card slot then upgrading the native storage is the only way to use the tablet when you're away from your office.
When looking for a replacement SSD for your Windows 8 tablet (or laptop) ensure that you are buying the correct type. There are two forms of SSD – one has the standard SATA connectors, while the other has the compact mSATA alternative, which enables tablet SSDs to be so small.
Equipment You Will Need

With your mSATA SSD purchased, you'll be ready to start. In order to successfully complete this operation, you will need some tools:
- Box cutter blade or guitar plectrum
- Suitable screwdriver
- Suction cup (optional)
- A soft towel, folded over once and placed on a secure, flat surface.
There are also some precautions you should take. Once the SSD is replaced, without installing Windows 8 on it you won't be able to use your tablet. To work around this, you might prepare a copy of Windows 8 to boot from USB, or setup an external DVD drive to install the operating system from your recovery discs.
Alternatively, purchase an adaptor that will enable you to connect your replacement mSATA SSD card to your tablet externally and create a backup image (using software such as EaseUS Todo Backup) of your existing SSD. If you choose this option, then you don't lose any data.
One final step – mSATA SSDs and tablet innards are delicate. You should take all necessary anti-static precautions to ensure you don't accidentally break your tablet computer.
Opening the Case
To get access to the mSATA SSD in your tablet computer, you will need to open it. Depending upon your Windows 8 tablet, the method for doing this will differ. Pictured is the method of opening the Acer Iconia W7 series, but you should search the web (and especially YouTube) for help in opening your own Windows 8 tablet.
Note that doing this will void your device warranty.
However you proceed, note that opening your tablet computer should be done with absolute care. Do not use force as the device should come apart when pressure is applied in the correct manner.

For the Acer Iconia W7, you will need to begin by removing the white strip on the back. Place the tablet display side down on the towel and lever this strip away with your box cutter blade. You'll find there are three catches that need prising open. Once the strip is separated, remove the two screws (one at either end) and place the three components together for replacement later.

You should then stand the tablet on its longest edge, holding with one hand while you begin to pull the chassis and the display apart using the boxcutter blade, as pictured above. A small suction cup may help in removing the display here.
Accessing the Motherboard
As the display is separated from the case, you will notice several small cables that will require disconnecting. Make a note of these (perhaps take pictures as you proceed) as you go, taking care to remove them carefully.

With the tablet opened up, and the display lying face down, you will need to remove a few more cables before you can remove the motherboard, which is necessary for accessing the mSATA SSD.
Once all cables have been disconnected from the motherboard, you will need to remove the case fan before unscrewing the board from the case (some tablets have the SSD on show without removing the motherboard – in this case skip to the next section).

Keep the screws safe and gently prise the motherboard away from the case. On the Acer Iconia W7 tablets, this means manipulating the motherboard in order to pull the audio jack and USB connectors away from the case.
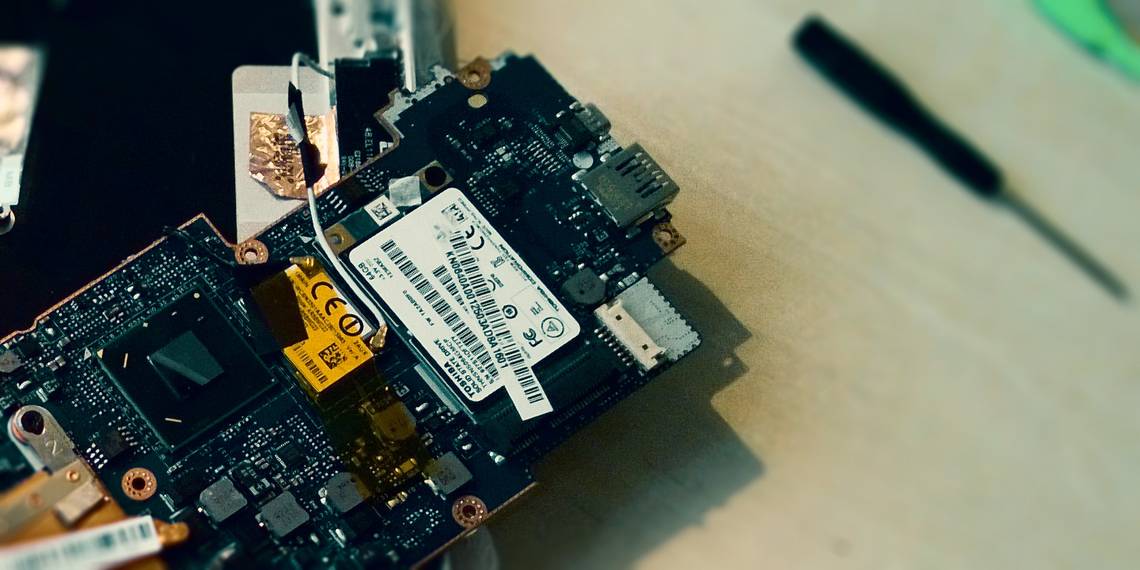
Once you're done, gently flip the motherboard over, where you will find the SSD!
Replacing the mSATA SSD
You will find the tiny mSATA SSD attached to the motherboard with one or two screws. Once both are removed, the small storage device will spring up as part of the removal procedure. All you will need to do is gently pull the card out, insert the larger/faster upgrade, and replace the screws, securing it in place.

It's probably fair to point out that in my own experience of upgrading the mSATA SSD of my Acer Iconia W7 that despite no problems with any of the screws up to this point, the single screw holding the drive in place was substandard, the screw head deteriorating as I attempted to remove it.
As a result, I had to take a Dremel-style tool to it, cutting a line through the screw with considerable care so that I might eventually remove it with a flat-edged screwdriver. Nail-biting stuff, but I got there in the end!
At this stage, you should be able to begin reversing the process for opening your tablet in order to put it back together, making sure that you have inserted all of the cables and replaced all screws as you go. When you're done, you can then boot up your computer and begin the Windows 8 installation process if you're booting a bare drive. If the new SSD has already been imaged, Windows should boot without any problems – faster and with more storage!
Conclusion: Upgrading Can Be Tricky, But Worth It!

It's a bit of a puzzle why Windows 8 tablets ship with a 64 GB SSD option when such storage really isn't enough to deal with any reasonable use. Once the page file and email inboxes are considered – plus perhaps Office 2013 or 2010 you're lucky if you're left with 10 GB, and that's without thinking about cloud storage and syncing media with your phone.
Upgrading is worth the effort, and while it might be potentially intimidating if you're new to opening and tinkering with sealed hardware like tablets and phones, if approached with a clear head and the right tools you should find that it is achievable and extremely satisfying once the upgrade is complete!
Have you attempted such an upgrade? Would you prefer to leave it to the manufacturer? Let us know your thoughts in the comments below.