Although Solid State Drives can deliver break-neck computing speeds, most users don’t know a nasty secret - your drive might not be properly configured.
The reason is that SSDs don’t come optimized out of the box. Before the drive reaches peak performance, the user must engage in a fair amount of tweaking and preparatory work. In particular, AHCI mode in BIOS/EFI must be engaged and the correct AHCI drivers must be installed. Additionally, you should strongly consider upgrading your SSD’s firmware to the latest version and verifying that you have the correct drivers installed.
However, for those of you looking to extend your drive’s life, check out Tina’s article.
Technical Jargon
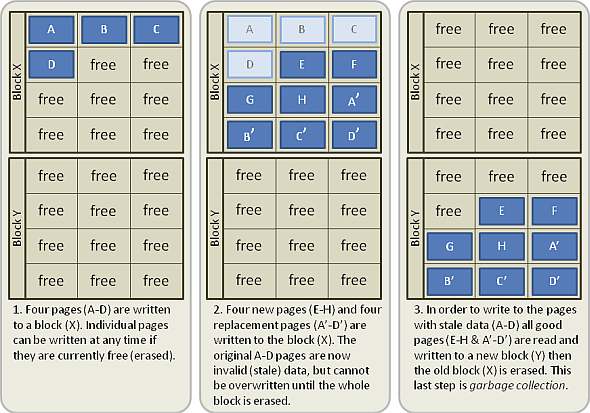
Garbage collection: Garbage collection in an SSD performs an essential part of keeping your SSD from sputtering out. Why you ask? Because SSDs cannot simply erase blocks of memory by writing over trashed data, the way a traditional, platter-based drive does. Before the SSD’s controller can write over a block, it must read it to mark it for deletion – the two-step read-write approach to erasing flash cells can take a great deal of time.
Background garbage collection solves this issue by reading and marking blocks as erased while the computer idles. This process, also known as idle garbage collection, functions independent of an operating system. So it works in both Linux, Mac and Windows. Activating background garbage collection simply requires that you log out and leave the computer running for a few hours.
TRIM: TRIM solves the issue of erasing flash memory by functioning at the operating system level. Instead of the SSD controller marking which blocks require erasure, the operating system performs this role. Unfortunately, TRIM is entirely dependent on driver and operating system compatibility. So if any issue arises within the OS or installed drivers, TRIM will fail to function.
BIOS/EFI distinction: The Basic Input Output System was fairly recently replaced by the Extended Firmware Interface system in newer computers. Functionally, however, you can still interact with both systems in the same manner.
Enable AHCI In Your BIOS/EFI
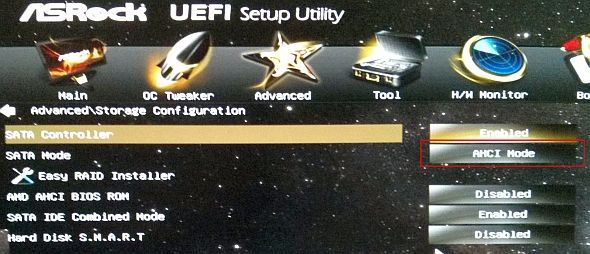
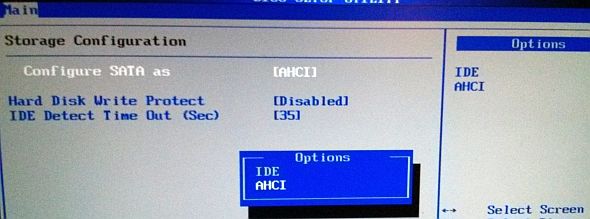
Turning on AHCI in a BIOS Environment: There are no significant differences between enabling ACHI in an EFI or a BIOS environment. However, because many preboot environments differ in layout and terminology, I can only provide general guidelines. The screenshots in this article will not exactly replicate your layout.
To get started enabling AHCI:
- Tap the correction F-key to get into your BIOS/EFI. This varies depending on the manufacturer and make of the motherboard. Oftentimes, the key is either Del, F2 or F10.
- Once in your BIOS or EFI, look for references to your “hard drive” or “storage”. Click on it.
- Change the setting from IDE or RAID to AHCI.
- Normally, hit F10 to save and then exit. Your settings may vary, however. Just make sure you save and exit, otherwise your settings won’t stick.
Windows: If you have not installed the AHCI drivers in Windows, then your computer will experience BSOD upon boot. Windows 7 became the first Windows OS to feature TRIM command. Unfortunately, Vista and XP lack it.
WARNING: If you originally installed your computer with it set to IDE, enabling ACHI in Windows will cause the dread Blue Screen of Death (BSOD) on boot. Before proceeding, first install Microsoft’s AHCI drivers, before enabling AHCI. Fortunately, Microsoft made installation quite simple: Just download and install the Fix It package directly from Microsoft.
Mac OSX: For OSX builds older than Lion, you should manually install TRIM for it to work. Here are some simple directions for proper setup.
Linux: Linux has had TRIM implemented since 2008. You can manually install it by following these directions.
Here's an example of an UEFI preboot environment:
Here's an example of the older BIOS preboot environment:
Download The Right Driver For TRIM
TRIM optimizes your drive, preventing stutter and slowdown. Unlike in a platter drive, SSDs don’t overwrite data marked as erased. Before writing to a “dirty” block, an SSD must issue a TRIM command to erase it. When TRIM works properly, the SSD controller erases unused blocks, which results in a seamless experience. However, if a technical glitch or configuration error exists, TRIM may not function and the drive will run out of free space – however, as it runs out of free space, the drive will slow dramatically.
Fortunately, the idle garbage collection feature built into almost all modern firmware controllers, mitigates a faulty TRIM. Not all drives use idle garbage collection – however, for modern non-Intel SSDs, garbage collection comes equipped as a standard feature. Activating garbage collection only requires that you log out and leave it running in idle.
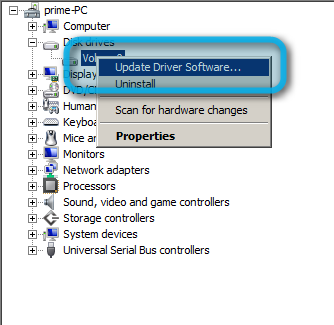
In general, enthusiasts suggest installing the official Intel storage drivers for Intel chipsets and the Microsoft drivers for AMD chipsets. To ensure that the MS drivers get installed, in Windows, go to Device Manager and select the SSD from "Disk Drives". Then simply update the drivers — Windows should automatically install them.
Make Sure Your Chipset Supports TRIM
Unfortunately not all chipsets support TRIM, particularly within RAID arrays. Series 7 Intel chipsets officially support TRIM in any form of RAID. However, unofficial support exists in Series 6 chipsets. Additionally, Linux purportedly supports software based TRIM in RAID arrays, although with some complications.
Update Your SSD’s Firmware
Many SSDs suffer from various bugs at the time they first reach markets. Fortunately, these bugs frequency receive updates in the form of firmware patches. These patches can be either destructive, where all data on the device gets destroyed, or non-destructive. In either case, you’ll need to backup your data before flashing the updated firmware.
For additional information on backing up your data, check out Tina’s manual. In a nutshell, simply copy your data to an external drive using software such as Clonezilla. Justin wrote an excellent guide on how to back up a drive using PartedMagic combined with Clonezilla, which I can personally vouch for. Alternatively, if you use Windows 7, try the baked-in backup feature.
While dangerous, updating your SSD’s firmware may prevent it from suffering issues in the future. But before updating, do your research – find what drives require firmware updates.
Don’t Buy Crap
Out of the eight SSDs that I’ve used in the past four years, four failed, despite having updated firmware and taken all necessary precautions. All four failures were from drives using second generation Sandforce controllers, which notoriously suffered from catastrophic failures.
Fortunately, modern SSDs suffer from fewer issues than the earlier models. However, don’t tempt fate. Read the reviews before making a purchase. Go with an up-to-date model such as the M.2 SSD.
Conclusion
Your SSD’s performance out of the box isn’t optimized until you take three essential actions: First, try to enable AHCI in your BIOS/EFI. Second, check to see whether or not your chipset (motherboard) is compatible with TRIM. Third, check to see if your drive requires a firmware update.
For an additional way to improve your PC's performance, you might consider upgrading to DDR4 RAM with these recommendations:
Image Credits: Flash Memory Blocks via Wikipedia

