Computers have changed a lot over the last decade, but one thing remains the same – the need for cooling. Efficiency has pushed temperatures down but hasn’t eliminated heat as an issue. That’s particularly true for high-end workstations and gaming PCs.
Installing a new cooling fan is often the best way to decrease heat. It also can be a good way to reduce noise (if the replacement fan is quieter, of course). Adding a fan is one of the easier upgrades a user can perform.
Identify The Fan You Need
The first thing you need to know is the size of fan you can install. The two most common fans sizes are 80mm and 120mm. There are also other less common sizes, however, like 140mm and 92mm.

The measurement is the size of the fan on each side. Just break out a tape measure if you’re not sure what size you need. Fans for purchase should be clearly labeled by size and the size is universal, which means fans from different companies will fit into the same mounting bracket as long as the size matches.
Line Up The Fan With The Mount
Once you have a fan of the correct size you need to open your case and line up the fan with the mounting area. It will have four screw holes, as will the fan, so you just need to line up the screw holes on each.

Also make sure that you have the fan mounted so it blows in the proper direction. The fan should have a printed or molded arrow that shows the direction air flows. Fans can be installed as either an intake (air blowing in) or exhaust (air blowing out). There may also be an arrow that shows the direction of spin.

Keeping the fan in place is before the screws are installed is a common difficulty. Expensive cases usually have brackets that can hold a fan even without screws, but budget cases do not, making installation a chore. My recommendation is to use a few pieces of masking tape or duct tape to temporarily hold the fan is place.
Install The Screws
The fan you purchased should come with at least four screws. These are usually short and stubby like the one in the photo below. However, the screws may be longer if they are meant to install alongside another piece of hardware, such as a radiator used in a liquid-cooling system.

Installation is as you would expect. Just insert the screws into the holes drilled in the case and then through the holes in the fan itself. Righty-tighty until the screw is flush with the mount and can't be tightened further. Because the screws usually have a very flat base you may find that inserting them is difficult. That’s another reason to temporarily tape the fan in place – it will make inserting the screw easier.

Now repeat for every screw. That’s it!
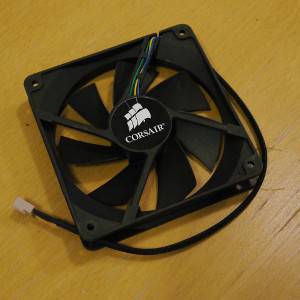
Connect The Fan To Power

All you need to complete installation is power. The fan will come with a three or four-pin female connector like that shown in the picture above. This needs to be plugged into a three or four-pin male adapter located either on the motherboard or power supply. The connector on a motherboard looks like so.

Now you may be wondering – what is the difference between three and four-pin connections? It’s all about a feature called Pulse Width Modulation. With this feature, which is enabled through the fourth pin, a computer can control the speed of a fan connected to its motherboard. Having this is nice because the fan can automatically adjust its speed based on internal temperatures or user presets.
A four-pin fan can be plugged in a three-pin connector and vice-versa. However, fan speed control will be lost.
Most motherboards come with two to four system fan connections. If you’re installing more fans than your motherboard can support you’ll need to connect the additional fans directly to your power supply. Some supplies will come with three-pin connectors for this purpose. Others require that you use a Molex adapter.
Success!
That’s all you need to know to install a PC cooling fan. There is no software to worry about. You don’t even need to bother with drivers or hardware connection.
If the fan is installed and has power it should start to spin as soon as the system begins to boot – if it does not, check the power connection again. Something may have come loose or the fan may be faulty.