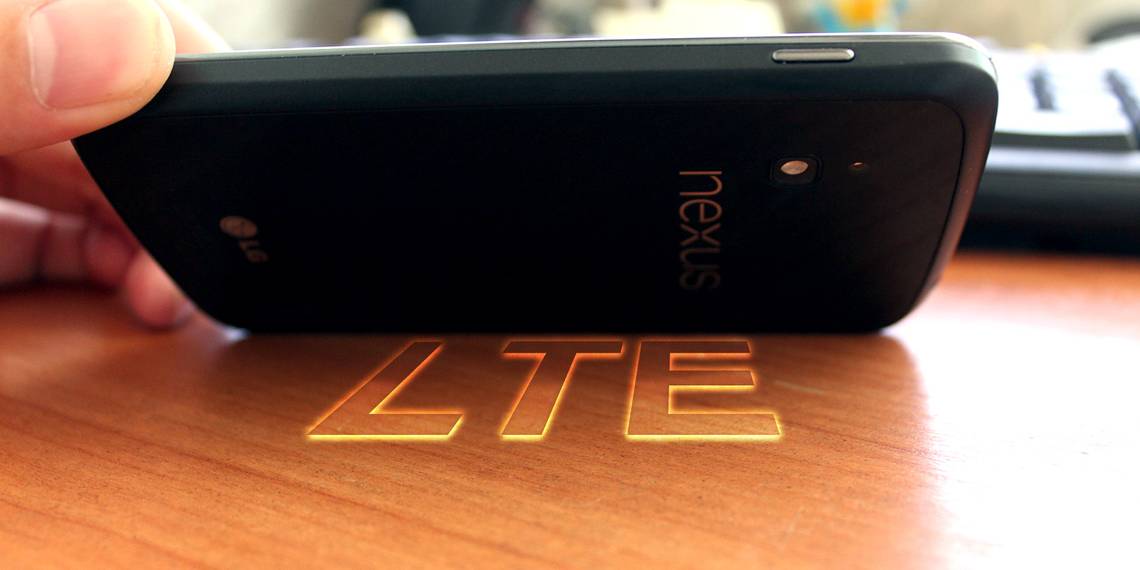
Did you know that the Nexus 4 actually has LTE functionality? The absolute truth is that yes, it does in fact have LTE, no matter what Google or anyone else may try to tell you. There are plenty of reasons as to why Google doesn't advertise the LTE functionality and why they try to make it harder for you to enable it. I'll tell you all of this as well as how to get LTE enabled, how to go back to a stock, non-LTE configuration, and any other important information that you need to be aware of at any point of the process.
Why Is LTE Disabled?
The Nexus 4 contains LTE functionality because it contains the same radio chip as the LG Optimus G. However, LTE is not advertised for the Nexus 4 because, although it has the radio for it, it doesn't have the corresponding antenna to make full use out of the signal (one of the reasons why it was so relatively cheap). As such, Google/LG did not ask for LTE to be certified by the FCC, so LTE is not an approved feature for the phone. Some could say that using LTE on the phone would be illegal because it was not certified by the FCC, but I haven't heard of a single person getting in trouble for using LTE on the Nexus 4 -- and there are plenty of people who already do it.

The LTE functionality on the Nexus 4 was first discovered through a simple trick that anyone could do to turn the radio's mode from WCDMA/GSM to LTE/WCDMA/GSM (where LTE is self-explanatory, WCDMA is 3G/HSPA+ data, and GSM is 2G data and voice capabilities). This trick remained functional until February 2013, when Google pushed the Android 4.2.2 update and along with it a new software radio that made accessing the LTE features of the radio impossible (the setting wouldn't stick).
Disclaimers
Getting LTE back on the Nexus 4 requires quite a bit of work, but it could very well be worth all of the work. There are a few things you need to be aware of before you can even consider going through the process of enabling LTE on the device:
- There is no single way of enabling LTE on the Nexus 4. There are many different ways that work, but the way I'm describing in this article will give you the easiest process with the best chances and the least amount of headaches afterwards.
- Enabling LTE via the process I describe will completely wipe your phone. Back up your data!
- If you have upgraded to Android 4.3 already, it will downgrade you back to Android 4.2.2 until CyanogenMod comes out with the first builds of CM 10.2. The current stable builds at the time of writing are CM 10.1 which are based on Android 4.2.2.
- LTE functionality is restored by flashing an older software radio to the device as the newer software radios disabled LTE. The reason why a certain build of CyanogenMod is being flashed is because it contains a handful of fixes to have the LTE settings stick as well as prevent a possible issue with no audio during phone calls.
- The Nexus 4 only has support for LTE on Band 4 (AWS). In the US, T-Mobile is the only carrier that reliably uses this band for its LTE offerings. In rare cases, AT&T also uses Band 4, but it's safer to assume this is not the case in your area. For other areas around the world, check with your carrier.
- Battery life is not guaranteed while using LTE, but I've had pretty positive experiences with it. A stronger signal usually translates into longer battery life.
Enabling LTE
With all of this information in mind, are you still ready to proceed? If so, you'll need to create a folder somewhere on your computer and download the following files:
- An unofficial build of CyanogenMod which contains LTE-specific cherry-picks. Just go to the first post in the thread and expand the Downloads section. I'd recommend downloading the latest stable build rather than a nightly build.
- An LTE-ready software radio. Any radio from the linked post that doesn't have LTE disabled will do, but I recommend that you use the .33 radio.
- The latest version of ClockworkMod Recovery for the Google Nexus 4. I recommend getting the regular recovery rather than the touch recovery because it prevents you from accidentally touching an option you didn't want.
- The Google Apps package. You do want Gmail, Play Store, etc., right? Get the version for the corresponding build of CyanogenMod (at the time of writing, 10.1)
Besides these files, you're also going to need to install the Android Tools onto your computer. These provide utilities such as adb and fastboot that you'll need for your computer to be able to communicate with your phone. Searching for Android tools in Linux repositories should be easy, while Windows and Mac OS X users should look up documentation on how to find, install, and use the tools. The following instructions will be for Linux users, but Windows and Mac OS X commands will most likely be very similar to these. If you aren't able to look up the documentation for your operating system for these tools or get them to work, you may want to think again about messing with your phone. If you do everything correctly, things will go smooth; do something wrong and you can find yourself acquainted with a new paperweight.

The CyanogenMod build and the Google Apps package should be in .zip format -- no need to extract anything from those. The software radio and the recovery image should be in an .img format, so extract those if they're still in a .zip file.
Now, follow these instructions step-by-step. Be sure to double check everything before continuing to the next step. Again, these commands will be specifically for Linux users but users of other operating systems should be able to use very similar commands.
-
- Connect your phone to your computer (with Android Tools installed) via a USB cable.
- Turn your phone off, then turn it on again by holding the Volume Down and Power buttons. You should see a new screen -- this is called the fastboot screen.

- On your computer, open up a command terminal, use the cd command to go to the directory with all of the needed files, and type: sudo fastboot devices. If something besides a blank appears, your computer has detected the phone and you may proceed.
- Type into the terminal: sudo fastboot oem unlock
- Should this command work, your phone should now prompt you about unlocking the bootloader. This will allow you to flash all of the other software, but it will wipe everything on your phone! Agree by using the Volume buttons to navigate, and the Power button to "enter", then continue.
- Type into the terminal: sudo fastboot flash recovery my_recovery_file.bin. This command will write the new recovery image to your phone. Of course, replace my_recovery_file.img with the actual name of the recovery image.
- Before we switch over to using the recovery, we'll also flash the older software radio by typing this command into the terminal: sudo fastboot flash radio my_radio_file.img. Again, replace my_radio_file.img with the actual name of the software radio.
- Now, reboot your phone into fastboot mode again, and then use the Volume buttons to switch between different options at the top of the screen, and use the Power button once you see 'Recovery".
You have now replaced the Recovery with something else that will make installing the rest of the software easier.

If you're in the new Recovery, you should see an orange circle with a hat on it. To install the rest, do the following on your phone (with it still attached to your computer via a USB cable):
- Choose "wipe data/factory reset"
- Go back to the main menu of the recovery, then choose "install zip from sideload"
- On the computer, type into your computer's terminal the command: adb sideload cm_xxxx.zip. Of course, replace cm_xxxx.zip with the actual name of the CyanogenMod file you downloaded.
- Once installation completes, repeat step 2 and then type into your computer's terminal: adb sideload gapps_xxxx.zip. Replace gapps_xxxx.zip with the actual name of the Google Apps package.
- Once you have done all of this, choose "reboot system now" from the main menu on your phone, and let your new LTE-ready Android installation load!
Post-Process Tips
After you go through Android's initial setup process, there are a few more things you need to be aware of:
- Because the phone's battery stats were deleted during this process, you can make the battery indicator more accurate by calibrating the battery. This is done by draining the battery until your phone shuts off, then keep attempting to turn on your phone (and letting it shut down again) until it finally doesn't want to on any more. Then plug your phone into a power source and immediately turn it on. It'll then be able to record at what levels the battery is at "0%" and "100%". This is best done overnight so that the phone is plugged in an entire night to ensure that it is indeed fully charged. Otherwise, the phone might indicate it's fully charged when it really isn't yet.
- Ensure that the phone is indeed now looking for an LTE signal. You can do this by going into the phone's system settings, choosing More under Wireless & Networks, and then Mobile Networks. The option labeled Network Mode should read "Preferred network mode: LTE/GSM/WCDMA". If not, click on it to change the setting.
- T-Mobile US users: You need to ensure that the phone is using the LTE APN settings rather than the old APN settings. The phone should automatically choose this based on what's available in your area during the first boot, so this is even more important if you do this in an area where LTE isn't available yet. Go into the phone's system settings, choose More under Wireless & Networks, then Mobile Networks, and finally Access Point Names. The unofficial build of CyanogenMod you installed has 4 APNs built-in, so choose the APN labeled T-Mobile US LTE by clicking on its respective radio button.
- If your area has an LTE signal, your phone should pick it up within a few minutes. Do note that the phone automatically switches to 3G/HSPA+ during voice calls. This is normal if your carrier does not yet support VoLTE (Voice over LTE), which most don't, including T-Mobile US.
- Do not update your version of Android through the included CyanogenMod updater. It will pull official CyanogenMod packages rather than the unofficial LTE-enabled build we used, which in turn would remove the stickiness of the LTE settings.
You should now have LTE on your Nexus 4, hoorah!

I've noticed quite a bit of speed improvements by using LTE, and it can help future-proof your Nexus 4 to make it last even longer than you originally thought.

Returning to Stock Android
If for whatever reason you want to go back to the official stock version of Android which doesn't include LTE (such as if LTE didn't give you as big of an improvement, if you don't like CyanongenMod, or if you're planning on selling your Nexus 4), it's fairly easy to get your phone back to a factory state. Be warned that this will wipe your device again. You'll need to head over to Google's Android Developer Images site and download the latest version for the Nexus 4 "mako/occam". I'd recommend just choosing the latest (Android 4.3 at the time of writing) because there's little reason to stick with an earlier release. Once the download completes, move the two included .img files from the .zip into a separate folder, and then open the secondary .zip and move those .img files into the same separate folder as well.

Then, boot your phone into fastboot mode, connect it to your computer via a USB cable, open up a command terminal on your computer, and "cd" into the separate folder containing all the .img files. Then type in the following commands:
- sudo fastboot devices (to make sure that the computer sees your Nexus 4)
- sudo fastboot flash bootloader bootloader_xxxx.img (Replace bootloader_xxxx.img with the actual file name)
- sudo fastboot reboot-bootloader
- sudo fastboot flash radio radio_xxxx.img (Replace radio_xxxx.img with the actual file name. For Android 4.3, the version should end in a .84)
- sudo fastboot reboot-bootloader
- sudo fastboot flash system system.img
- sudo fastboot flash userdata userdata.img
- sudo fastboot flash boot boot.img
- sudo fastboot flash recovery recovery.img
- sudo fastboot format cache (to remove any old traces of the old system)
- OPTIONAL: sudo fastboot oem lock (this re-locks the bootloader to prevent future tinkering with the device, i.e. forces you to "unlock" the bootloader again and wipe the device before tinkering)
- sudo fasboot reboot
You should now be booting into a completely Google-official build of Android for the Nexus 4.
Conclusion
Being able to enable LTE for the Nexus 4 is fantastic, and can surely benefit you wherever it's available. Like I said, it does take a lot of effort to get going, but I'm pretty happy with its LTE capabilities. I get great data speeds, and it convinced me that I can keep my Nexus 4 for a lot longer rather than dropping it now to get an LTE-enabled (and advertised) phone.
Any feedback on LTE on the Nexus 4? Show us your data speeds after enabling LTE!