Most of us have seen them around in things like ‘Before’ and ‘After’ photos, on T-shirts, or even on famous art, but few realize that there’s a slightly un-stylish word used to describe them. Diptychs and Triptychs are images or photos that bring together two or three similar (or different) images and place them side-by-side, often separated by a slim border.
Diptychs and Triptychs can be used to show comparison (Before or after, good or bad, easy or hard), as a narrative, explain progression or change etc. They are actually easy enough to create. You just need to bring two or three images alongside each other and combine them in a single layer. From the humble Microsoft Paint, to the mighty Adobe Photoshop, any graphic tool worth its salt can be used to make a Diptych or a Triptych.
Nancy showed us 5 Easy Ways To Create Diptychs & Other Photo Collages Without Photoshop. Let me turn to the redoubtable Adobe Photoshop and an Open Source tool that turns multiple photos into these wonderful mosaics.
Tych Panel - The Free Open Source Tool for Making Your ‘Tychs’

The idea for making this Photoshop extension came into the head of a photographer. Reimund Trost is a wedding photographer from Sweden and I see why he would want an easy to use ‘nTych’ creating tool. If the diptych or triptych tool is clock-efficient enough, you could do away with the usual Photoshop actions or template process. The Tych Panel (Version 2) is the fruit of his labors. As he says,
It is a dead simple Adobe Photoshop extension that automates the process of laying out pictures side by side. It makes it easy to create diptychs, triptychs, quadtychs and a virtually unlimited set of custom layouts.
Tych Panel is Open Source and the tiny ZXP file can be opened (installed) via Photoshop’s Extension Manager. You can click on the file and if you have Photoshop installed, the process is pretty straightforward. An ‘extension is not signed’ message might come up, but you can safely ignore that.
Automate Your Photo Mosaics In A Few Clicks
https://www.anrdoezrs.net/links/7251228/type/dlg/sid/UUmuoUeUpU61261/https://vimeo.com/39017189
The above video blitzes through the process, but which I hope makes you appreciate the power of automation it brings to the art of creating mosaics. Launch the Tych Panel from Adobe Photoshop – Window. I am using Adobe Photoshop CS5 here.

The automation is fueled from Options. As the video above also explains, one of the nice features is that you can maintain a target width or height when adding pictures. This is an important consideration for bloggers who want to fit diptychs and triptychs according to blogging guidelines. Though, you can also use the unconstrained options by not giving any width and height numbers. But I prefer to go with a target width or height.

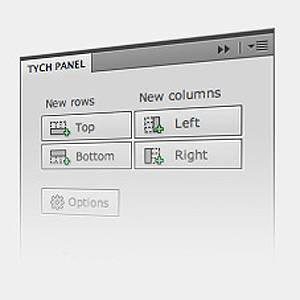
The starting point is to create a diptych first by adding your first two images and then expand the mosaic by choosing new rows and new columns and placing your images precisely. The Top, Bottom, Left and Right buttons give you unlimited sets of custom layouts.

If you select multiple images, you can re-order the thumbnails and fix their relative position on the canvas. As each image is nothing but a layer, the re-ordering is easy enough to understand.

The Fine-Tuning Features
Smart Objects & Layer Masks

Using smart objects is an advanced Photoshop skill. Smart objects basically allow for non-destructive editing of the original source image file by linking the original photo with the photo in the Photoshop document. Digital photographers use layer masks and smart objects for various image corrections without affecting the original file. You can change the appearance of an image using smart objects, but you cannot add or remove pixel information from a smart object.
In Tych Panel 2, you can use smart objects for re-cropping your pictures after they have been laid out. Enable Smart objects in the options and all layers will be converted to Smart objects and get the appropriate Layer masks automatically.
Rounded Corners

You can further ‘beautify’ your mosaics by specifying pixel values for corner radius, thus allowing for rounded corners. You can create interesting combinations with background colors and blank images. The above image is taken from the developer’s gallery.
Actions for the Final Touch-up

If you are not satisfied with a simple diptych or triptych, you can decorate your image with the set of actions you have available as default or any custom ones you might have installed.
Tych Panel 2 gives me enough customization options for creative control over diptychs and triptychs. If I am using Photoshop, it certainly is the smoothest way to go about it. Photoshop is a difficult tool to master at the best of times (though our Photoshop Guides can help you out there). Productivity tools like Tych Panel cut short the process. If you are into digital photography or are a creative artist, how easy do you find this tool?