Nothing on a computer scares you like finding your machine suddenly won't boot. When you can't get into your computer, you can't get any work done. Even worse, if you haven't set up proper backups, a dead PC can mean your files are gone.
If you've exhausted our tips for solving Windows boot problems, chances are your Windows installation is toast. However, don't despair, because there's a good chance you can recover your files. We'll show you how to boot into a live Linux installation and rescue your data, even when you can't get into Windows.
Note: These instructions will only work if you can't get into Windows, but your PC will still boot. If you can't turn your system on, can't see anything on the screen, or have a dead drive, you can't use this method to recover any data.
Step 1: Ready Your Tools
Even though Windows isn't working, your data remains on your hard drive or solid state drive. To copy it elsewhere, we need to boot into an operating system (OS) other than Windows. Since Linux is free and easy to install, that's what we'll use! There are endless versions of Linux you could try for this process. We'll use Linux Mint since it's popular and similar to Windows, but feel free to substitute another if you prefer.
To create a bootable USB drive, you'll need three things:
- A spare flash drive of 4 GB or more, which you must wipe to install Linux.
- A working computer to set up the bootable USB flash drive with Linux.
- An external drive, a sufficiently large flash drive, or cloud storage space to copy your data.
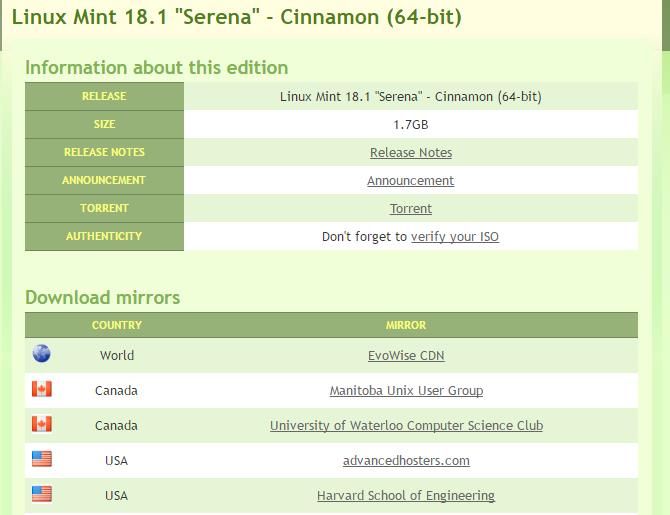
The Universal USB Installer tool from Pendrivelinux makes this process painless. Visit the site and download a copy of the tool, then head to the Linux Mint download page to download the ISO (disc image) of Mint. You'll need to choose between the 32-bit and 64-bit versions of the OS here, similar to Windows. Most computers from the past five years or so will likely be 64-bit, but if you're not sure, pick 32-bit for compatibility. The Cinnamon flavor will do just fine for our purposes.
Once you've chosen the right version of Mint, pick a download mirror in your country from the many on their website. At the time of writing, this download was about 1.7 GB, which may take a while depending on your connection.
Step 2: Install Linux on Your Flash Drive
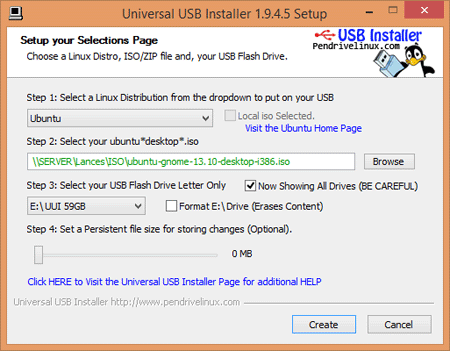
Now we have everything we need to install Linux. Go ahead and insert your flash drive into your secondary computer. Open up a File Explorer window to This PC and double-check to confirm the drive letter of the flash drive (it's likely D:, E:, or F: depending on how many devices you have connected to the PC). After this, open Universal USB Installer from where you downloaded it.
The tool will first ask you which version of Linux you're installing. Choose Linux Mint from the list, then click Browse next to the Step 2 box and find the place where you downloaded the Linux Mint ISO. In Step 3, select the flash drive you inserted by letter. Do not check Show all Drives, as this will include your internal hard drive in the list. You don't want to wipe that!
To wrap up, check the box to Format Drive — this will wipe it clean so Mint installs successfully. In Step 4, you can add a persistence file. This allows you to save changes made to the OS in between boots. If you have a big enough flash drive, it's a good idea to include a few gigabytes here, just in case. Without persistence, the OS acts like it's the first time you've used it every time you boot up, and you can't install any software permanently.
When you're all done, triple-check your drive letter to make sure you don't erase the wrong device, and press Create to begin the process. This will take a bit, so wait until you see Installation Done, Process is Complete! before clicking Close. After this, your flash drive is ready!
Step 3: Boot from the Flash Drive on the Problem PC
Next, we need to make sure your primary computer will boot from the flash drive.
When you turn on the PC, watch for text like Press F12 to select boot device or Press ESC for boot options. This will vary on every computer, so you might have to try a few times (or Google your computer model name and "boot menu") to find it. Usually, the key is F12, DEL, or Esc; you'll need to repeatedly hit the right key as soon as you boot until you see the boot menu.
Use the arrow keys to highlight your flash drive. It will likely be USB: Kingston 3.0 or something similar with the drive's manufacturer. Press Enter to select that as your boot device, and you'll head into Linux. Running an OS from a flash drive is fairly slow, so be patient as it loads. After a minute or two, you'll see the Linux Mint welcome screen.
Here, you'll need to enter some basic info to set up the OS. Select a username and password, and meet your Linux desktop.
Step 4: Back Up Your Data
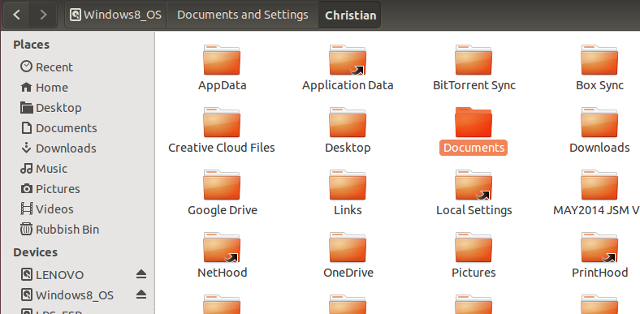
From here, you just need to move your data onto a different medium to save it. Open up a file browser — it's called Nemo on Mint. Look for its folder icon on the left-hand side of the taskbar at the bottom of the screen, then find your hard drive listed on the left sidebar under Devices. It's likely the only drive listed, shown by name or size. If you see multiple, click on one and see if it has the Program Files, Users, and Windows folders inside it. When you find those, that's your internal drive!
To get your files, head to Users > USERNAME. Unless you've moved your user folder, all your documents, pictures, and videos are found here. You can't back up installed programs, but you can copy the AppData folder to save configurations for some software.
Since your hard drive is dead, you'll need to move everything to another drive. Unless your Linux flash drive is huge or you don't have many files to recover, you probably won't have enough room for everything. Thus, you should connect an external hard drive or another flash drive with enough room to copy everything over using the file browser.
If you don't have an extra drive but only need to back up a few files, you can use your cloud storage. Using the default Firefox browser, sign into Dropbox, Google Drive, or any other provider and you can drag-and-drop files into your storage for those accounts. We don't recommend this if you have dozens of gigabytes to back up, since it will take a long time for everything to upload.
You've Recovered Your Data!
After you make sure you've copied everything you need, you're all done! This process is a lot more involved than simply restoring from a backup when your computer goes kaput, so learn from this experience and set up a bulletproof backup plan right away.
If your hard drive or motherboard dies in the future, this method won't work, resulting in lost data or an insanely expensive restoration process. Regardless, you should keep your new Linux drive handy for the future! A friend may need the same help soon.
Now that your data is safe, you can wipe your computer and reinstall Windows so you can get a fresh start and get back into your computer.
Have you ever recovered data using this method that you once thought lost? Let us know if a Linux flash drive has saved the day for you!
Image Credit: 3DMart via Shutterstock.com


