Today, many of us use a thumb drive or email to transfer files between computers mere meters away from one another — but there's a better way. Network file transfers may take a few minutes of setup, but it's well worth having invested that time in the long run.
Whether you use Windows system tools or a third party service like Dropbox, a network file transfer procedure can save you time on a daily basis. Follow these pointers, and you'll be up and running in no time at all.
Native Windows Sharing Solutions
You don't have to engage a third party solution to share files and folders on your home network. Windows provides these natively. Here's how to set them up.
Using a Homegroup on Windows 7 / 8 / 10
If the computers you need to share files between are all on Windows 7 or a more recent version of the operating system, you can use a Homegroup to facilitate the process. First, take care of the physical networking of the devices, if you haven't done so already.
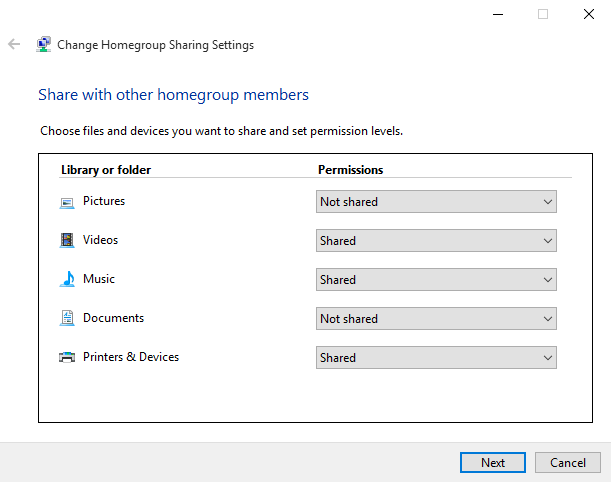
The next step is to open Homegroup, the quickest way of doing so being simply to search for it. The application will then take you through the procedure to create a Homegroup for your network, deciding which devices and folders you want to share with the other computers on your network.
You'll be given a password to use when you're joining the Homegroup from other systems. Once that's running, you'll have access to the folders each use sets up as being shared. Simply drag and drop the desired files into that folder to begin transferring them between devices.
Using Workgroups to Share Between All Version of Windows
It may well be the case that there's a holdout using Windows Vista or even XP on your network. While there are plenty of reasons to upgrade to a more modern version, that might not be possible in certain circumstances, so fortunately there's a workaround that allows for files to be transferred between more up-to-date machines and the outdated contingent.
The key to getting the first part of the procedure correct is choosing a Workgroup name. The default is different across different versions of Windows, so it's best to choose something memorably to avoid tripping yourself up later. To find the Workgroup name in Windows XP, right-click My Computer and select Properties. The information will be listed under System Properties > Computer Name.
If you're using Windows Vista or newer, right-click Computer and select Properties. The Workgroup will be detailed in the Computer name, domain and workgroup settings section — navigate to Change Settings > System Properties > Computer Name > Change.
Further Setup for Homegroup and Workgroup
Whether you used a Homegroup or a Workgroup, there might be some more setup that you need to complete before your network is ready to begin sharing. First, make sure that your firewall has the correct ports open to facilitate sharing — if you use Windows Firewall, this will be done automatically, but Microsoft offers a full list.
You may also have to enable some other options to carry out the type of sharing desired. If you've changed your network location to Home or Work, then Network Discovery will already be enabled, but otherwise it's well worth turning it on now. Likewise, File Sharing will be automatically enabled as soon as your try and share a file in Windows 7 or above, but other versions need the switch flipped manually.
In Windows 7 and above, you'll access these options by searching for Network and Sharing Center in the Taskbar. Select Change advanced sharing settings, and use the appropriate section to edit options for the desired network profile.
Network Discovery, File Sharing, and Public Folder Sharing options are all found in this menu, and you'll want to enable all three to make file sharing as easy as possible. However, take care only to do this on a network that you trust, and that isn't publicly accessible without a password.
Sharing via the Cloud
The easiest way to share files and folders between computers is a cloud service like Dropbox or OneDrive, and depending on the scope of your usage, you might have to pay a monthly subscription for access to the service. If this is a problem, there are free alternatives listed below — they might just take a bit more legwork to get up and running.
Computers running on the same network can take advantage of the LAN Sync functionality that Dropbox offers. Rather than uploading and downloading from the web, this allows networked computers to transfer over their LAN connection, which makes for a much faster process.
To enable this option, click the options cog on the system tray icon for Dropbox and select Preferences. Then navigate to Bandwidth > LAN Sync and tick the required box. Now, so long as you and the other user both have a network connection and Dropbox accounts, you should be able to transfer large files quickly and easily.
Sharing Files over Your Local Network
Similar to Dropbox's LAN Sync, BitTorrent Sync (our BitTorrent Sync review) lets you synchronize files and folders between computers. However, it does so directly between devices and can work entirely on your local network, bypassing any limitations of cloud storage, particularly limited storage space. With BitTorrent Sync you can automatically sync an unlimited amount of data.
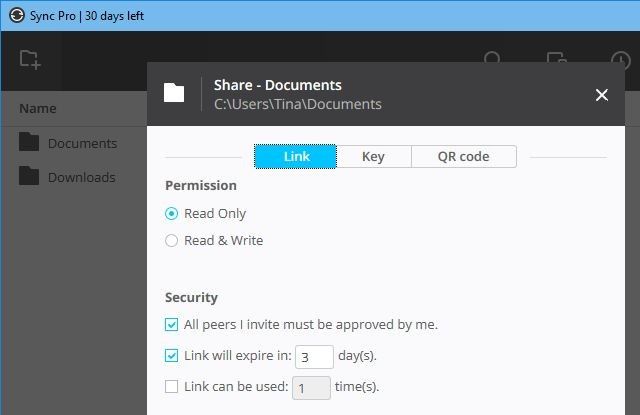
Install BitTorrent Sync on the two computers you wish to keep in sync, add folders to sync, set permissions, generate a link, key, or QR code, and share it with the target device. Once the target device connects, the folder will be kept in sync, privately, using device to device communication over your LAN network. With this method you can selectively share specific folders with different people.
BitTorrent Sync is available for free. The Pro version adds selective sync, the power to change folder access permissions, and other advanced features starting at $40 per license for an individual user.
What Is Your Preferred Sharing Method?
Do you have a top tip for sharing files on a local network? Are you struggling to perform this task and looking for assistance? Join the conversation in the comments section below.


