Google Slides is quickly becoming one of the best pieces of presentation software available. Far from its bare bones beginnings, its latest features offer you more chances than ever to create presentations that amaze your audience.
As the video below shows, with a little creativity and patience, Google Slides can do almost anything -- including animation!
As cool as that project is, it's not what most of us are using Google Slides for. Thankfully, recent updates give all users access to tons of great tools, meaning that creating your best presentation is easier than ever.
Whether you're collaborating on a class project, courting a client, or impressing your boss, these tips will help you create the perfect slideshow!
1. Host a Q&A Directly From Slides
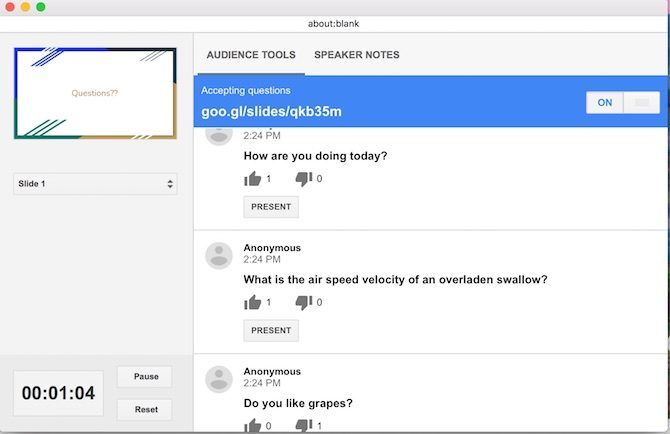
Question and answer breaks are often awkward for both the presenter and their audience. Audience members may be self-conscious or uncertain about their questions, or curious about an overly-specific detail that no one else in the room cares about. Thankfully, Slides Q&A offers a great solution to these problems.
Audience members can submit questions using a specific web link, which are then visible to the presenter as well as the audience. Audience members can up vote questions that they are interested in, ensuring that the presenter answers higher priority questions first.
The Q&A feature is accessible through Presenter View. All you have to do is click Enable New under Audience Tools.
2. Insert Videos Directly Into Your Slideshow
There's a lot to be said for having video footage in your slideshows. It can keep presentations interesting, offer additional learning experiences, and give your voice a break! Google Slides now offers two different ways to insert videos: through YouTube or through your Google Drive.
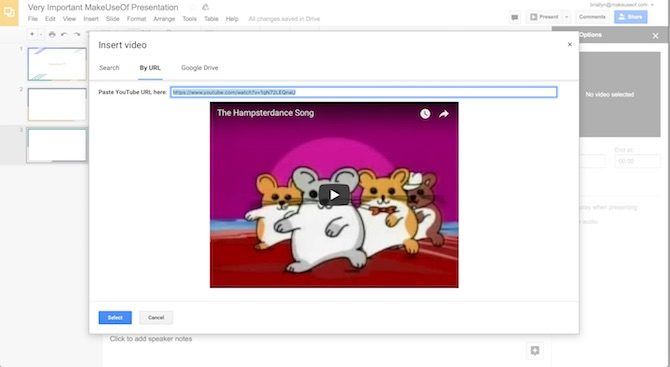
To insert a video, ensure that you know its YouTube URL or that it is already uploaded to your Google Drive. Then, navigate to the Insert menu, and select Video.
A box will open with separate tabs to "search" YouTube, link directly through a YouTube URL, or navigate your Google Drive files. Simply enter the URL or select the file you want to link to your slideshow, and then press Select to insert it into your slide.
3. Autoplay Videos When You Advance Slides
One area where Google Slides fails to measure up to its competitors is in its automation customizability. Thankfully, you can now autoplay videos to begin immediately upon a transition to a new slide.
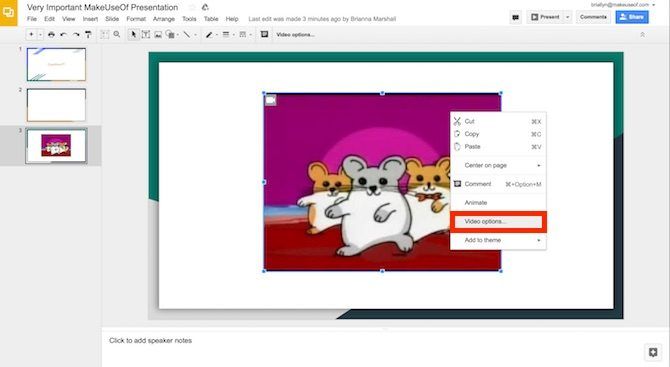
To autoplay a video, first insert the video file as shown above. Then, right-click on the video thumbnail and click Video Options... A new menu will open on the right of your screen, with a checkbox for Autoplay When Presenting. That's all it takes!
Pro-Tip: As seen in the video below, you can use this trick to create voiceovers for your slides (another key feature that's currently unavailable)!
Simply record your voiceover for each slide (using a program such as Screencastify), and upload the video file (either through YouTube or directly from your computer), shrink the size of your video preview, and set it to automatically play when you transition to each slide.
4. Trim Videos Using Google Slides
Is the video you want to use not quite what you need? No audience member wants to sit through a 10-minute video when only 30 seconds are needed to make your point! While Google Slides isn't a replacement for full-power video editing software, you can still modify the video's length in two easy steps.
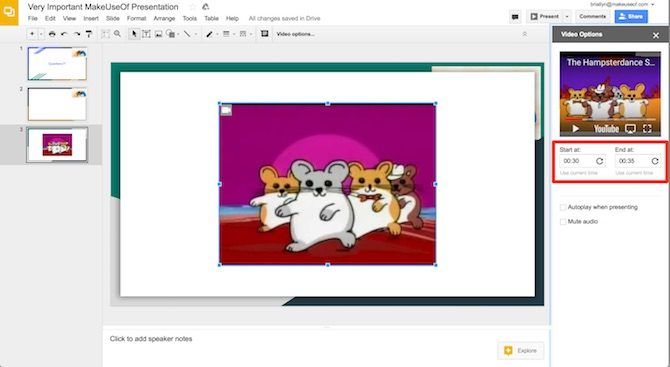
As above, once you insert your video into your slide, right-click on the preview and click Video Options. The right-hand menu will appear. Under the video preview clip, you can set the beginning and end times by directly entering your preferred times (down to the millisecond) or by clicking Use Current Time.
4. Import Slides
If you already made a presentation on PowerPoint but want to take advantage of Google Slides' features, fear not! Google Slides can import slides from other Google Slides files or from PowerPoint. To access this feature, go to File>Import Slides and then select the file(s) you wish to import.
Once Google Slides processes the file, you can select the individual slides that you wish to include in your presentation. Be aware that some fonts or positioning may change during this process! Always double check your slides before beginning your presentation.
5. Speed Up Your Design Process With Master Slides
Have you ever spent hours slowly losing your mind as you carefully change every bit of text in a presentation to the same font? It's not a fun time.
But those days are over! Google Slides allows you to manipulate all your slides simultaneously using its "Master Slide" feature. This is ideal for finalizing a font, inserting a graphic or logo into the corner of every slide, or changing your background color at the last minute.
To access your deck's master slide, head to the View menu and then press Master. Make sure you click the top slide to affect every slide in your deck, or select a specific style of slide to make smaller-scale changes. Then, edit as normal!
6. Project Slides From Android/iOS With Chromecast
If you are presenting in a venue that has Chromecast technology, you don't need to worry about hooking up any cables or ensuring your laptop is compatible with the venue's system. Using Chromecast and/or AirPlay (for iOS devices) you can do your entire presentation using only your mobile device!
Download the free Google Home app for your device (Android/iOS), connect to the Chromecast-connected device you would like to share your screen with, and hit Share Screen.
Then, simply navigate to your Google Slides app, and present your slides -- just be sure to have your phone in airplane mode to prevent any unwanted notifications from popping up!
7. Show the Latest Data on Google Sheets
Want to dramatize your presentation by providing up-to-the-minute data in your charts and graphs? You're in luck! If you store your chart and its data in a Google Sheets file (that's updated regularly), you can simply insert your desired chart into a slide (Insert > Chart > From Sheets).
Then, right before it's time to present, simply hit the Update button in the right-hand corner of your modified chart.
http://www.youtube.com/watch?v=EooLYqDefd4
8. Add Comments to Your Slides on Mobile
One of the most beneficial pieces of Google's cloud-based office suite is real-time collaboration. Now, you can contribute to the discussion from your mobile device! Simply download the Google Slides app (iOS/Android) and open the file. The owner of the file must enable commenting for this function to work!
If you want to make a comment, tap the + button in the upper right-hand corner of the app, then press comment. In the comments, you can tag other file contributors, create action items (and assign them to others), and mark action items as complete. Speaking from experience, there's no easier way to get a group presentation done!
Ready to Present?
Google Slides might be easy enough to use at a basic level, but some of its hidden features can take your presentations to the next level. Now that you know about them, your presentations will definitely catch the eye of every audience member!
What are your favorite tricks for making presentations on Google Slides? Let me know in the comments!
Image Credit: AllaSerebrina/Depositphotos


