Video game live streaming rose to prominence with the popularity of platforms like Twitch. Watching video games remained popular since the inception of games. However, the this eventually evolved into a spectator sport. Arcades once reigned supreme as an arena for game watching. Yet the rise of the internet launched game live streaming.
Esports became legitimized over time. Even ESPN covers esports. Video game live streaming offers a fun means of broadcasting your skill or lack thereof. Additionally, there's potential to earn an income. Because of support from the likes of Steam, Linux is a thriving gaming landscape.
These Windows and console games are natively available for Linux now. Additionally, Wine allows further Windows game installs on Linux. Learn how to get started with video game live streaming on Linux!
Video Game Live Streaming Software
You'll first need software to stream with. Open Broadcaster Software (OBS) is an excellent choice. It's free, open source, and cross platform. OBS boasts Windows, Mac, and Linux compatibility. You can read more about OBS on other operating systems and set up.
Head over to the OBS Download page and select the Linux installer. Open Broadcaster Software for Linux is officially compatible with Ubuntu 14.04 and higher. Therefore, OBS should install properly on Ubuntu derivatives such as Lubuntu and Xubuntu.
Installing FFmpeg
Open Broadcaster Software requires FFmpeg to run. Ubuntu 15.04 includes the correct repositories for installing FFmpeg. However, Ubuntu 14.04 and below requires adding the correct PPA.
Installing FFmpeg on Ubuntu 14.04
If you're using Ubuntu 14.04 LTS, you'll need to add the specific PPA. Open a terminal (Ctrl + Alt + T) and enter the following command:
sudo add-apt-repository ppa:kirillshkrogalev/ffmpeg-next

You'll be prompted for your password. Next, enter your password when required. After adding the PPA run an update and install FFmpeg:
sudo apt-get update && sudo apt-get install ffmpeg

Installing FFmpeg on Ubuntu 15.04
FFmpeg is included in the official repositories on Ubuntu 15.04 and up. So if you're using Ubuntu 15.04 or a following iteration, simply enter:
sudo apt-get install ffmpeg

Proceed with installing OBS now that FFmpeg is loaded.
Installing Open Broadcaster Software
You'll use the command line to install Open Broadcaster Software. Open a new terminal and add the PPA:
sudo add-apt-repository ppa:obsproject/obs-studio

Enter your password when prompted to finish the adding the PPA. Install and update OBS with the following command after you've added the PPA:
sudo apt-get update && sudo apt-get install obs-studio

Unofficial Open Broadcaster Installations
Open Broadcaster Software only offers official installations for Ubuntu and its derivatives. Additionally, you can unofficially install OBS on several Linux distros. These include Arch Linux, Fedora, and Manjaro.
Manjaro
You can install OBS on Manjaro by searching Octopi or the Pacmac Manager for "obs-studio." Alternately, install using the command line:
sudo pacman -S obs-studio
Arch Linux
Open a terminal and enter:
sudo pacman -S obs-studio
Fedora
Fedora offers an unofficial installation. You'll need to configure RPM Fusion first. To configure RPM Fusion, enter:
su -c 'dnf install https://download1.rpmfusion.org/free/fedora/rpmfusion-free-release-$(rpm -E %fedora).noarch.rpm https://download1.rpmfusion.org/nonfree/fedora/rpmfusion-nonfree-release-$(rpm -E %fedora).noarch.rpm'
Proceed with installing OBS using this command:
sudo dnf install obs-studio
If you're using NVIDIA hardware accelerated encoding, there's an additional step. Ensure that CUDA is installed:
sudo dnf install xorg-x11-drv-nvidia-cuda
Reliability will vary on unofficial distros. Probably Ubuntu lends itself best to OBS. Nevertheless, unofficial workarounds do exist.
Configuring Open Broadcaster Software
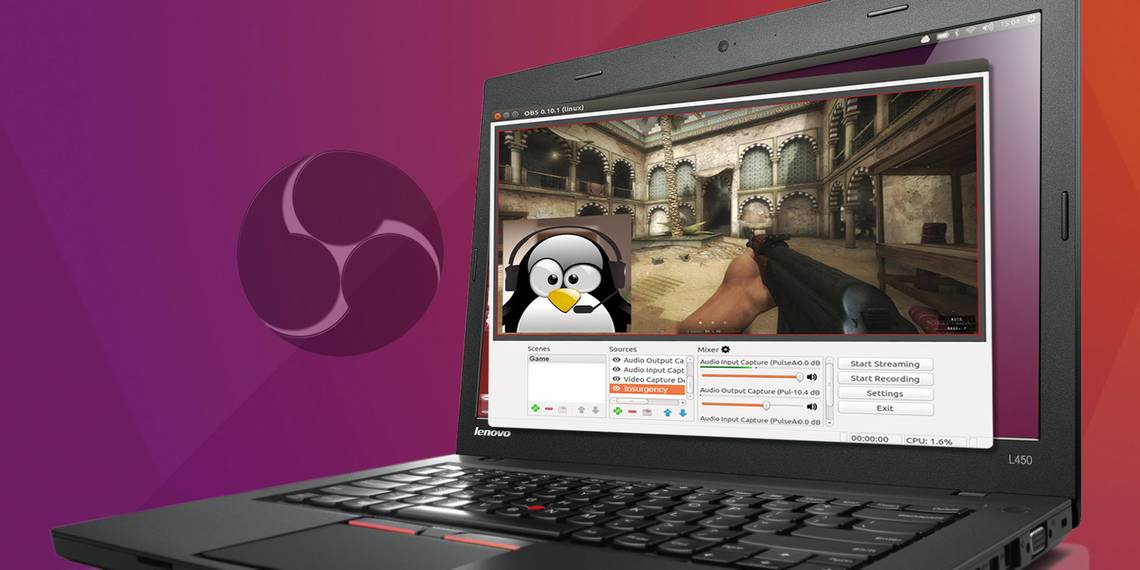
Now you need to configure Open Broadcaster Software for video game live streaming. We'll explore adding scenes, screens, and sources like mics and webcams. Launch Open Broadcaster Software. Look in the lower left corner of the screen. You'll see a box labeled Scenes. Click on the + symbol to add a new scene.

Adding a Screen
OBS issues a pop up that says Add Scene. There's a box and a prompt to "Please enter the name of the scene." I named my scene "Steam" as I'll use this for video game live streaming from Steam.

Adding a Source
With your preferred scene highlighted, click the + symbol under Sources.

Select Screen Capture (XSHM). Make sure you have Create new checked. You can give this a unique name or leave it as is. If you're running a dual screen set up you'll need to select the correct screen from the drop down.

You can't begin streaming until you've added a stream source. Select Settings and navigate to Stream. In the drop down, select either Streaming Services or Other Services. By default, only Twitch appears. However checking the Show all services box populates the Service dropdown with a bevy of options. These range from YouTube to hitbox.tv. If you're looking for a Twitch alternative, Hitbox may be the best pick for you.

Let's begin with Twitch. Log in to Twitch.tv. You'll need your stream key. Click on Dashboard in the top right of the screen. Select the Stream Key tab.

Click the Show Key button to reveal your key. If this is the first time you've opened your key, you'll receive a security warning. Hit I Understand to show your key.

Copy your Twitch stream key into Open Broadcaster Software stream key box. Make sure that you've selected the best server for video game live streaming. This is generally the closest server to you. When you're finished, hit OK.

Since you're set up to live stream, simply start a game. With your correct scene and source selected and game running, click Start Streaming.
Adding Other Services
Under the streaming settings you can connect to a variety of preselected services. However there's also a Custom Streaming Services tab. You'll need a URL and stream key to enable custom streaming services in Open Broadcasting Software. I used Disco Melee, probably my favorite streaming service. It was the first service I tried and it's intuitive to set up. Plus, Disco Melee benefits from a dedicated, passionate community.

Simply enter the correct URL and stream key and click OK. Your custom streaming server settings in OBS will vary.
Bonus Level: Adding a Webcam/Mic for Live Streaming
Many gamers use video game live streaming to create a personality. For this, you'll want a webcam and microphone hooked up so you can make your live streams more personal. Select your desired scene and click the + under Sources. Choose Video Capture Device (V4L2). Feel free to give this a name. For instance, if you have a built-in webcam and USB webcam, you can name them differently. There's a dropdown beside Device so you can pick from different webcams.

Similarly, to add a mic, navigate under the scene you're using to Sources. Hit the + and this time select Audio Input Capture (PulseAudio). Choose the microphone you wish to use. Beside Device find your source. You should be able to pick from an internal and external mic if available. I used my Blue Yeti mic.

Once you've added a mic and webcam, you can tweak your audio and video settings. Since my primary Linux machine is an admittedly underpowered laptop, I dialed back the video settings to encode faster at the expense of quality. This thereby reduced the number of dropped frames. For audio, you can set the volumes of your desktop audio and mic. You can also move around and resize the picture-in-picture of your webcam video.
Final Boss: Video Game Live Streaming on Linux
As gaming continues to blossom on Linux, so too does live streaming. On Linux, you'll only need a computer, free software, and some games. Webcam and mic optional. Most laptops include these features so you may not even need additional equipment. If you're looking for more Linux video games, Steam and GOG have solid Linux libraries. The Software Center holds several great games as well. Plus, there's always Wine and the PlayOnLinux frontend for running certain Windows games on Linux.

Notably, you can even use capture devices run video through various sources. I successfully hooked up a Dazzle and recorded some PlayStation 2 video footage using OBS. However I was unable to load the proper audio drivers for the Dazzle. Still, there's no shortage of capture cards so you can surely find a Linux compatible device. Now that you're set up for video game live streaming on Linux, check out these tips to help you begin casting esports. While you're at it, try building a game server on Linux.
Are you video game live streaming on Linux? Share your experience and what games you're playing in the comments section below!