With Halloween on the way, now is the time to start sharing spooky photos on Facebook. I've already shown how to add a ghost to your Facebook profile picture and how to make a creepy profile picture with a free template I provided. In this article, I'm going to mix things up and show you how to make a spooky old photo in a graveyard.
The hardest part of making this fake photo is shooting the images you need. The Photoshop work is really simple. Once again, I'm providing all my files for you to use (including the final TIFF file) and a screencast showing the full editing process. You can download the resource pack here.
If you take the time to get the photos right, no matter what your Photoshop ability, you'll be able to follow along.

If you're already good with Photoshop, take what I'm doing and improve on it. There are so many ways you can make my work better.
Prerequisites
To edit the images, you need a proper image editor like Photoshop. If you don't have Photoshop, you can modify my process to any other image editor.
If you're using a PC, Paint.NET is a decent, free alternative while Pixelmator is a great app if you're on a Mac. Linux has a couple of options though I'm not familiar with any of them.
If you're using Photoshop, understanding the basics will make it much easier to follow along. You should check out our four part Idiot's Guide to Photoshop:
- An Idiot's Guide to Photoshop, Part 1: Easy Photoshop
- An Idiot's Guide to Photoshop, Part 2: Useful Tools & Tips
- An Idiot's Guide to Photoshop, Part 3: Pro Tips
- An Idiot's Guide to Photoshop, Part 4: Advanced Features and Fun Photo Effects
I'm also using some of the same techniques as in the previous article, so reading that first is a good idea.
Finally, I use the Pen tool which we've covered before so you should have a look at that article before continuing.
Shooting the Photos
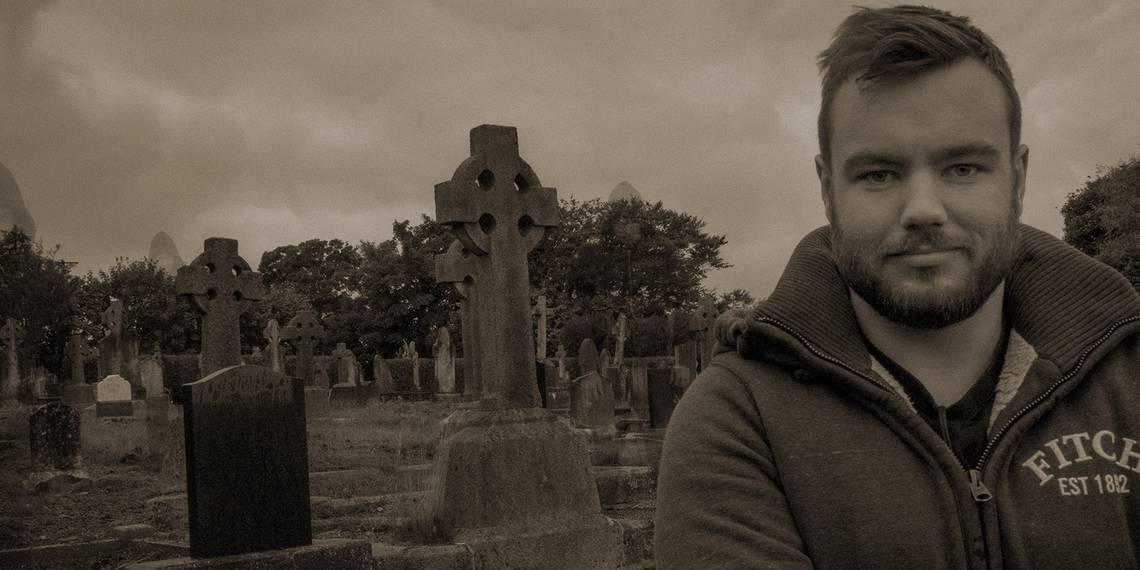
The final photo is made up of four separate images: one of the main subject and background, and one for each of the ghosts. You could use more or less images for yours, depending on how many ghosts you want. Head to a spooky location like a graveyard or the woods and bring your camera.
To take the photos, you need the camera to stay as still as possible between each shot. If it doesn't, lining up the images in Photoshop becomes a lot more difficult. The easiest way to do that is to use a tripod. I used a Gorillapod but any will do. Put the tripod on something solid and frame the shot.

For the same reasons, you want to keep the exposure constant between each photo. The simplest way to do that is to use a camera — or app for your phone — that lets you set the aperture, shutter speed, and ISO manually. Set the aperture to between 8 and 11 and the shutter speed and ISO to whatever will give a good exposure. If you've got a friend to help, it makes things easier but you can use your camera's self timer like I did to take the pictures.

You'll notice that in my image, the leg of one of the ghosts and my shoulder intersect. This requires a bit more work to make look right in Photoshop as you'll see in the screencast. If you want to make things easier, make sure your ghosts don't overlap with each other or the main subject.
Shoot a few extra images for safety and when you're happy with what you've got, head home and transfer them to your computer.
The Photoshop Process
If you've shot the images properly, the Photoshop process is surprisingly simple. All the photos should match in terms of composition and exposure, so blending between them won't present any problems. For the full Photoshop process, watch the above screencast. The basic steps are:
- Import and auto-align all the images.
- Using Layer Masks, add the ghosts into the background of the main image.
- If a ghost overlaps with the main subject, use the Pen tool to create a selection around your subject. Paint inside and outside of the selection to get an edge between the two images that looks good.
- Clean up each ghost using the Spot Healing Brush so that obvious things like clothing logos aren't visible.
- Lower the Opacity of all the ghosts until they look suitably spooky.
- Add a Curves adjustment layer to tweak the brightness and contrast of the whole image.
- Convert the image to black and white with a Black and White adjustment layer.
- Add a new layer with the blend mode set to Soft Light then use the Brush to Dodge and Burn the image.
- Add a new layer with the blend mode set to Overlayand fill it with a solid sepia brown colour. Lower its Opacity until the image looks good; somewhere around 20% normally works.
- Merge everything to a new layer and then use Add Noise to add Gaussian, Monochromatic noise that emulates film grain.
And with that, you're done.
Show Us Your Work
Whether you take my files and work through the process yourself or go out and start from scratch, I'd love to see your results. Post them online somewhere and then share a link in the comments below. Also, if you get stuck at any point, feel free to ask any questions you want. I'm happy to help.