The default fonts that come pre-installed on Windows 10 are fine but ultimately boring. Never settle for Arial, Calibri, Times New Roman, or Verdana unless you truly love and adore them above all other fonts. You deserve better! You can have better.
Plus, did you know that working with different fonts can renew productivity?
In this article, you'll learn everything you need to know about installing fonts, managing fonts, resizing fonts, and improving font rendering in Windows 10.
How to Install Fonts in Windows 10
When downloading a font to install, 99 percent of the time it will be in either TTF or OTF formats. You should read up on the differences between TTF and OTF, but the short of it is, you can use either format although TTF is preferable for Windows 10.
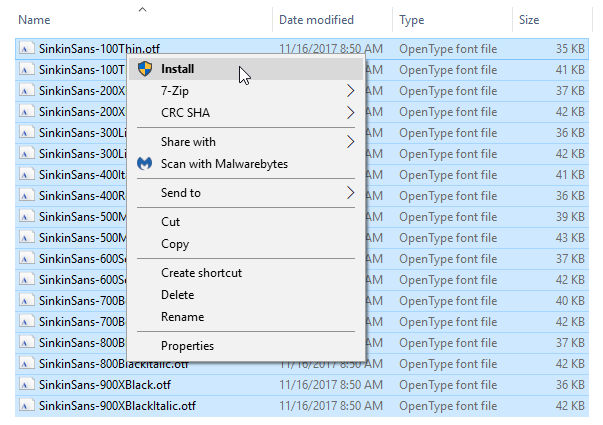
- The font will likely arrive in multiple files, one for each combination of weight and style (e.g. Medium weight with Italic styling). You'll need to install all of them to make every combination available on your system.
-
Select all of the font files, then right-click and select Install:
It's really that simple. If the font already exists on your system, Windows will ask if you want to replace or skip. Otherwise, it installs and you're ready to use it.
- You'll need to restart any running apps before they can see newly installed fonts.

How to Manage Fonts in Windows 10
What if you want to view or remove existing fonts, whether default or installed? You have two options: the simple method (using the Fonts folder) and the advanced method (using a third-party font management tool).
Using the Fonts Folder
When you install a font on Windows, it gets saved to C:\Windows\Fonts. You can instantly jump to this folder by opening the Start Menu, searching for font, then selecting the Fonts folder from the results:

This is a special system folder that doesn't behave like a normal folder, so don't mess around with it too much. What's important to know is that you can sort your fonts, preview individual fonts, delete the ones you don't want anymore, or mark certain fonts as hidden so they don't appear in font lists when using apps (e.g. text editors or word processors).
Using NexusFont
NexusFont by JungHoon Noh is a portable app that makes font management easier. You can instantly preview text with all existing fonts, change the preview text and settings, delete the ones you don't want, and organize fonts into folders and collections.

The nice thing about NexusFont is that you can install fonts to NexusFont instead of directly to Windows. While NexusFont is running, its fonts are available to the operating system, but when NexusFont is closed, the fonts become unavailable. It's less clutter for the Fonts folder, which is great if you just want to test fonts or only need a particular font for a little while.
If you don't like NexusFont, try one of these other font managers for Windows.
How to Change Font Size in Windows 10
Windows used to allow changing system font settings, but then came the Creators Update in early 2017 and removed that ability. Now if you want to resize fonts in Windows 10, you have two options: changing DPI settings or using a third-party tool.
1. Changing System DPI Settings
DPI ("dots per inch") is a scaling feature in Windows that's meant to make the interface more readable on high-resolution monitors, otherwise the text and buttons would be way too small for day-to-day use. But you can use it even on smaller screens!
Navigate to the Display settings by opening the Start Menu, searching for display, and selecting Change display settings in the results:

Under the section called Scale and layout, click on Custom scaling:

You can enter a scaling percentage between 100 and 500 percent, though we don't recommend going above 150 unless your resolution is extremely high (e.g. 1440p or 4K monitors).
Note that while this does boost font size, it also causes other interface elements to enlarge as well (e.g. windows, title bars, taskbar, etc.). If necessary, you can try a few other ways to make text easier to read in Windows.
2. Using System Font Size Changer
System Font Size Changer by WinTools is a portable app that can tweak six different font elements in Windows 10: title bars, menus, message boxes, palette titles, icon names, and tooltips. Sizes can be set anywhere from 0 to 20, and fonts can be regular or bolded.

Upon launching the first time, System Font Size Changer asks if you want to back up your current settings. You should click Yes, then store the resulting WindowMetrics.reg file somewhere safe. This way if System Font Size Changer mucks something up (unlikely but possible), you can restore your settings by double-clicking WindowMetrics.reg.
How to Improve Font Rendering in Windows 10
If the size of fonts is fine but they still seem hard to read for some reason, you may need to adjust your system's font rendering settings. Windows 10 uses a technology called ClearType, which is why fonts look different on Windows versus Mac or Linux, but it looks best when tweaked specifically for your monitor.
Tweaking ClearType Settings
Open the Start Menu, search for cleartype, then select Adjust ClearType text in the results. This launches the ClearType Text Tuner. Make sure you turn on ClearType:

Fortunately, the ClearType Text Tuner is a straightforward wizard that walks you through each step. All you have to do is look at all the options, pick which one looks best to you, and rinse and repeat until you reach the end. For most, this results in text that's pleasing enough.
Using MacType
If you've ever used Mac or Linux before, you know that text just looks different on those operating systems for some reason. That's because they don't use ClearType and instead use another text rendering technique. If you prefer that, you can sort of replicate it by installing a tool called MacType.
Visit the MacType official website and click Get MacType to download the installer. It's an open-source project so you can view all of the source code on the MacType GitHub page (you can download binary releases here as well if the main site isn't working).

Once installed, it'll take you through the MacType Wizard for setup. We recommend choosing Load with MacTray (which sits in the System Tray and lets you tweak as needed), and make sure you enable Run as Administrator as well as Standalone loading mode.
On the next page, you can select which rendering profile you want to use. Different ones will look better or worse depending on your physical screen, but you can't really go wrong with the Default profile. Click Finish and you're done.
Where Do You Download Free Fonts?
My two favorite resources are Google Fonts and Font Squirrel, both of which offer entirely free-to-use fonts that you can download and install for personal use. They're both well organized and easy to navigate, so finding fonts you'll love isn't hard at all.
What are your favorite font sites? Which fonts do you use the most? Know of any other useful font tools we missed? Share with us down in the comments below!