Web designers have an almost impossible job. They need to come up with one design that pleases everyone. When talking about a service like Gmail, used by countless millions of people all over the world, you can really drop the "almost" part – it’s just impossible. Even if a redesign is well liked by most people, there will always be users who really don’t like the new look.
Sometimes there are enough of these users to force a company to backtrack, like Google recently did with the Gmail icon buttons. But what if there’s something you really hate, and the company doesn’t change it back? Are you stuck with it forever? Thanks to user styles, you can fix such problems yourself.
Introducing Stylish

Stylish is a free add-on available both for Firefox and Chrome, and it lets you do something pretty magical - apply your own styles to webpage elements. Even if you’re not a web developer and you’ve never written a bit of CSS in your life, this is much easier than it sounds. You can use Stylish to transform websites completely (as I will show you in the next section), but even more importantly, you can use Stylish to fix small annoyances in minutes.
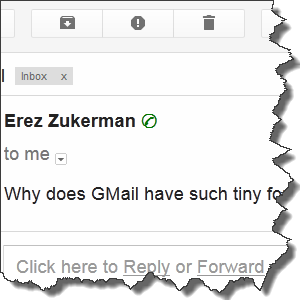
For example, I had a problem with the default font size in Gmail. The interface was fine – I didn’t want to zoom in (Ctrl +) with my browser, because that would increase the size of all interface elements and be really ugly. I just wanted a way to make the message font slightly bigger.
With Stylish, it was really simple, and I’ll show you how. But before we look at creating your own user styles, let’s talk about leveraging other people’s work.
UserStyles.org

If something is getting on your nerves, it is entirely possible you are not alone. UserStyles.org is a website that lets users share styles they’ve created. Above you can see a style (Add labels to toolbar icons) recommended by MakeUseOf commenter RandyN in reply to our story about the Gmail icon buttons. This style lets you keep the icons, but add in text labels – something Google won’t let you do.
UserStyles.org is great, but it is not perfect. Some of the designs try to do too much (change the appearance of a website entirely), and some are for old versions of websites and are now broken. If you’re trying to fix something small and can’t find it on UserStyles.org, perhaps your best course of action is to do it on your own.
Creating Your Own Simple User Style

To create your own user style, you first need to know what element of the page you’re trying to change, and then what change you want to make. So, to get started, right-click whatever it is you want to change, and pick Inspect Element. You should see something like this:

Firefox darkens the rest of the page, and draws a very clear frame around the element you’ve selected. Above that element, the text that says div#2d6.ii.gt.adP.adO, is a bunch of CSS classes, along with one ID (the part that starts with #). This is the selector that affects the styling for this element. Along the bottom of the screen there’s a navigation bar that lets you "traverse the DOM tree", or in simpler words, go up and down in the hierarchy of elements leading to the element you’ve picked.
The name of the game here is to pick the element you wish to style, and make the selection not so narrow that it won’t affect everything you want to affect, nor so broad that it would mess up other things.
I clicked one element higher, div.gs, just because I like its name (seems like something that won’t change too soon, but that’s a complete guess on my part). It affects the entire message area. Once the area you wish to style is selected, click the Style button on the bottom-right corner, to open the Rules pane:

I know, it’s scary at first. But this is where you see the different CSS rules that affect the element you selected, and this is where you can make your own temporary modifications and see their impact on the page in real-time, without reloading it. But what should you change? Click the Properties button and uncheck “Only user styles”:

Here you can see a complete list of all CSS rules. You can scroll down the list until you find a rule that makes sense for what you need (font-size in our case), and even click the question mark next to it to open an explanation page. So, now we know we want to tweak the font-size property for all div elements that have a class of "gs" (written in shorthand as div.gs).
The only question that remains is what we want its value to be. For that, we go back to the Rules pane and start playing around:

40 pixels may be a bit crazy, but you get the general idea. Play around with this, and feel free to add any other properties, until you get the look you were going for. Be sure not to close the page, because your changes are not saved anywhere.
Saving Your New Style
![stylish[18]](https://static1.makeuseofimages.com/wordpress/wp-content/uploads/2012/03/stylish18.png?q=50&fit=crop&w=1500&dpr=1.5)
Once you’ve got this part of the site to look just like you want it, it’s time to save it. Click the Stylish icon in the add-on bar, and select “Write new style”. Stylish would then want to know on what pages it should apply the new style – in our case, pick the second option, “mail.google.com”. Next, you will see this dialog:
![stylish[20]](https://static1.makeuseofimages.com/wordpress/wp-content/uploads/2012/03/stylish20.png?q=50&fit=crop&w=1500&dpr=1.5)
I have already filled it on. Obviously, I picked a name and some tags for the style. But the real stuff happens within the code: Line 3 was already there – Stylish put it in place so that it knows on what pages the style applies. But line 5-7 are mine. Let’s analyze them:
Line 5: div.gs { – this part you should recognize. This is the element we’ve decided to style. The opening brace means we’re now going to write some CSS rules.
Line 6: font-size: 20px !important; – that’s the rule we wish to change (font-size), followed by its new definition (20 pixels), and then by an “!important” declaration, which means Firefox would obey this rule even if an element “closer” to the text tries to set the font size to something different.
Line 7: } – closing the style definition.
Next, click Preview and marvel at your work:

And finally, once you see that it’s working, click Save.
This Is Not A Complete Guide
I am well aware that to keep this short tutorial within the bounds of a single post, I’ve had to make a number of leaps and jumps. If you were confused along the way, please accept my apology. CSS is tricky at first, but it is not so complicated once you get the hang of it – and customizing websites locally remains one of the best ways to learn.
If you were confused by anything, please ask me below and I’ll do my best to help.