Desks are an essential piece of office furniture that generally don't come cheap. Fortunately, you can build your own custom sit/stand desk for as little as $50-$150 that can fit any space, functions better, and looks better than many store bought desks!
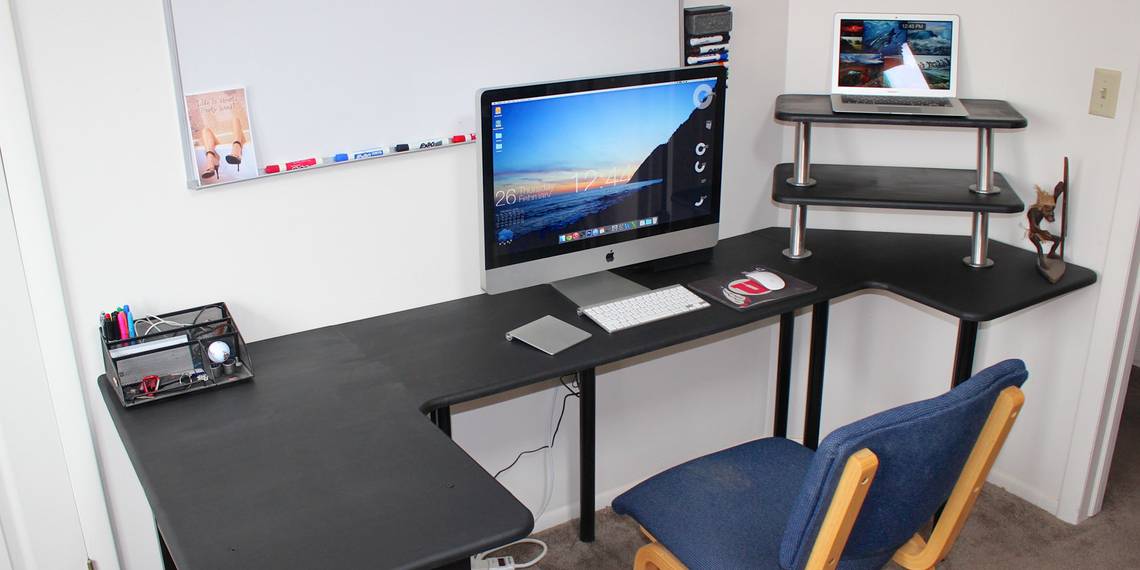
I designed my DIY desk using MDF board with a standing portion for my wife. Having tried standing desks, I personally prefer a chair, but they are a great option for many people (assuming you aren't using them wrongly: 5 things you're doing wrong with your standing desk). Because of this, I made the desk so that it had both a standing and a sitting part to fit whatever you're feeling at that moment. It's a project that you can do in a weekend with only a few power tools and little woodworking/DIY experience.
If you can put together Ikea furniture, you can probably make this.
Step 1: You Will Need

- MDF Board (I used 3 pieces, at $11 each)
- Legs
- Ikea Adils Legs ($3.50 each)
- Ikea Capita Bracket (Optional - $20 each)
- Ikea Kallax Shelving Unit (Optional, $35)
- Screws
- Paint ($11)
- Steel Tie Plates ($1 each)
I spent around $150 for the design you see below. If you're building a budget oriented desk, you really only need the MDF Board, Adils Legs, screws, paint, and tie plates which you can easily keep under $50.
Some basic woodworking equipment is also needed:
- Jigsaw
- Drill
- Router (Optional)
- Tape Measure
- Screwdriver
- Sandpaper
- Paintbrush
- Wood File (Optional)
Step 2: Plan it Out on Paper

This is a custom design, so obviously yours is going to differ in both size and shape – determine where you want to put you desk and how big it's going to be. I decided to put mine along a wall in our study with a 45 degree corner. Once you've determined the size of desk, you'll know how many sheets of MDF you will need. Mine took 3 2'x4' sheets to make the "U" Shape. The dashed circles are where I placed the legs under the desk. On the left side, I wanted to expand the amount of storage in the room, so I integrated an Ikea Kallax 2x2 Shelving Unit underneath. This is completely optional, but adds a nice finished touch. The Kallax shelf was put under the left hand dashed rectangle. The dashed green squares on the right side are where the 2 levels will sit above the main desktop for the standing portion of the desk.
Step 3: Plan it Out on Your Materials

Now that you have a plan of what you're going to build, measure and sketch it onto the MDF boards. The old saying is "measure twice, cut once", and for good reason. The legs can be placed anywhere, just make sure they will adequately support your desk's shape, and should be placed after the boards are cut. I used a small paint can (~4" diameter) to draw rounded edges, but you can use any circular guide you have on hand with larger or smaller diameters to make the rounded effect more or less dramatic.
Step 4: Cut the MDF to Shape

Using the Jigsaw, cut out the desktop along your drawn lines (this can also be done more easily with a circular saw, if you have one). Don't worry if your cuts aren't perfectly straight – you can always file or sand down the edges later.
You may also prefer to route the edges if you have access to a router. It makes the desk look more professional and is nicer to use day to day. I used a 1/2" rounded-over router bit to create a flush chamfer around the edges of the desk. I did not route the edges toward the walls.
Finally, sand and file down the rough spots from the cutting and routing. It doesn't need to be perfect – paint will hide many of the imperfections.
Step 5: Place the Legs

If you're using Ikea Adils Legs, you'll need to drill 5 screw holes per leg. I used 6 legs to support the middle and right portions of the desk, and it is very sturdy, so 3 legs per 12 square feet of MDF should be adequate. Place the attachment plate where you intend to place the legs on the underside of the desk top and mark where you will drill the holes for the legs. I used #8 3/4" screws for the entire project, and therefor used a 5/32 drill bit. If you are also using #8 screws, this will work for you, if not consult a chart identifying what size drill bit to use such as this one.
My MDF Board was 3/4" thick, so I measured 1/2" from the tip on the drill bit and marked that spot with a Sharpie. This way you know exactly how deep you are going and that you will not accidentally drill through the top of the desk. Once you have all the holes drilled, go ahead and screw on the legs.
Step 6: Attach the Separate Desk Top Pieces Together

You may want to wait on this step until you have painted the desk, but since I was painting the desk inside (thanks to winter), it was easiest to connect it together and assemble it. Using 2 steel tie plates per connection, for a total of 4 tie plates, I attached the 3 pieces of wood. You will again need to pre drill the holes for the screws, in the same manner as the leg screws, and I used about 10 screws per plate for a very sturdy connection.
If you're using a shelf like I am, you'll need to attach the shelf to the underside of the desk: I created holes for 4 wooden pegs that came with the shelf to assemble it. These pegs go up into the underside of the desk and down into the top of the shelf. Since I wanted it to be securely connected, I also drilled 2 holes down into the desk and countersunk the holes so that the screws aren't sticking up and are flush with the desktop. Now the shelf is secured to the desk and is very sturdy.
Step 7: Build the Standing Part

For the standing portion of the desk, I created 2 levels, one for the keyboard/mouse and one for the screen. You should attempt to match this guide for proper ergonomics of the standing desk. I used 2 sets of the Ikea Capita legs that angle back away from the user. Mine is fairly low (fit to my wife), but you could easily use the Adils Legs cut to size or additional levels with Capita Legs if you needed more height. Being taller, I simply use the higher of the 2 shelves for the keyboard.
I drilled the holes that the Capita legs would be placed into and attached the legs to the underside of the desk top, but did not attach them yet so I could paint without having to worry about the stainless steel legs.
If you plan to use the standing position regularly, be sure to kit yourself out with some of these standing desk accessories.
Step 8: Paint

Now you have a close-to finished desk! Go ahead and paint whatever color/design you want. I used matte black oil paint. Oil paint holds up better than many other paints, and while it can be a pain to clean up (you'll need white spirit), it looks great and lasts a long time. I put on 3 coats of paint over 3 days, and allowed around 24 hours for the paint to dry.
Step 9: Final Assembly

Once the paint has dried, finish assembling the standing portion.
You now have a custom desk built for your home, exactly to your specifications. I personally think this is one of the best looking desks I have ever owned and am very happy with how it turned out. This can easily be adapted to be as simple or complex as you want, but is a great place to start planning a desk that fits in with your home.
Good luck, and show us what you end up with in the comments! Too difficult? Check out these other 6 standing desk designs. Not convinced you even need one? Read about the health benefits of standing desks. Dave also had a go at building a budget Ikea standing-only desk a few years back, but the parts are still being sold.