Do you actually use Microsoft OneDrive, or do you just get sick of seeing its pop-ups asking you to complete setup? While OneDrive is a fine cloud storage solution, you might want to remove it if you already use Dropbox, Google Drive, or another provider. After Microsoft cut the free storage down to 5 GB, you'd be forgiven for moving to Google Drive's generous 15 GB.
OneDrive integrates into Windows 10 and isn't a separate download, but it's still safe to disable it. From the easiest to most complex method, we'll show you how to turn OneDrive off so that it doesn't bother you any more.
With the Creators Update or Windows 7: Easy!
The newest update to Windows 10 brings lots of improvements. One of them hasn't made any headlines, but is great news for anyone who hates OneDrive. In the Creators Update, you can completely remove OneDrive without jumping through any hoops.
If you can believe it, Microsoft now lets you remove OneDrive by uninstalling it just like any other app. Type Apps in the Start Menu to open the Apps & features window. Search for OneDrive in the list, then click its entry and hit the Uninstall button. This will remove it from your system -- easy enough, right?
Note that if you're using Windows 7, you can easily uninstall OneDrive by visiting the Control Panel > Programs and Features. Right-click on OneDrive and choose Uninstall to get rid of it. We've shown how to remove OneDrive from Windows 8.1, too.
Don't have the Creators Update yet? It's coming to your computer soon -- or you can skip the wait and install it right now.
If You Have Windows 10 Pro
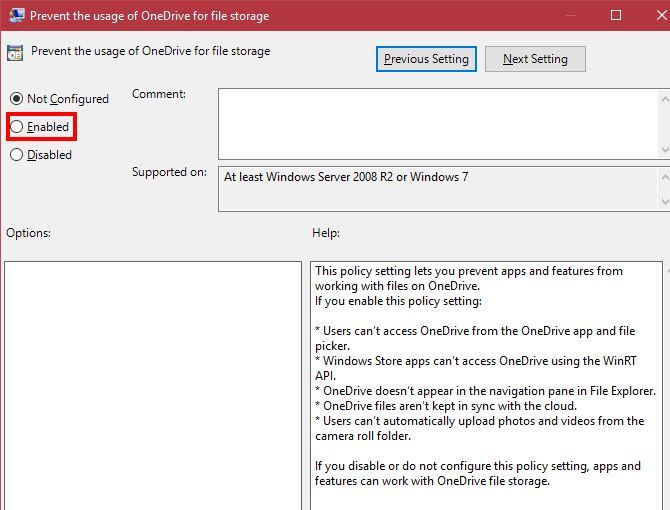
The Creators Update makes it easy to remove OneDrive, but previous versions of Windows have other methods of disabling it. If you have the Pro edition of Windows 10 (which isn't worth the upgrade if you don't), you can take advantage of a Group Policy edit to shut off OneDrive. Press Windows Key + R to open the Run dialogue, then type gpedit.msc to open the Group Policy Editor.
Navigate down the tree to Computer Configuration > Administrative Templates > Windows Components > OneDrive. On the right side, you'll see a list of settings you can tweak. Double-click on Prevent the usage of OneDrive for file storage and change it from Not Configured to Enabled. Click OK to save the changes, then restart your computer to apply them.
Once you've done this, OneDrive essentially disappears. While it's technically still present, this setting prevents OneDrive from syncing, hides it from the File Explorer, and you can't access the OneDrive app. That's as good as removed for most people.
Those with Windows 10 Home can try a workaround to access the Group Policy Editor so they can use this method. Follow the same steps to disable OneDrive.
Windows 10 Home: Hiding OneDrive
On Home versions of Windows, you don't have access to the Group Policy editor. But you can perform essentially the same steps by hand to remove all instances of OneDrive.
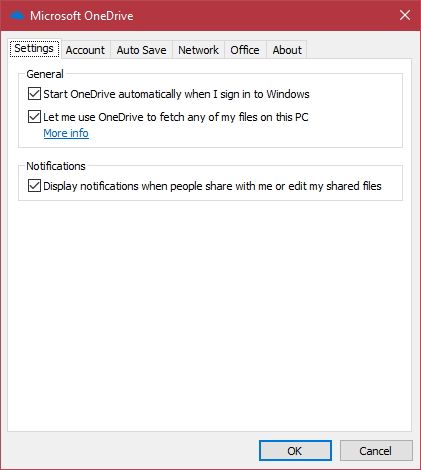
Find the OneDrive icon (it looks like two clouds) in the System Tray at the bottom-right of your screen. If you don't see it, click the little arrow to show hidden icons. Then, right-click the OneDrive icon and choose Settings.
Uncheck every box on the General tab, then visit the Auto save tab. Set the options here to This PC only and uncheck the boxes below. Next, go to the Account tab and click Choose folders. Click the box to Sync all files and folder in my OneDrive twice to clear everything and press OK. This removes everything in OneDrive from your PC while still keeping it safe in the cloud.
Now, go back to the Account tab in OneDrive settings. Click Unlink this PC to remove your account from OneDrive and close the Welcome window that pops up, as you don't need it. Finally, open a File Explorer window. Find OneDrive on the left sidebar, and right-click it to open its Properties. Check the Hidden box on the General tab to prevent it from showing. Right-click on the OneDrive icon in the System Tray one last time and click Exit to close it out.
The Nuclear Method (Not Recommended)
Since Windows 10 launched, another method to uninstall OneDrive has made its rounds. This one runs a quick uninstall on the OneDrive app, but there are several unknowns surrounding it. It's not clear how to get OneDrive back after using this method, and it might leave other pieces of the service around.
You should use one of the above methods, but if you really want to obliterate OneDrive, you can do so with a few quick commands. Open an administrator command prompt by right-clicking on the Start Button and choosing Command Prompt (Admin) or Windows PowerShell (Admin). Type this command to kill all current instances of OneDrive:
taskkill /f /im OneDrive.exe
Then, type the first command if you're running a 64-bit version of Windows, or the second command for 32-bit users:
        %SystemRoot%\SysWOW64\OneDriveSetup.exe /uninstall
%SystemRoot%\System32\OneDriveSetup.exe /uninstall
This doesn't prompt you for confirmation, but it removes the OneDrive app and service. Again, one of the above, less-intrusive methods is a better choice for most users.
Life Without OneDrive
Though OneDrive is hooked into newer versions of Windows, it's thankfully not hard to remove. Whether you don't trust cloud storage or prefer using another provider, you can decide whether to use it on your own. Once you perform one of these processes, your Windows computer becomes free of OneDrive.
We definitely recommend using another cloud storage provider, though, as they make it easy to access your files from anywhere, hold lots of neat features, and act as an extra layer in your backup. In addition, make sure you have a proper backup so you don't lose your data!
Do you like OneDrive, or are you happy to remove it? Tell us your favorite cloud storage provider and your uses for OneDrive down in the comments!


