<firstimage="https://www.makeuseof.com/wp-content/uploads/2010/10/shutterstock_42706630.jpg" />
Shopping systems are often slow, bulky systems that can be quite demanding. The exceptions are blog (i.e. Wordpress) plug-ins, but even these require advanced control over your webserver and database installs.
In short, a lot of work, files and really tough to use with free (limited) webspace.
Today, we'll discuss an alternative. It's free, super lightweight, and just needs a little different approach. That's to say, there's no graphical user interface for adding shop items with this web site shopping cart. Instead, you need to insert simple tags in your HTML code. Don't worry, we'll tell you how.
simpleCart(js)
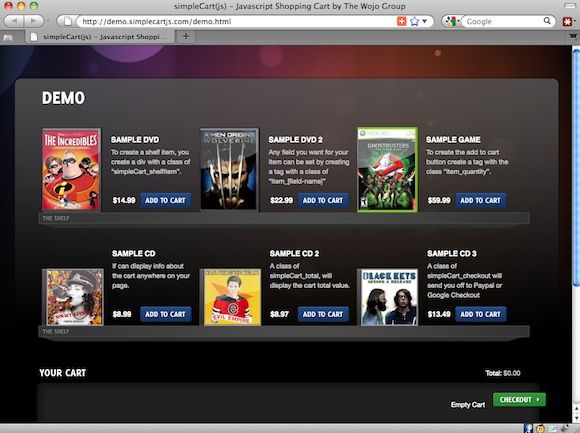
The end-user interface is slick, simple and direct. Products are aligned in this web site shopping cart in a grid, with relatively large icons, product explanation and price. The webmaster can optionally add different options for a product, i.e. small, medium and large T-shirts. Because of the build-up, simpleCart is best used for displaying a smaller and relatively static product arrangement, perfectly suited for amateur sellers.
The cart is usually shown at the bottom of the page, but you can pretty much put it wherever you want. Here the buyer can review the products already selected, change the quantity, or empty the card.
When satisfied, pressing the Checkout button will take the buyer to Paypal or Google Checkout, starting a money transfer to your account. You'll receive a notification when you get the money, where after you can ship the products. As simple as that.
Setting Up SimpleCart On Your Website
First, make sure you've got a basic website capable of executing JavaScript (which most can) and some little web space for the rest of the files. You can download simpleCart(js) from the website. It's donation ware, so you can choose for yourself if you like it and how much you think it's worth.
Unzip the file and upload simpleCart.js to your site directory. The set-up is completed by inserting some little code into your website's HTML files. Wherever those snippets of code are inserted, that's where the specific simpleCart components will show up.
<script type="text/javascript" src="simpleCart.js"></script>
Add this to every page, between the
<HEAD>
and
</HEAD>
tags, wherever you want to use simpleCart.
<script type="text/javascript">

            simpleCart.checkoutTo = PayPal;

            simpleCart.email = "you@yours.com";

            </script>
Add the above to make simpleCart check out using Paypal. You also need to specify your Paypal mail address. Change the elements in green, and paste the entire snippet between the
<HEAD>
and
</HEAD>
tags, wherever you want to use the checkout.
<script type="text/javascript">

            simpleCart.checkoutTo = GoogleCheckout;

            simpleCart.merchantId = "111111111111111";

            </script>
If you instead want to use Google Checkout, paste the above snippet between the
<HEAD>
and
</HEAD>
tags, wherever you want to use the checkout. Instead of your email address, swap the green element with your Google Checkout Merchant ID.
<div class="simpleCart_shelfItem">

            <h2 class="item_name"> Product Name </h2>

            <select class="item_size">

            <option value="Small"> Small </option>

            <option value="Medium"> Medium </option>

            <option value="Large"> Large </option>

            </select>
<span class="item_price">$35.99</span>
<input value="1" type="text">
 <a href="javascript:;" class="item_add"> Add to Cart </a>

            </div>
The code snippet above is used to add an item to your shelf. Change the item name and price, show in green. The select class, shown in blue, is entirely optional. If there are no subclasses in your product, you can leave it out. Paste it between the
<BODY>
and
</BODY>
tags, wherever you want to show it on your page.
<div class="simpleCart_items"></div>
Paste this between the
<BODY>
and
</BODY>
tags, where you want to display the entire web site shopping cart.
You have <span class="simpleCart_quantity"></span> items in your Cart.

            Cart total: <div class="simpleCart_total"></div>
<a href="javascript:;" class="simpleCart_checkout">Checkout</a>

            <a href="javascript:;" class="simpleCart_empty">Empty</a>
The above elements will respectively display the amount of items in your cart, the cart total, a checkout link and an empty cart link. Each element can exist independently.
Take a look at the documentation for more advanced settings, including currency options, tax rates, shipping, and changing the cart formatting.
What do you think about simpleCart(js)? Have you ever sold anything online on your own site, and how did it go? Let us know in the comments!
Image credit: Shutterstock


