An increasingly common way of sharing more information than Twitter's 140-character limit allows is to share a screenshot from an article. If you want to point out a specific line or two in a paragraph, you can create a fake highlight effect using an online tool. Or if you have access to Photoshop, you can actually do this offline.
Step 1
Take a screenshot of the paragraph of text you want to highlight and open it in Photoshop. Open the brush tool in Photoshop from the tool menu or using the keyboard shortcut B. A regular round brush will do the trick but if you want, you can download a marker brush set to make it even more authentic.
Step 2
Create a new layer in your image by going Layer > New > New Layer, or use the keyboard shortcut Shift + Cmd/Ctrl + N. Make sure you are on the new layer and not on the layer with the screenshot before going to the next step.
Step 3
Select a bright yellow color. In the screenshot below I used #f2ea10. Holding down the Shift key, drag the brush across the text. Using the Shift key allows you to draw a straight line. The text will be completely covered by the color, but the next step will take care of that.
If you're highlighting more than one line, you might find that when you go to the next line, Photoshop tries to link your previous highlighted line with the new one. If this happens just use the keyboard shortcut Ctrl/Cmd + Z to undo and that connection will be severed when you go to draw the line again.
Step 4
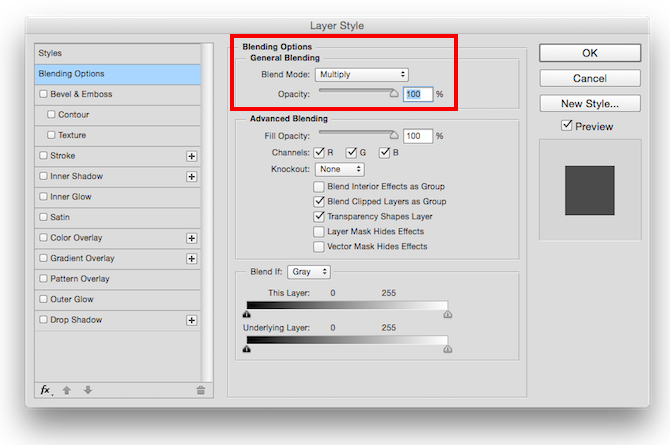
Once you've covered all the text you want to highlight, right click the layer with the yellow lines and select Blending Options. Under General Blending you can select a Blend Mode from a drop down menu. Select Multiply. An optional step is to adjust the opacity, but that really depends on your personal preference.
The final product will look like this:
The use of a second layer is a good way to have complete control over the highlighting without accidentally making irreversible changes to your original screenshot.
If you prefer, however, you can simply skip creating a new layer and work directly on your screenshot. When you select your brush in the first step, you can also select the blending mode from the brush properties. Choose Multiply, and when brush over your screenshot, you will be able to see text beneath it.
Do you have any tips and tricks for creating a faux highlighter effect on screenshots? Let us know in the comments.


