Got spare hard disk drives that you want to use more efficiently with your Linux computer? RAID can provide a performance boost, or add redundancy, depending on how it's configured. Let's take a quick dive into the multi-disk world.
RAID 101
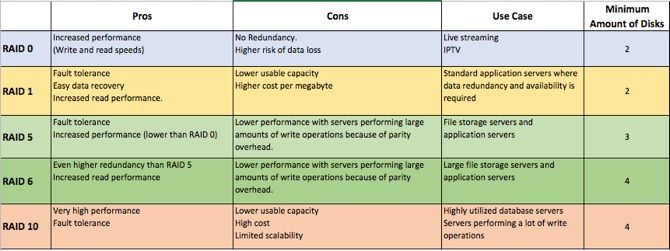
A Redundant Array of Inexpensive (or Independent) Disks (RAID) is a collection of drives working cohesively to provide benefit to a system. These benefits can either be performance, redundancy or both. The usual configurations you will come across are RAID 0, RAID 1, RAID 5, RAID 6, and RAID 10. We've summarized them below.
Other configurations exist, but these are the most common.
Regardless of which RAID level you would like to use, RAID is not a backup solution.
While it may help you get back up and running quickly and provide another layer to protect your data, it does not replace actual backups. RAID is a great use case where high availability is a must. Our guide to RAID explains further.
RAID 0: Non-Critical Storage
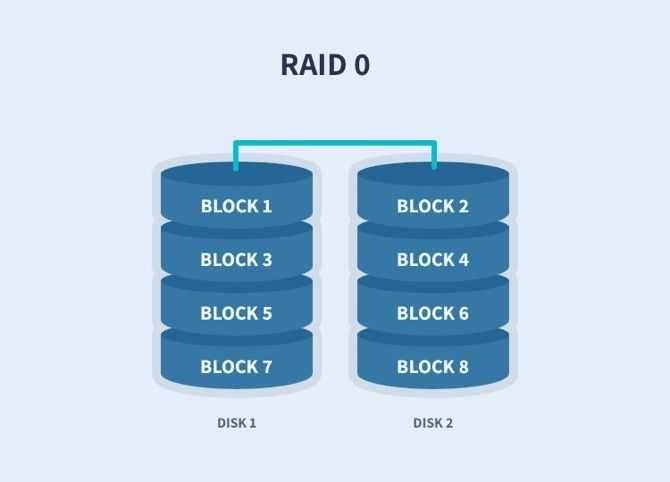
RAID 0 works by striping data across multiple drives. You need a minimum of two drives for RAID 0, but you can theoretically add as many as you like. Because your computer is writing across multiple drives simultaneously, this provides a performance boost.
You can also use drives of differing sizes. Your array will, however, be limited to the smallest drive in the array. If you have a drive that is 100GB and a drive that is 250GB striped in a RAID 0 array, the total space for the array will be 200GB. That's 100GB from each disk.
RAID 0 is excellent for non-critical storage that requires higher read and write speeds that a single disk can't offer. RAID 0 is not fault-tolerant.
If any of the drives in your array fails, you will lose all the data within that array. You have been warned.
RAID 1: Mirror Your HDD
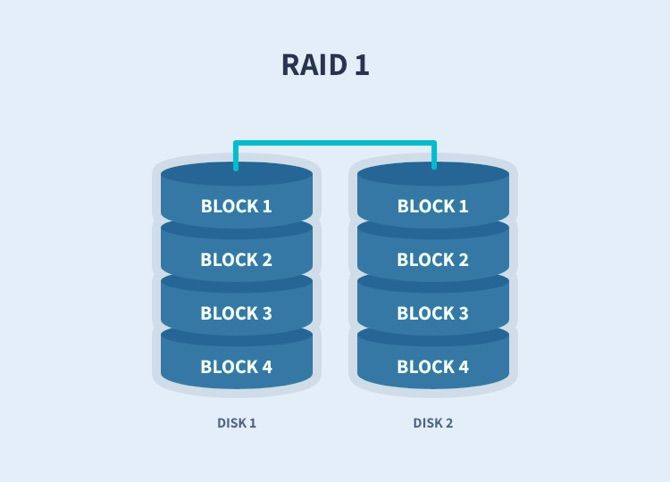
RAID 1 is a simple mirror. Whatever happens on one drive will happen on the other drives. While there will be no performance benefit from RAID 1, there is an exact replica of your data on each drive, which means there is a redundancy benefit with RAID 1. As long as one drive in your array is alive, your data will be intact.
The maximum size of your array will be equal to the size of the smallest drive in the array. If you have a drive that is 100GB and a drive that is 250GB in a RAID 1 array, the total space for the array will be 100GB. This cost implication just needs to be kept in mind.
RAID 5 and 6: Performance and Redundancy
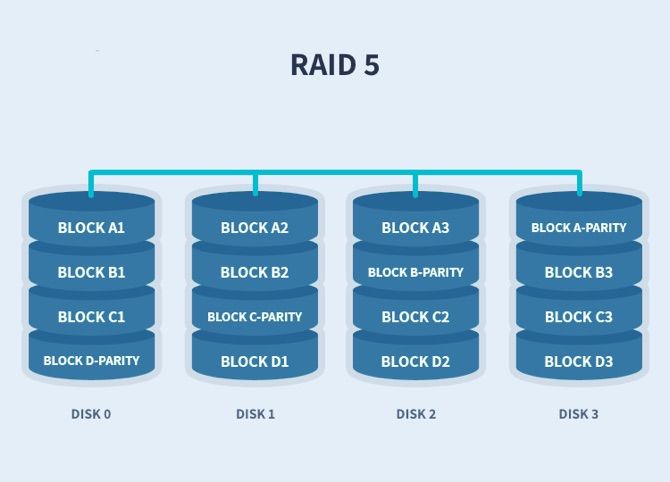
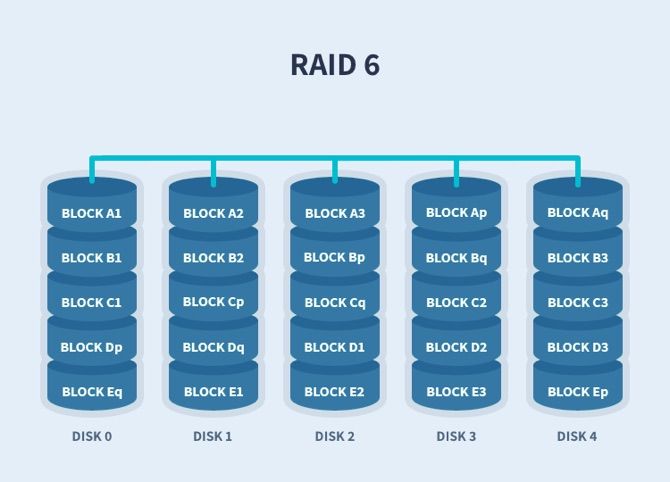
RAID 5 and 6 will provide both performance and redundancy. Data is striped across the drives along with parity information. RAID 5 uses a total of one drive's worth of parity with RAID 6 using two. Using the parity data, the computer can recalculate the data of one of the other data blocks, should the data no longer be available. This means RAID 5 can suffer the loss of a single drive while RAID 6 can survive two drives failing at any single point in time.
Storage wise this means RAID 5 and 6 will equal total drive size minus one drive and two drives respectively. So if you had four drives each with a capacity of 100GB your array size in RAID 5 will be 300GB, while RAID 6 gives you 200GB.
RAID 5 needs a minimum of three drives and RAID 6 requires four. While you can mix and match hard drive sizes, the array will see all disks as the size of the smallest drive in the array. In the unfortunate event that a drive fails, your array will still be operational, and you will be able to access all the data. At this point, you will need to swap out the dead drive and rebuild the array.
In its degraded state, the array will operate slower than usual, and it's not a good idea to be using it until the array has been rebuilt.
RAID 10: Striped and Mirrored
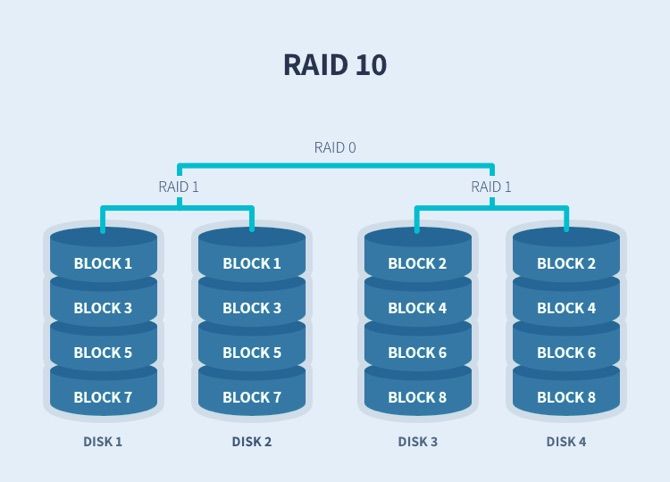
RAID 10 is basically RAID 1 + 0. It is a combination of these levels. You will need pairs of disks for this to be achieved. Data is striped across two disks, and that is then mirrored on another set of disks. You get the performance benefit from RAID 0, and the redundancy of RAID 1.
Configuring RAID in Linux
Configuring all of this redundant goodness can be done on either hardware or software levels. The hardware flavor requires a RAID controller which is generally found in server grade hardware. Fortunately, Linux has a software version of RAID. The principles are the same, but bear in mind the overhead will be on your CPU as opposed to the RAID controller.
Let's walk through a RAID 5 configuration using nothing but a terminal window, a few drives, and some determination. When ready, open a terminal window with your favorite shell, and type:
sudo apt install mdadm
Preparing the Drives
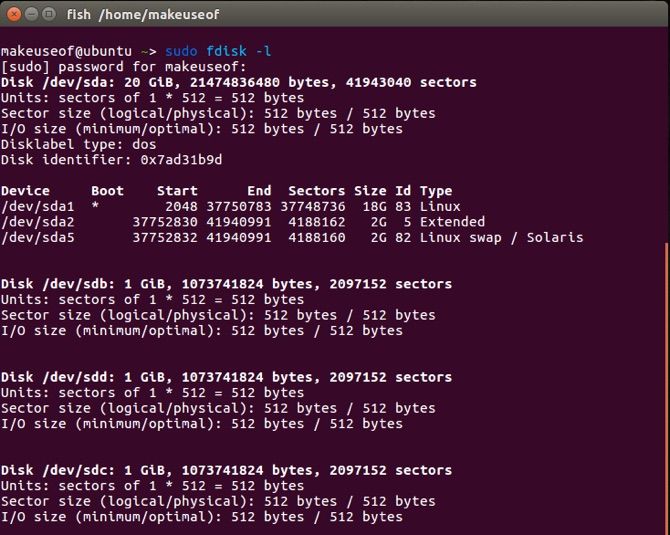
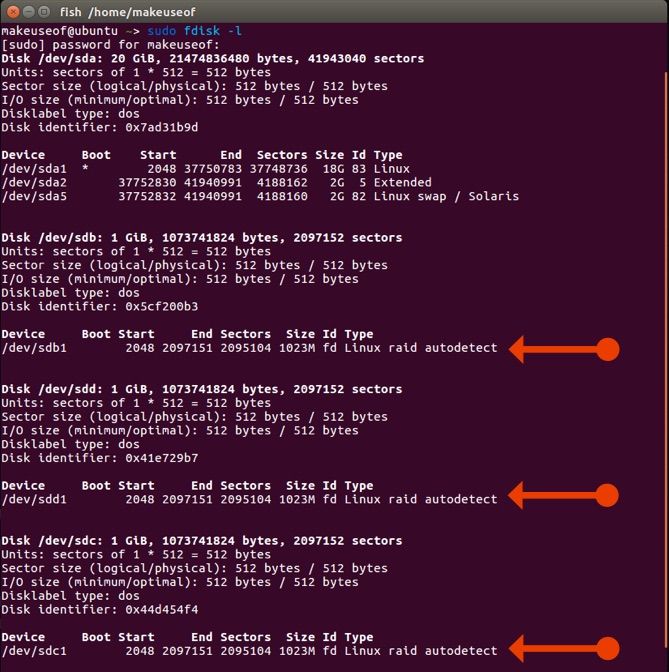
In our example, we'll use three 1GB drives, for simplicity (in reality, these will be larger). Check which disks are attached to your system with these terminal commands:
sudo fdisk -l
From the output, we can see sda as the boot drive and sdb, sdd, and sdc just attached to the system.
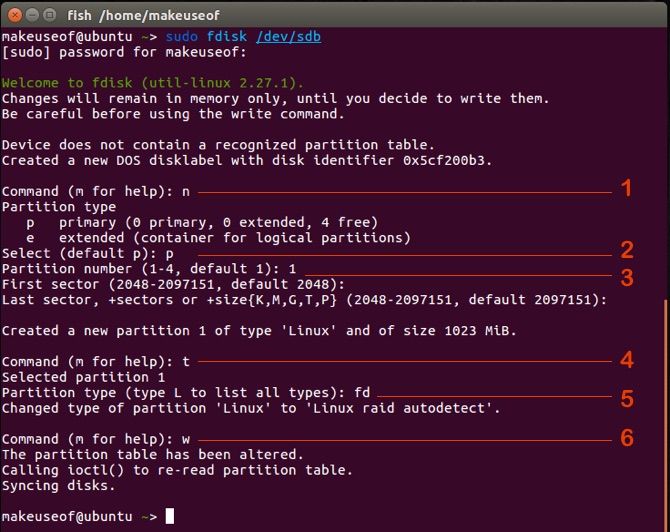
Now we need to partition these disks. Make sure your cousin's graduation photos are backed up and not on these drives because this is a destructive process. In a terminal, enter:
sudo fdisk /dev/sdb
We then need to answer with the following inputs:
- n: Adds a new partition
- p: Makes the partition the primary one on the disk
- 1: Assigns this number to the partition
- t: To change the partition type
- fd: This is the RAID partition type
- w: Saves the changes and exits
Carry out the exact same steps for the remaining two drives. Namely /dev/sdc and /dev/sdd. We now need to inform our operating system of the changes we just made:
sudo partprobe /dev/sdb
Follow this with:
        sudo partprobe /dev/sdc
sudo partprobe /dev/sdd
Setting Up RAID 5
Let's take a quick look at the partition table now. Again, run:
fdisk -l
Awesome! Our drives and their partitions are ready to be RAID-ed!
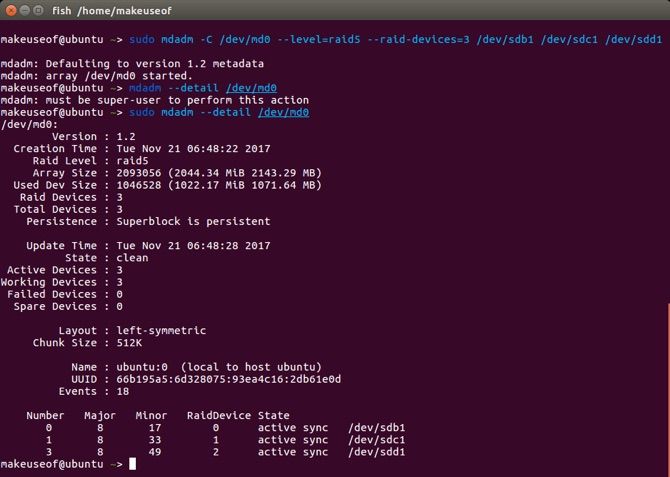
To set them up in RAID 5 run:
mdadm -C /dev/md0 --level=raid5 --raid-devices=3 /dev/sdb1 /dev/sdc1 /dev/sdd1
Taking a closer look at the syntax:
- mdadm: The tool we're using
- C: This is the switch to create a RAID array
- /dev/md0: Where the array will be pooled
- level: Desired RAID level
- raid-device: the number of devices and their locations
We can view the details of our RAID by typing:
sudo mdadm --detail /dev/md0
The final steps will be to create a file system for the array, and mounting it so we can actually use it! To format the array and assign a place it can be accessed, type:
        sudo mkfs.ext4 /dev/md0
sudo mkdir /data
Mounting the Array
There are two options for mounting the newly created array. The first is temporarily, which will require it to be mounted each time the computer is started. Or you could mount it permanently so that it is mounted with each restart. To mount temporarily type:
mount /dev/md0 /data/
If you prefer to persist the storage, you need to edit your /etc/fstab file and make sure you add in the line like the picture below:
sudo nano /etc/fstab
Once you've saved and closed the file, refresh the mounting table:
sudo mount -a
We can then view our mounted devices by typing:
df -h
Congratulations! You've successfully created a RAID array, formatted it and mounted it. You may now use that directory as you would any other, and reap the benefits!
Troubleshooting RAID
Remember the redundancy benefits we spoke about? Well, what happens if a drive fails? Using mdadm, you can remove the failed drive with the mdadm -r switch. Hopefully, your motherboard supports hot-swapping of drives and you can plug a replacement drive in.
Following the fdisk command above, you can set up the new drive. Simply add the new drive to the array using the mdadm -a switch. Your array will now start rebuilding. Because this is RAID 5 all your data should be there, and even available while the drive was unavailable.
Do You Need RAID?
The table above lists some possible use cases where RAID might be of benefit to you. If you have a business need that is driving this requirement, it may be worth looking at hardware RAID controllers or options like FreeNAS to better suit your need.
If you are looking for a cost-effective way to squeeze some extra performance or provide another layer of redundancy for home, mdadm may be a worthy candidate.
Do you currently use RAID? How often do you go through hard drives? Do you have a data-loss horror story?

