Microsoft Edge might look "modern", but in reality it still has a lot of the same features and functions as its more longstanding competitors.
One of those features is the ability to clear your entire browsing history and reset the browser to a "clean" state.
But how easy is it to perform those tasks on Microsoft's latest offering? We take you through it, step by step.
How to Clear Your Browser's History
There are lots of reasons you might want or need to reset your online history – like maintaining your privacy from prying eyes, if you're preparing to sell your computer, or if you experience a software malfunction.
As with most other browsers, you can choose to clear your entire history or just wipe certain aspects of it. Edge provides two methods for doing so.
Method One – The Settings Menu
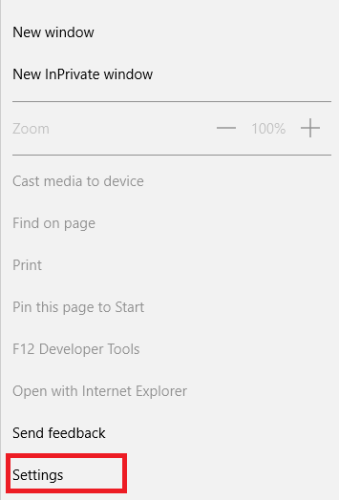
The browsers various settings can be accessed by clicking on the three dots in the top right-hand corner of your browser's window.
Click on Settings from the pop-up menu.
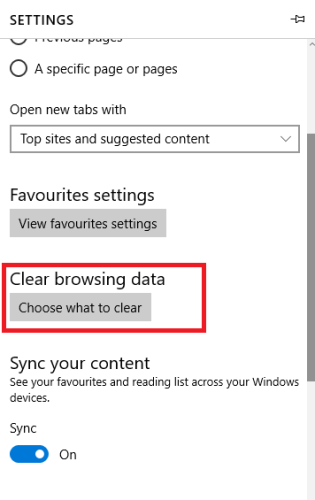
You will then be presented with a list of options that will let you tweak the browser to suit your preferences. Scroll down until you reach Clear Browsing Data, then click on Choose What to Clear.
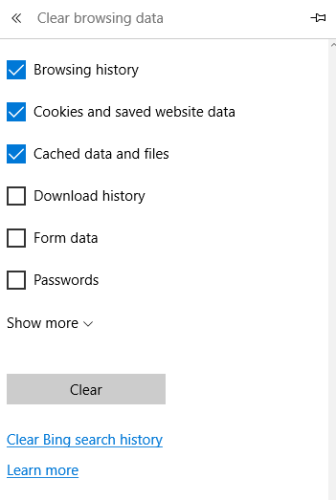
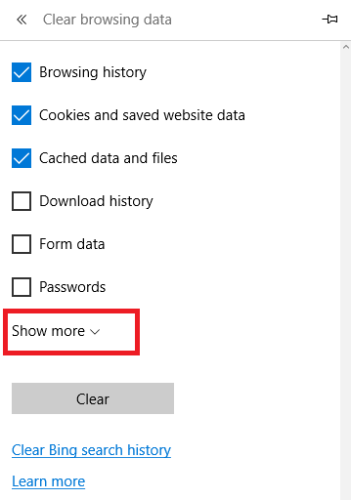
You'll now be shown a list of the different areas which can be wiped. They include your browsing history, your passwords, your cached data, and your download data – among other things.
Choose the checkboxes next to the data you want to delete, then click on Clear.
That's it, your history is now… history. Remember, however, that as soon as you start using Edge again new data will start to be amassed.
(Note: It is also possible to delete your Bing search history from this same menu, just click on the option below Clear)
Method Two – The History Tab
This is arguably a faster way of deleting your history.
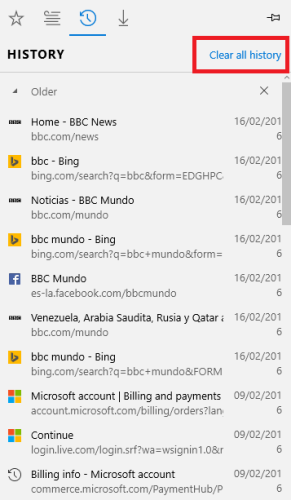
If you hadn't noticed, Edge has three icons alongside the settings button. These represent the share feature, the annotation feature, and the "Hub". You'll need the Hub button; it's the furthest left of the three and is made up of three horizontal lines.
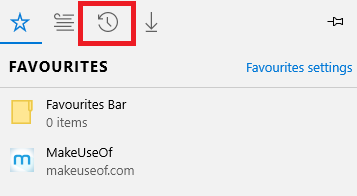
Click on it. The first thing you'll see is a list of your favorites, but at the top of the panel you'll see four buttons.
The third one from the left is the History Tab – it's the one that looks like a clock.
Select it, and you'll be given a complete history of your browsing data. In the top right-hand corner of the pane you'll see a link titled Clear All History.
After you click on it, you'll be taken to the same screen as you'd see if you were using the first method. Again, just select the desired checkboxes and choose Clear.
How to Completely Reset the Browser
In a more extreme case, you might need to completely reset the browser to its factory state. This is a nuclear option – it will delete your entire user data, history, and associated settings. It is typically only necessary if your browser is experiencing problems of a more serious nature.
Once again, this is more than one way of performing the desired task. Let's take a look.
Method One – The Settings Menu
The step by step guide for this method is the same as using the settings menu to clear your browsing history, up to a point.
Click on the three horizontal dots, then head to Settings > Clear Browsing Data > Choose What to Clear.
This time, however, instead of choosing Clear, you'll need to select Show More.
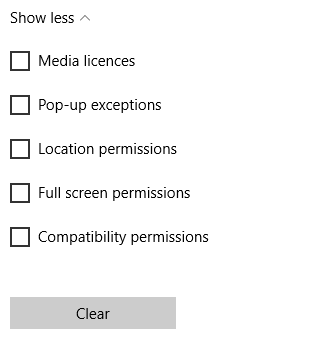
You'll now be given a way of deleting data concerning media licenses, pop-ups, location permissions, and more.
To entirely reset the data, tick each checkbox on the list and select Clear.
Method Two -- System File Checker
If that has not fixed your problem, you might have a corrupted file elsewhere on your system. As Edge is a core component of Windows 10 (rather than a separate app), a seemingly insignificant corrupted file can have grave knock-on consequences.
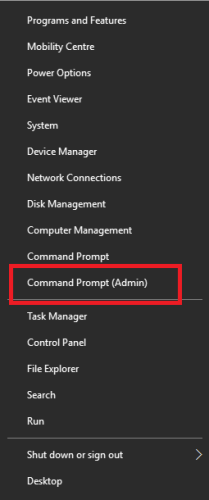
To check for corrupted files, you can use the built-in System File Checker. To run it, you'll need to launch the Command Prompt as an admin user.
Firstly, right-click on the Start Menu and choose Command Prompt (Admin).
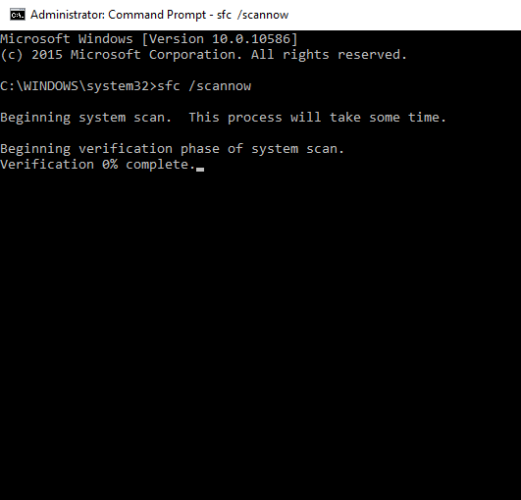
Next, type sfc /scannow and hit Enter.
The scan will fire up. As per the on-screen warning, the scan itself could take quite a long time to complete, though can keep using your machine in the meantime.
Windows will automatically locate and fix any problems on your system. Once it's finished, return to Edge and see if your issue has been solved.
Method Three – PowerShell
The third and final step is to use PowerShell. For those that aren't aware, PowerShell is Windows' primary task automation and configuration management framework.
It's a very powerful tool that can cause severe problems with your system if used incorrectly. With that in mind, make sure you create a full backup and system restore point before proceeding.
The first step to delete Edge's local app data.
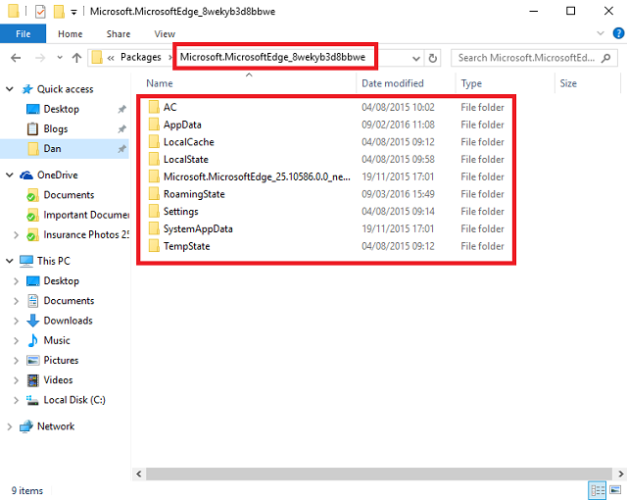
Head to C:\Users\[USERNAME]\AppData\Local\Packages\Microsoft.MicrosoftEdge_8wekyb3d8bbwe and delete everything inside it (replace [USERNAME] with your own username).
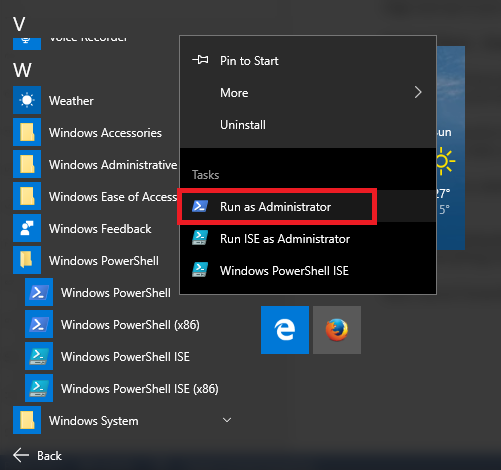
Next, launch PowerShell by heading to Start > All Apps > Windows PowerShell. Right-click on Windows PowerShell and choose Run As Administrator.
Now, copy and paste the following command into the program and press Enter:
Get-AppXPackage -AllUsers -Name Microsoft.MicrosoftEdge | Foreach {Add-AppxPackage -DisableDevelopmentMode -Register "$($_.InstallLocation)\AppXManifest.xml" -Verbose}
That's it – PowerShell will run the command and present you with an on-screen message if successful.
Next time you launch Edge it will be "as new" – all your user data and settings will have been erased and you will be guided through the browser's setup process.
Did These Methods Work for You?
Microsoft Edge is still early in its lifecycle, but it's already showing wonderful signs of progression.
Like any computer program, however, things can go wrong. If things do go awry, you'll now hopefully have the tools at your disposal to fix them.
What problems have you come across while using Microsoft's new browser? Did these methods work for you? As always, we'd love to hear from you. You can get in touch via the comments box below.


