Okay, I admit it - sometimes I multitask a little too much, and not efficiently enough. I have about seven different POP email accounts that I log into several times a day to check email. One reason I tend not to use a single email client for all of those accounts is because I don't want to download all of those emails to my laptop. If you're like me, you just need an easy way to know when an important email comes in. The best solution for getting such an alert is POP Peeper.
How POP Peeper Can Make You More Productive
Think about all of the email accounts that you have. You likely have an email account with your ISP, but you probably also have one or more Gmail, Yahoo, AOL or Hotmail accounts. Some people have from 5 to 10 email accounts or more, and staying on top all of those accounts can be tedious and time consuming. This is where POP Peeper can save the day.
POP Peeper is a non-intrusive, free email notification service that runs in your windows taskbar and utilizes just a very small memory footprint. In many ways, it's a lot like your standard email client, however you can set it up only as a notification service where it just checks all of your email accounts and alerts you to when and where an email comes in.
Setting up POP Peeper is a very quick and easy process. You can configure it to read your emails from a POP3, IMAP, or one of the many webmail accounts that's supported. In this guide I'll cover the three scenerios that I use a lot, POP3, customized POP3 Gmail accounts, and a Yahoo webmail account.
POP3 Setup: Configuring a POP3 Account With POP Peeper
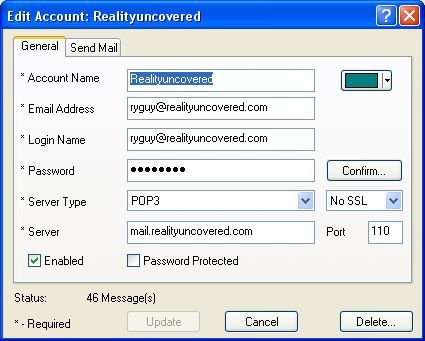
Setting up a POP3 email account on POP Peeper is just a matter of filling out two small screens worth of information, and you're done. You just insert the basic information for incoming and outgoing mail servers, such as below, where I've set up my POP3 account for RealityUncovered emails.
Obviously, you'll need to know your POP3 server, login name and password, as well as whether the account is set up with SSL or not. If you don't know those answers, check with the administrator who set up the email account for you. You'll also notice a color box to the right of the account setup - this will color code all messages coming from this particular source.
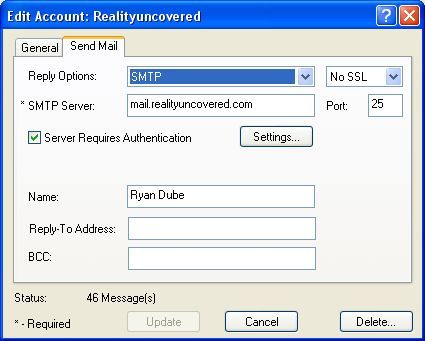
Setting up SMTP outgoing allows you to reply to emails from within POP Peeper if you want to. HOwever, if you just want to use POP Peeper as an email notification service, this isn't really necessary. But if you don't want to bother opening up your email client or webmail account in order to reply, then you can insert your outgoing SMTP information here.
Gmail POP3: Configuring a Gmail Account With POP Peeper
When someone provides you with a customized Gmail account for an organization that you work for, it doesn't really work like a standard Gmail account. These are customized accounts that you can access by enabling the POP3 setting within your Gmail mailbox. First, log into your Gmail account, click on "Settings," and then "Forwarding and POP/IMAP." Within this section, you can enable the ability to access your mail via POP access.
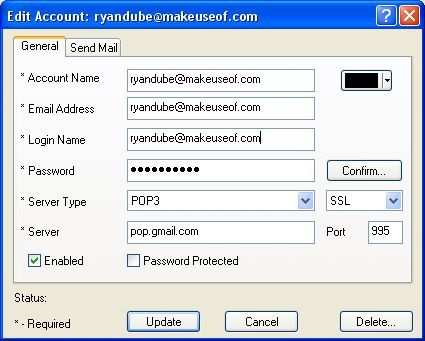
Once you enable POP within your Gmail account, you can then set up your account in POP Peeper just like you would with a regular POP3 account.
For Gmail, the Incoming mail server is pop.gmail.com, and outgoing is smtp.gmail.com. Make sure to use your full email address as your login name and you're good to go.
Free Webmail Accounts: Setting Up Yahoo, Hotmail, Gmail and others with POP Peeper
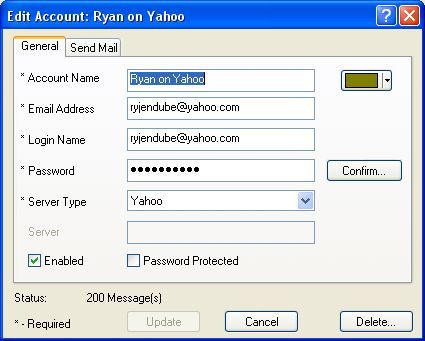
If you have a free webmail account (or several) like Yahoo, Hotmail and others, setting up access to those accounts through POP Peeper couldn't be easier. Access to a long list of free online email services is supported by this application. All you need to do is select the service, enter your account details, and the software will immediately integrate with your online account.
Again, color code the source and you're golden. It really doesn't get any easier than this.
Configuring Notifications, Email Access and Other Features
Once you have POP Peeper set up to poll your long list of email accounts for you, all that's left is to set up the application to behave as you'd like it to. There are many features you can tweak, but the most important items you'll want to configure if you want the app to run as efficiently as possible are storage settings, polling interval and notification options.
You can configure the application so that it only downloads the message headers and doesn't store the message to disk. This is the best option if you just want notification and would rather not use the application as your mail client.
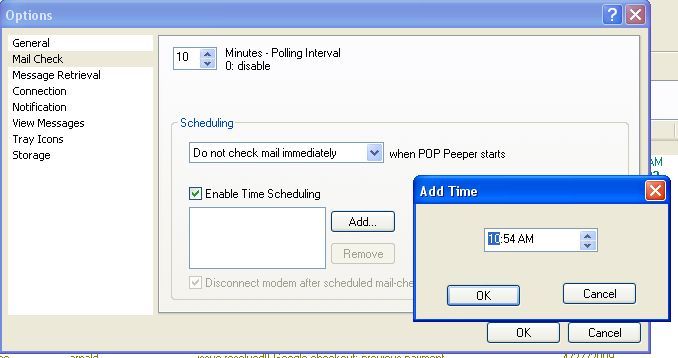
Next, set up how often you want the application to go out and poll all of your email accounts. Another option is that you can "Enable Time Scheduling," meaning you can set the application to only go out and poll your accounts at specific times during the day. Check your email only at lunchtime? Set up POP Peeper to go out and pull down all of your emails around that time.
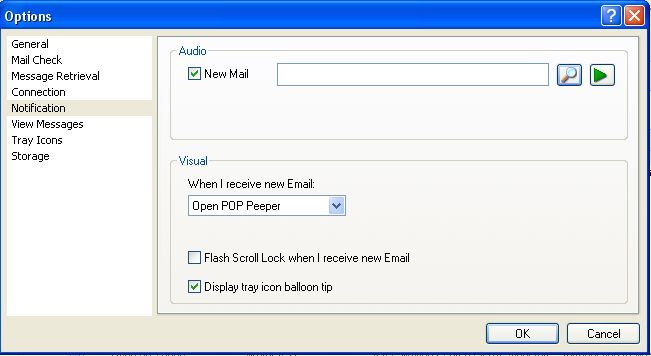
My favorite feature of POP Peeper is the ability to configure how it notifies you when you have new emails. You can have it play a sound file, flash the Scroll Lock light, pop up a balloon from the tray icon and open up the application automatically. You set the level of notification you want that you won't find too annoying while you're trying to work.
Your Email Control Center
Using POP Peeper is pretty cool, once you have all of your accounts set up from around the web. This is the best way to consolidate those dozens of email accounts that you're constantly forgetting to check. Now you'll never miss another email again.
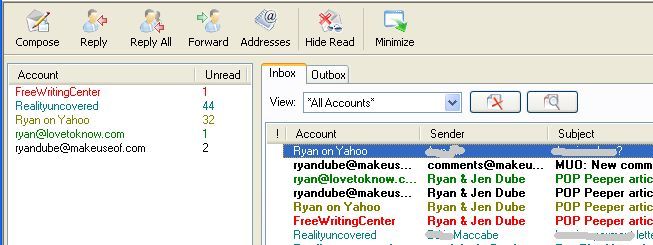
The cool thing about this "control center" for all of your email accounts is that you can either view all of your emails in one place, color coded by account, or you can select a particular account that you want to focus on. The option is yours. However you use it, POP Peeper will make sure that you're instantly aware the moment anyone ever sends you another email to that obscure email account that you hardly ever use any more. Now you can keep track of everything in one convenient place.
Do you have your own methods of managing your many email accounts? Share your techniques in the comments section below.


