If you watch a lot of movies on your PC or media center, I'm sure you've faced the lighting dilemma; do you completely turn off all lights? Do you keep them on full blast? Or do you use a dimmer switch to keep a dull yellow glow somewhere? Well, suffer no more.
For less than $100, you can set up an amazing lighting system that's going to reflect what's on-screen; if the video is a blue night scene, the lights will be blue; when a blaze of orange fire flashes on, so will your lights. Welcome to world of ambient RGB lighting.
Components
- RGB light strip - this is a 5 metre strip of RGB LEDs which can be bought on eBay and shipped from Hong Kong for less than £20 each. If you purchase in electronics shops you'll be paying by the metre and a reel of 5m will cost three or four times that, so buy online. These type of LED strips can be changed to any colour, but only all at once - they cannot be individually adjusted.
- 12v power supply - the power (ampage) required depends on upon how many strips of LEDs you'll be connecting. Each metre draws approximately 0.6 amps, but this depends on the density of your LEDs so be sure to check your particular LED strip. 3A would be sufficient for the 5m strip I linked above, and separate power supplies can be bought for around £10 if you can't source one elsewhere.
- 3 x MOSFET N transistors - you can probaby find cheaper, but I bought a pack of 6 (type STP16NF06FP) for around £10. These are used to isolate the current from the Arduino - connecting the strips directly to the Arduino would fry it with the amount of current they draw. You need 1 MOSFET transistor per LED color channel, for Red,Green, and Blue.
- Arduino - I haven't included the cost of this item as it's assumed you'll already have one, and there are a variety of clones you can buy if you can't afford an official one.
The total cost was therefore around £40 not including the Arduino.
Introduction
The project consists of two parts. First we'll be creating a basic Arduino circuit that listens to commands from the computer, and sets the RGB LEDs to an appropriate colour. The second involves using a new application called Processing and Java on the computer side - to work out what colours are currently on screen, average them, and output that to the serial communications port for the Arduino to react to.
Part 1: Circuit and Arduino
The circuit we're using is very simple as you can see from the diagram below. The LED strip should be supplied with a male plug on one end that you can place directly into the breadboard.

Your LED strip may vary, but if you look closely you'll see 12v, R, G, B written on the rails somewhere. These strips can actually be cut at these copper points (every 3 LEDs on the ones I have), so if you want to cut the strips at the corners of your TV you can safely do that - you needn't use the whole 5m either, so you may have some left for a future project. Connect the positive 12v directly to the external power supply.

The MOSFETs have three pins; gate, drain, and source. The gate is like the electronic switch which the Arduino will control. This then determines the current flowing between the source and drain. The drain of each MOSFET should be connected the ground of the Arduino, and the ground of the power supply, while the source connects to the LED strip channels.

When you've completed the circuit, download and run this test code (originally from LadyAda, pins modified). You should see your LED strip swirl through a variety of colours.

Part 2: Processing
Download Processing and run. You may be surprised to find it looks almost exactly like the Arduino development environment; that's because the Arduino environment was based on it, though they both perform different functions. Grab this code - originally by Silicon Republic but heavily modified by me to make the screen size settings automatic and with better color representation - and take a moment to look over it. Basically it uses a Java class called Robot to do a screen capture every 10ms; it then picks out every odd pixel and averages the total color. If performance is an issue for you, increase the skipValue variable to 3 or 4 to skip more pixels - the overall effect should be the same but it'll run faster as it examines less pixels. Finally, I added a filter which helps to saturate the color by increasing the maximum and decreasing the minimum RGB values found (without this, I found the colors to be too white).
Run the app; the first time, you will probably get an error as it tries to access the wrong serial port.

Check the debug window for a list of current serial ports, and note the number next to what your Arduino is plugged into. In my case on a Mac, the USB connection is port 4. Change the number in this line to the correct port:
port = new Serial(this, Serial.list()[4],9600); //set baud rate
Save and re-run; you should see a small window pop up - this represents the average color of everything on-screen. Launch a painting app or something with strong colors to test it, otherwise it'll probably just display a murky shade of grey. Stop the application when you're done testing as we need the serial port access to program the Arduino.

Lastly, load this code on to your Arduino. Instead of sending random colors to the LED strip, this code reads the values from the serial port (which Processing is outputting to). It's fairly easy to understand, the only difficult part may be the use of a marker in the serial data:
        if (Serial.available()>=4) {
if(Serial.read() == 0xff){
red = Serial.read();
green= Serial.read();
blue = Serial.read();
}
}
This ensures we read the correct byte values - the Processing app outputs a marker as a "breakpoint" between each set of values so that the Arduino won't get out of sync and think that the green value is for blue etc.
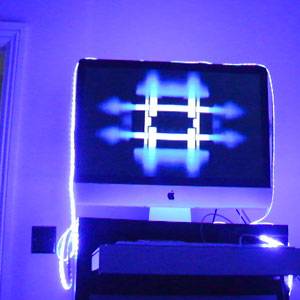
Once the Arduino code is uploaded (there should be no output on the LED strip initially), then you can load and run the Processing app; immediately you should see your ambient light working.
Here's a video demo of how it worked out for me with some random trippy music video.
What do you think?! While it isn't quite as impressive as something that analyses each part of the screen and uses individual LED pixels, it is a lot cheaper and a lot brighter. The only downside to this is that everything must be run on your media center computer - it won't work with regular TV broadcasting or your Xbox 360, for example. If you have any problems, questions, or suggestions then please ask away; or perhaps link to a video of your completed setup.