BrikBook
Denmark isn't that much bigger than West Virginia. The tiny Scandinavian nation has a population of just 5.6 million. Despite that, it consistently punches above its weight, producing things that rapidly become global icons. It's the country that gave us Mew, Alphabeat, Efterklang, Jarlsberg cheese, bacon, and of course, Lego.
Despite being a childless, tax-paying adult of 24, I have an almost adolescent affection for the plastic, multicolored bricks. I grew up with them. I've stood on more Lego (or is it legos? No. No it isn't!) than I can count. During my undergraduate degree, I even used Lego Mindstorms kits to create simple autonomous robots, using RobotC. Some of my colleagues even use Lego to organize their time.
It's for this reason why I was so incredibly excited to review the BrikBook, available online now for under $50. This is essentially a clip-on fascia for the Retina MacBook Pro - both 13 and 15 inch models - and for the MacBook Air 11" – which allows you to create your own laptop cover designs using Lego.
Creating Your Own Designs
My review unit landed on my doorstep towards the tail-end of March. Besides a couple of instruction cards, the only thing that was included in the box was the BrikBook itself. What is so striking about it is that it's essentially a slab of dull, grey plastic. It looks, at the face of it, quite unspectacular. But looks are often deceiving and the grey quickly becomes the backdrop for your own vibrant, artistic creations.

The BrikBook is totally Lego compatible. This means that if you've got a box of bricks gathering dust in your attic, you'll be able to use them to create your own designs, even if they're certifiably ancient. Although it's worth noting that the vertical pitch of a standard Lego brick is 9.6 millimeters, while the height of a current model Retina MacBook Pro is around 18 millimeters. By using standard lego bricks, you essentially increase the thickness of your laptop by at least 50 percent.
If you're so inclined, you can stack Lego bricks to create more ambitious and eye-popping designs. One idea, which was depicted on the back of the BrikBook box is to create a series of pockets, so that you can store things like pens and paperclips. Alternatively, you can find a miniaturized USB drive, and replace the casing with a hollowed-out lego brick, allowing you to attach it to the back of the BrikBook. I've previously written about a number of ideas for organizing technology using Lego, and many of them apply here.
Generally speaking though, ordinary Lego bricks are just too big. If you're going to want to create your own design without increasing the profile of your laptop, you're going to want something a little thinner. Mercifully, the makers of BrikBook have you covered. They've created their own lego-compatible bricks, available to purchase separately from their website. 100 bricks in a given color will set you back $5, plus shipping. This, I thought, was pretty reasonable. Although, if you want to create a more ambitious design which takes advantage of multiple different colors, you're going to find that the costs quickly spiral.

You can also buy design kits. These contain everything you need to make a pre-designed laptop fascia. These range from just $8 for one design that simply says 'hello', to $30 for an emoji design kit.

These bricks (or 'briks') are not just smaller, but also radically thinner, having a vertical pitch of around 2 millimeters. This allows you to create finer, more mosaic-like designs. I got a smarties-tube of these bricks with my review unit, in addition to a few smaller packets which will be finding their way to our competition winners. In my experience, one of these was enough to create a small-scale design.

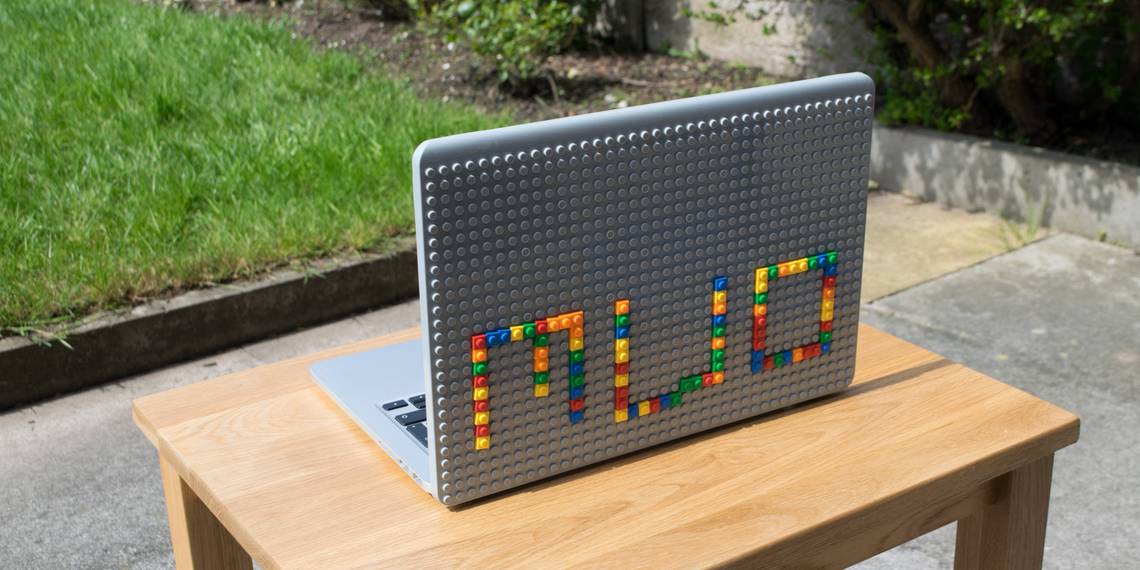
Over the course of a few weeks, I delighted in making and remaking designs; finally settling on a colorful, though somewhat artistically-challenged rendition of our site logo. That's a "U", by the way.
In terms of overall build quality, they are faultless. They're made of a rigid and sturdy polymer, which didn't chip, break, or distort, and could easily withstand being repeatedly attached and detached. Another huge advantage of them is that thanks to their small size, they don't snag, allowing you to shove your BrikBook in a bag without your design coming asunder.

But there's a downside to this diminutive size. Firstly, it's almost impossible to remove a brik using your bare hands. They're simply too small for you to get any leverage. The official advice, which comes with the BrikBook is to use another Brik, and use that to detach it. This worked, but I found that a Victorinox Swiss Army Knife served even better. It's also worth remembering that the briks themselves are tiny. If you drop them on a cluttered surface, you might not find them ever again.
Furthermore, their small size makes them hard to attach to the board. Sometimes, you just have to shove them into place with brute force, causing the BrikBook to bend and contort worryingly. They're especially fiddly if, like me, you've got large fingers.
Attaching It To Your Mac
Coming up with your own designs is undeniably fun, but aspects of the process could certainly be easier. Thankfully, attaching the BrikBook to your laptop is mercifully painless. Just line it up with the outline of your Mac, and press down. When you hear a satisfying 'click', you're good. But there's a couple of things that's worth noting before you do so.
Firstly, you should never attach a brik while the BrikBook is attached to your computer. That's a sure-fire way to irreparably damage your screen. Instead, you should create your design before you attach it. If you find that the BrikBook dips while applying briks, you might want to consider putting something underneath it, like a paperback book.

Secondly, if you've got a non-retina Mac, there's no chance it will fit. I tried it on my 2012 non-retina MacBook Pro without any luck. I asked Brett Miller, CEO and founder of BrikBook if the company had any plans to extend their offering to other laptops. Miller said "We would love to make Brik Book compatible with all laptops. We are still exploring options for the PC, but the market is extremely fragmented. We hope to have a solution out by the end of the year.".
Should You Buy The BrikBook?
At $50, the BrikBook is undeniably expensive, especially when you compare it to the literally thousands of decals and stickers that are available online. You can go on eBay, and find a cool-looking laptop sticker for under ten bucks. You can even create your own laptop stickers, with services like StickerMule and StickerYou. My colleague Mihir wrote a round up of MacBook sticker vendors last December. Despite that, I'm thoroughly enamored with it, and would enthusiastically recommend it above any of those off-the-shelf decals.

Why? Because it allows you to be truly creative with how your laptop looks. You can create a design, and then recreate from scratch it if you're not 100% satisfied. No other product on the market does that.
It's not all good news though. My biggest frustration was with the briks, which were hard to attach, and harder still to remove. But that's a relatively small complaint, and it didn't diminish the fun I had playing around with it.
[recommend]Applying and removing the "briks" is an exercise in frustration, and the BrikBook is far more expensive than other decals and fascias. Despite that, it offers unparalleled customization, and it's fun like you wouldn't believe.[/recommend]