A benchmark is a test, or a series of tests, that determines how well a certain piece of computer hardware runs -- and in a lot of cases, "benchmarking" is essentially synonymous with "stress testing". By pushing your hardware to its limits, you can then compare its measurements against the measurements of other hardware.
Most benchmark tests are designed to emulate the kind of workload a PC might experience under real-world conditions. As such, it's pretty much the only way to get quantitative data on how well your system can perform -- and if your numbers fall short, it's a sign that you may want to upgrade some of your PC components.
So, ready to test your own PC? Here are some of the more useful benchmarks that are available to Linux users.
All-in-One Benchmarks
All-in-one benchmark tools, also known as benchmarking suites, are exactly what they sound like: they test and measure various aspects of your system instead of focusing on one specific piece of hardware, which can be useful when you don't want to clutter up your system with three or four different tools.
Phoronix Test Suite
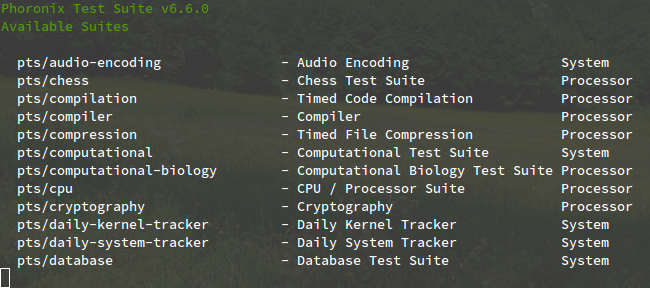
Phoronix Test Suite is one of the most well-known all-in-one benchmarking solutions for Linux. There are some who claim that it has a lot of inherent problems -- and sure, we won't say that it's perfect in every way -- but it's more than good enough for most users. Plus, there aren't many worthwhile alternatives.
Phoronix has access to over 100 different test suites (i.e. groups of individual tests) and over 450 different test profiles. You can choose to install only the ones you need, so if you only care about CPU and HDD benchmarks, then you can simply install "Processor_Tests" and "Disk_Tests". It also supports system logs and reports.
Best of all, Phoronix is free and open source. It also comes in Live CD form called PTS Desktop Live, which lets you run it off of a CD, DVD, or USB drive so you can test any machine's hardware using a "clean" operating system on demand.
Stress-ng
As you might be able to glean from its name, stress-ng is a true stress test -- it's extremely good for pushing your system to its limits, but because it can be so demanding, we don't recommend running it very often. Certain components, especially CPUs and HDDs, will wear out faster when repeatedly stressed.
Install stress-ng on Debian and Ubuntu:
sudo apt-get install stress-ng
Install stress-ng on Fedora, Red Hat, and CentOS:
sudo yum install stress-ng
Once installed, stress-ng can test all kinds of stuff, including your CPU, RAM, I/O, network, virtual memory, and more. It's also highly configurable -- with every test, you can specify different parameters such as how many test instances, how many CPU cores, how aggressive to test, how long to run, etc.
Covering all of the various commands and parameters is beyond the scope of this article, but this page on the Ubuntu wiki is an okay starting point.
PassMark BurnInTest
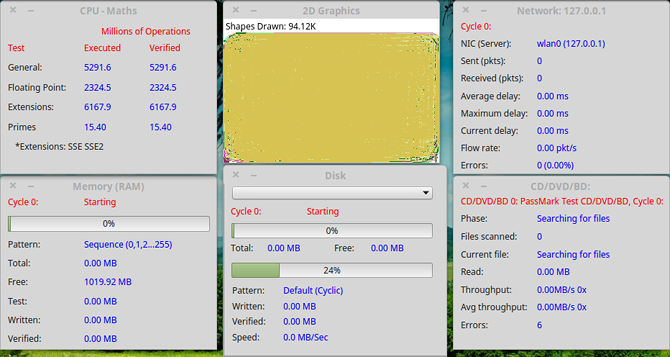
PassMark maintains all kinds of PC testing and monitoring software, including the well-known MemTest86 and PerformanceTest applications, which are only available for Windows users. The BurnInTest application, on the other hand, does come in a Linux version and it's certainly worth checking out.
In short, it can test all of the major subsystems of a computer at once. But instead of testing for straight performance, it focuses more on stability and reliability instead. We recommend pairing it with some other forms of performance testing for best results.
It comes with a 30-day free trial but costs $79 once the trial ends.
CPU Benchmarks
Comparing two different CPUs can be tough. Remember the days when you knew that a Pentium III was pretty much always better than a Pentium II? Not so anymore. Sometimes an i5 can outperform an i7, and a quad-core isn't always better than a dual-core.
Because of this, CPUs benefit the most from benchmark comparisons -- more so than any other piece of PC hardware. If you chose not to use one of the all-in-one suites above, you can get started with one of these two tools.
Geekbench
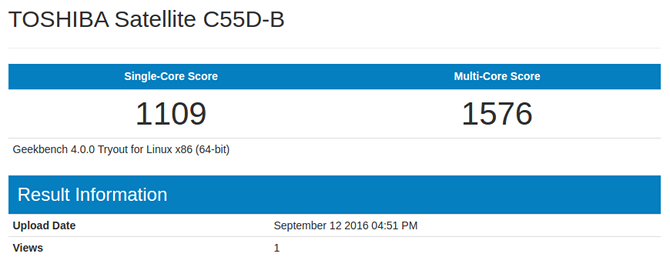
Geekbench is one of the best CPU benchmarks currently available. It comes equipped with ten integer workload tests and eight floating point workload tests -- some of these are also available in Hardinfo (covered below) but some of them are unique to Geekbench.
The Windows and Mac versions come with user interfaces, but the Linux version is only available as a command line executable. Benchmark results are uploaded to web, allowing you to browse your scores in a more intuitive way than the terminal.
Upon download, Geekbench will run in a limited-feature Tryout Mode (essentially an unlimited free trial) that only has 64-bit and OpenCL benchmarks. For CUDA benchmarks, standalone mode, and other features, you'll need to buy Geekbench or Geekbench Pro.
Hardinfo
Hardinfo can be grabbed on most distros using the native package manager, but I find it easiest to just run this command on Debian and Ubuntu:
sudo apt-get install hardinfo
Or run this command on Fedora, Red Hat, and CentOS:
sudo yum install hardinfo
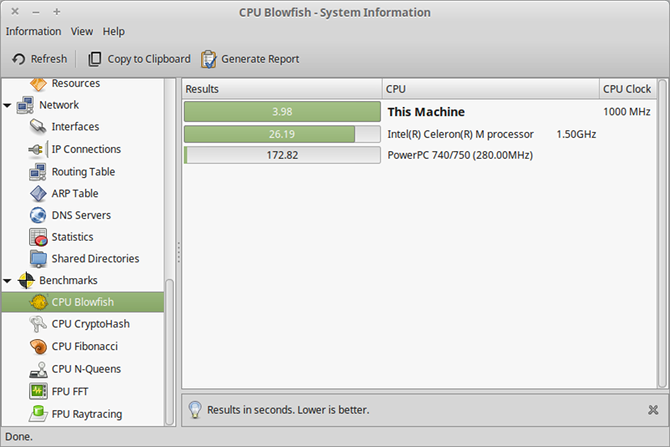
Hardinfo comes with six different benchmarking tests, with each one providing a score that you can use to accurately compare with other systems. The CPU tests perform integer calculations while the FPU tests perform floating point calculations. When comparing results, make sure to compare the same tests.
Hardinfo is also useful as a way to get quick system information. Just browse the various pages in the sidebar to see the details of your computer configuration.
GPU Benchmarks
To test the graphical capabilities of your system in a non-scientific way, you could just see if your PC can handle graphics-intensive games. For more quantitative results, run one of these tests instead.
Unigine
Unigine has two benchmarks worth mentioning: the Valley benchmark and the Heaven benchmark. Each one renders a different scene (a forest-covered valley and a series of flying steampunk islands, respectively) that will force your GPU to work overtime.
This is the graphics benchmark of choice for most Linux gamers.
The free benchmarks are interactive and more than enough for getting a sense of how good your GPU is, but the Pro versions are necessary for commercial use and deep per-frame analysis. These cost $495 each.
GFXBench
Formerly known as GLBenchmark, GFXBench is the lesser of the two main graphics benchmarks for Linux systems. It comes with two sets of tests: high-level tests (overall performance) and low-level tests (specific feature performance).
All things considered, it's fine for what it does. It just so happens that Unigine is the more known and more used option, so that's probably the better choice for cutting-edge GPUs. Then again, if you want to compare two GPUs that you don't own, the GFXBench Results page definitely comes in handy.
Data Drive Benchmarks
Speed isn't always of utmost importance when it comes to data drives. For example, when a drive is used to store backups, the main concerns are longevity, reliability, and capacity. For day-to-day operations though, you'll want a fast SSD with great performance.
Hdparm
Hdparm is a command line utility that comes installed on most modern distros and is surprisingly easy to use. Not only can it be used to test a drive's performance, but it can also change settings on a per-drive basis (e.g. turning DMA on or off). Be warned that Hdparm can crash or corrupt drives if used improperly!
First, use the
df
command to get a list of all the drives on your system. Find the one you want to test -- use contexts such as total disk space and mount location if you aren't sure -- and then use that with the following commands. In my case, my drive is
/dev/sda2
.
To test buffered read performance:
        sudo hdparm -t /dev/sda2

/dev/sda2:
    Timing buffered disk reads: 180 MB in 3.00 seconds = 59.96 MB/sec`
To test cached read performance:
        sudo hdparm -T /dev/sda2

/dev/sda2:
    Timing cached reads: 3364 MB in 2.00 seconds = 1682.75 MB/sec`
Whichever one you use, run the command multiple times to get multiple readings, and then average them together to get a more accurate sense of the performance. Make sure you aren't doing anything else that might impact the readings, such as tranferring files.
Bonnie++
Bonnie++ is a free utility that's designed to benchmark file system and hard drive performance. It doesn't come installed on most distros out of the box, but it should be available in the core repositories. Install on Debian and Ubuntu with:
sudo apt-get install bonnie++
Or install on Fedora, Red Hat, or CentOS with:
sudo yum install bonnie++
Once installed, the simplest way to run Bonnie++ is to use the following command:
bonnie++ -d /tmp -r 2048 -u [username]
This will run the test in the
/tmp
directory (thus testing the performance of the drive on which
/tmp
resides) with a parameter stating that the system has 2048 MB of RAM, and the testing will be run as the
[username]
user, which in my case would be
jleeso
.
Not sure how much RAM is on your system? Use the
free -m
command and look under the total column for Mem.
At the very end, you'll see a comma-separated line full of different numbers. These are your results. Here's an example:
1.96,1.96,ubuntu,1,1378913658,4G,,786,99,17094,3,15431,3,4662,91,37881,4,548.4,17,16,,,,,142,0,+++++,+++,+++++,+++,+++++,+++,+++++,+++,+++++,+++,16569us,15704ms,2485ms,51815us,491ms,261ms,291us,400us,710us,382us,42us,787us
Copy it and type the following command:
echo "[paste your results]" | bon_csv2html > /tmp/test.html
Now open up
/tmp/test.html
in your web browser and you'll see a nicely formatted table that shows your results in a more readable way.
How Does Your PC Stack Up?
If your hardware benchmarks look good but your system still feels slow, note that there are several other factors that could be playing a role in that. Yes, slow hardware is often the bottleneck, but you should look elsewhere before dropping money on an upgrade.
For example, on Ubuntu there are a handful of tips and tricks for speeding up everyday operations (and non-Ubuntu distros have their own versions of these). You may also want to consider updating the underlying Linux kernel.
So what do your benchmark numbers look like? Did you find a hardware bottleneck worth upgrading? Or are you happy with the performance of your system? Let us know with a comment down below!


