I finally got my first Android handset, a good old HTC EVO 4G, with Android 2.3.3 pre-installed and it’s been great. Two things that are slightly annoying though are first, the battery life and second, the fact that taking a screenshot takes a bit of setup.
I’ve been able to remedy the first problem with JuiceDefender, an app I found in our Top 100 Android Apps page, but the second one -I thought the process would take too long - so I didn’t bother to learn the process. That was until I found out the article that Ryan authored at the end of 2009, detailing how to capture screenshots on an Android device with the Android SDK Manager and the built-in screenshot tool, Dalvik Debug Monitor. It turns out, it’s really not that hard after the initial setup.
The Dalvik Debug Monitor from the SDK manager is a good way to get screenshots of your Android handset, but I’ve found another tool that makes things a lot easier if you find yourself needing Android screenshots quite a bit.
AShot, is an open-source screenshot and screencasting tool. You can easily view what’s on your Android handset on your computer screen and more. Read on to find out more about what makes this a good alternative to the built-in Dalvik Debug Monitor.
Setting Up
For the purposes of this article, you’ll need the Android SDK Manager, an USB sync cable, AShot, and your phone, of course. For more details on what to do after installing the Android SDK Manager, you can consult Ryan’s article. To summarize it, here are a few tips:
-
- You don’t actually have to download the executable file.

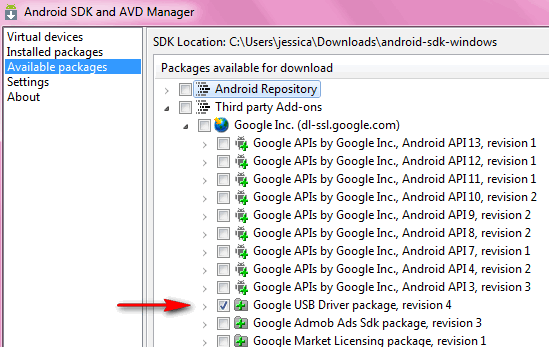
- The zip file of the SDK Manager will do just fine. Just extract the contents, make a note of the location where you extracted the android-sdk-windows.
- Right-click on the SDK Manager and select Run as Administrator.

- Install and update the first entry, Android SDK Platform-tools. For the other entries, simply choose Reject, which will ensure a speedier download for the actual components that you need.

-
Also, select the Google USB driver from Third-party Add-ons in the Available Packages tab.
-
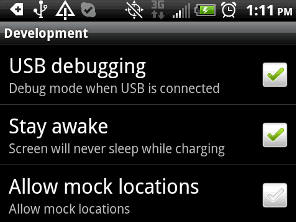
Connect your phone to your computer via the USB sync cable. If it’s your first time plugging in your phone to your computer, you might be prompted to install the necessary drivers, which you should. Once that’s done, on your phone, go to Menu > Settings > Applications > Development and check the box for USB debugging.
-
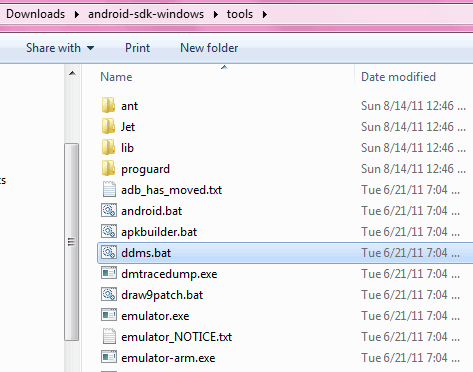
Now run the ddms.bat file in the tools folder.
-
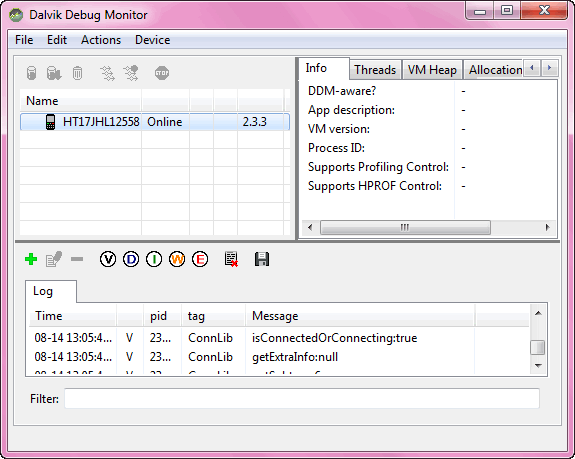
Make sure this windows pops up, with your Android phone listed on the left panel. This will ensure AShot runs properly.
- Now, download and install AShot. When you first launch it (it will show up in the Start menu as Android Screen Capture), it will ask you to choose the location of your android-sdk-windows, which you made a note of in the first bullet point. Once you browse to that location and click on OK, you’ll be able to see what’s on your Android phone on your computer screen.


What You Can Do With AShot

How is AShot different from using the Dalvik Debug Monitor, you ask? With AShot, screen capturing requires minimal effort. There's no need to click on the refresh button every time your Android handset's screen changes. AShot displays what's on your device on your computer screen in real-time, with just a little lag. There are also keyboard shortcuts for things like going fullscreen, rotating clock- and counterclockwise, etc.

You can also set a capture folder and click on the Start Capture button to automatically log all of your handset activity in screenshots.

To record a screencast, I’d suggest using Camstudio for Windows or the web-based Screenr, both of which support screencasting in HD resolution.
If you get stuck in any step, simply go to the AShot developer’s instruction page or ask in the comment section below.
Image Credit: Mike Saechang