This is the next part in our learning Arduino series, and this time we?ll be learning about and using Arrays to make a little Christmas tree ornament with various flashing sequences. This would be an ideal project to keep the kids occupied if you'd like to teach them basic soldering - just mount the LEDs on a piece of card, and you can get power from a standard 9v battery.
It's also a key lesson in beginner Arduino programming, though if you don't plan on actually using this as an ornament I'd strongly suggest breadboarding it out anyway.
Note: This is a very beginner level tutorial and we certainly won?t be breaking any new ground - it?s? just a device to teach the concepts of using Arrays and For loops to deal with a large number of LEDs (or other output devices).
If you haven?t already, now would be a good time to follow along with the other articles in the series:
- What Is Arduino & What Can You Do With It?
- What Is An Arduino Starter Kit & What Does It Contain?
- More Cool Components To Buy With Your Starter Kit
- Getting Started With Your Arduino Starter Kit ? Installing Drivers & Setting Up The Board & Port
- Fritzing, a free tool for drawing circuit diagrams
- A Closer Look At The Structure Of An Arduino App & The Example Blink Program
For this project, you?ll need at least 8 or 9 LEDs in either red or green, a resistor for each of them, a breadboard and some hookup wires. The starter kit from Ooomlout, which I recently purchased myself and is pictured in this tutorial, offers great value for money and has more LEDs and resistors than you?ll ever need, as well as coming with a neat breadboard and Arduino case to keep things tidy.
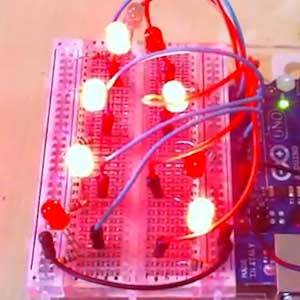
Here?s the final thing:

And a video of it in action.
Here?s a view of the wiring from Fritzing. It?s very basic - just connect the positive lead of the LEDs to pins 2->whatever (up to pin 13), and connect the negative legs to the ground inline with a resistor. The value I?ve used here is 560 Ohms. That?s it for wiring.

On the software side, think about how you might write to all these LEDs in the code. You could go about it like this:
int led1 = 2; // first LED on pin 2

            int led2 = 3; // second on pin 3

            // etc etc

            void loop(){

             digitalWrite(led1,HIGH);

             delay(100);

             digitalWrite(led1,LOW);

             delay(100);

             digitalWrite(led2,HIGH);

             // etc

            }
You should be able to see that with 9 LEDs, this is will quickly get tiring. The answer lies with Arrays, which if you can?t remember our Programming 101 about basic datatypes - are basically just lists.
The syntax looks like this (place this as the first line in your code):
int leds[] = {2,3,4,5,6,7,8,9,10};
The square brackets indicate that the ?leds? variable is going to be an Array. The curly braces enclose the list of pin numbers that our array will hold.
Now, to use an Array, we need to address it by the index number. The index starts at 0, and will always therefore go up to 1 less than the total number of things inside it (so with 9 items, the last one would have an index of 8).
You write it like this:
leds[0]
Which in our case, would fetch the number 2, because that?s what?s at index 0 in our array.
Following so far? Great. That alone isn?t enough for us though - we also need some way to iterate over each element of our LEDs array For that, we will use a for loop. The syntax to do that is like this:
for(initial variable; condition under which we repeat again; change to variable each iteration)
For example:
for(int i = 0; i<9; i++)
Which says
- start this loop with a variable, i, which has a value of zero
- continue looping only while i is less than 9?(so: 0,1,2,3,4,5,6,7,8)
- each time, add 1 to i (i++ is a short way of saying i = i+1)
So basically, the loop is going to be repeated as many times as we have LEDs, and each time it?s repeated we will have a variable, i, which we can use however we like.
We?ll be using this structure twice to start with. Once inside the setup function to make all our pins turn to output mode, like this:
void setup(){

             for(int i = 0;i< 9;i++){

             pinMode(leds[i],OUTPUT);

             }

            }
Can you see what we did there? Instead of writing 9 lines of code to declare each individual pin as output, we create a 'for' loop to repeat itself 9 times, each time setting another pin.
Now, you should be able to see how we could do the exact same thing in the main program loop to turn each LED on in sequence:
void loop(){

             for(int i = 0;i< 9;i++){

             digitalWrite(leds[i],HIGH);

             delay(100);

             digitalWrite(leds[i],LOW);

             }

            }
Try that. You can download the full code for today's project from here if you?d rather not type it out again (though I encourage you to, as it helps the learning process).
Okay, so now we have a fairly boring lighting sequence. Let?s program another one. Just for fun, let?s make it completely random. Replace the main loop code with this:
void loop(){

            int randomLed = random(0,8);

             digitalWrite(leds[randomLed],HIGH);

             delay(50);

             randomLed = random(0,8);

             digitalWrite(leds[randomLed],LOW);

            }
Instead of using a 'for' loop to iterate over each LED, we pick a random number from 0-9 instead, and flash that on.
I'm going to leave it there for today as you should now be armed with enough knowledge to program all new sequences and experiment with loops. To prove how easy this all is, I challenged my wife to think of a sequence she?d like to see, and then got?her to program it herself, given only the code and lessons you?ve had so far. She came up with this, so see if you can match that for homework!
Questions, suggestions, problems - please get in touch in the comments.