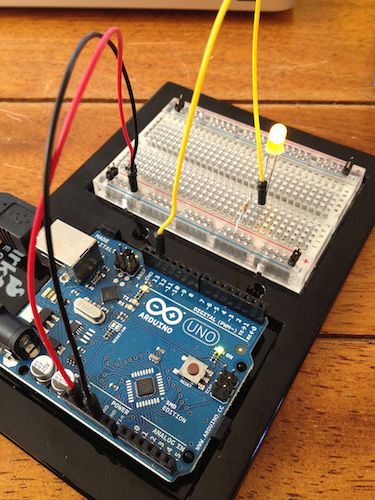
When you first started learning how to develop for the Arduino, you probably built a product that works a little bit like this:
Connected to your Arduino would be a single LED light. This would turn and off every second or so, and will continue until the Arduino is turned off. This is the "Hello World" program of Arduino, and perfectly illustrates how just a few lines of code can create something tangible.
I'm also willing to bet you used the delay() function to define the intervals between the light turning on and off. But here's the thing: while delay is handy for basic demonstrations of how Arduino works, you really shouldn't be using it in the real world. Here's why – and what you should use instead.
How Delay() Works
The way the delay() function works is pretty simple. It accepts a single integer (or number) argument. This number represents the time (measured in milliseconds) the program should wait until moving on to the next line of code.
But the problem is, the delay() function isn't a good way to make your program wait, because it's what's known as a "blocking" function.
The Difference Between Blocking and Non-Blocking Functions
To illustrate why blocking functions are bad, I want you to imagine two different chefs in a kitchen: Henry Blocking, and Eduardo NonBlocking. Both do the same job, but in wildly different ways.
When Henry makes breakfast, he starts by putting two rounds of bread in the toaster. When it finally pings, and the bread pops out golden brown, Henry puts it on a plate and cracks two eggs into a frying pan. Again, he stands by as the oil pops, and the whites begin to harden. When they're finished, he plates them up and starts frying two rashers of bacon. Once they're sufficiently crispy, he takes them off the frying pan, puts them on the plate and starts eating.
Eduardo works in a slightly different way. While his bread is toasting, he's already started to fry his eggs and bacon. Instead of waiting for one item to finish cooking before moving onto next one, he's cooking multiple items concurrently. The end result is Eduardo takes less time to make breakfast than Henry does – and by the time Henry Blocking has finished, the toast and eggs have gone cold.
It's a silly analogy, but it illustrates the point.
Blocking functions prevent a program from doing anything else until that particular task has completed. If you want multiple actions to happen at the same time, you simply cannot use delay().
In particular, if your application requires you to constantly acquire data from attached sensors, you should take care to avoid using the delay() function, as it pauses absolutely everything.
Fortunately, delay() isn't the only way to make your program wait when coding for Arduino.
Meet Millis()
The millis() function performs a single task. When called, it returns (as a long datatype) the number of milliseconds that have elapsed since the program was first launched. So, why is that useful?
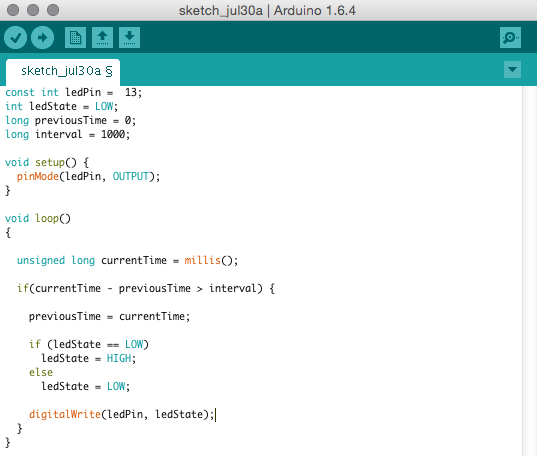
Because by using a little bit of simple math, you can easily "time" aspects of your program without impacting how it works. The following is a basic demonstration of how millis() works. As you'll see, the program will turns the LED light on for 1000 milliseconds (one second), and then turns it off. But crucially, it does it in a way that's non-blocking.
Now let's look at how it works with Arduino.
This program - which is heavily based on one from the official Arduino documentation - works by subtracting the previous recorded time from the current time. If the remainder (ie. time elapsed since the time was last recorded) is greater than the interval (in this case, 1000 milliseconds), the program updates the previousTime variable to the current time, and either turns the LED on or off.
And because it's a non-blocking, any code that's located outside of that first if statement should work normally.
Simple, isn't it? Note how we we created the variable currentTime as an unsigned long. An unsigned value simply means that it can never be negative; we do this so that the maximum number we can store is larger. By default, number variables are signed, which means one "bit" of memory for that variable is used to store whether the value is positive or negative. By specifying it'll only be positive, we have one extra bit to play with.
Interrupts
So far, we've learned about one way to approach timing in our Arduino program which is better than delay(). But there’s another, much better way, but more complex: interrupts. These have the advantage of allowing you to precisely time your Arduino program, and respond quickly to an external input, but in an asynchronous manner.
That means that it runs in conjunction with the main program, constantly waiting for an event to occur, without interrupting the flow of your code. This helps you efficiently respond to events, without impacting the performance of the Arduino processor.
When an interrupt is triggered, it either stops the program, or calls a function, commonly known as an Interrupt Handler or an Interrupt Service Routine. Once this has been concluded, the program then goes back to what it was going.
The AVR chip powering the Arduino only supports hardware interrupts. These occur when an input pin goes from high to low, or when triggered by the Arduino’s built-in timers.
It sounds cryptic. Confusing, even. But it isn’t. To see how they work, and see some examples of them being used in the real world, hit the Arduino documentation.
Don't Get Blocked
Using millis() admittedly takes a little bit of extra work when compared to using delay(). But trust me, your programs will thank you for it, and you can't do multitasking on the Arduino without it.
If you want to see an example of millis() used in a real-world Arduino project, check out James Bruce's Arduino Night Light and Sunrise Alarm.
Found any other blocking functions we should be wary of? Let me know in the comments below, and we'll chat.
Photo Credits: Arduino (Daniel Spiess), Chef (Ollie Svenson)


