There are many ways to remotely access your computer when you're away from home. Two of the most popular are Google Remote Desktop and TeamViewer. But if you just need access to files and folder, there's one solution that's frequently overlooked: OneDrive.
OneDrive has a curious history with remote file access. The feature, formerly called Fetch, was introduced in Windows 7, scrapped in Windows 8, then reintroduced in Windows 10. But what exactly is it? How does it work? And how do you set it up?
How to Use OneDrive to Remotely Access Files
Before we dive into the details, it's important to clarify the following:
You can only access your files remotely if the OneDrive app is running on your computer and your machine is connected to the internet. Whenever one of those isn't true, the process won't work.
You can follow the step-by-step guide below to set up remote file access using OneDrive:
- Locate the OneDrive icon in your taskbar.
- Right-click on the icon.
- Select Settings.
- Click on the Settings tab.
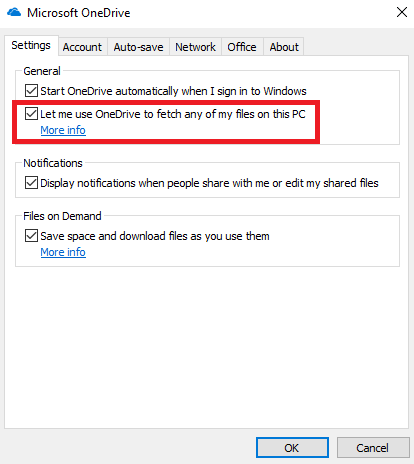
- Mark the checkbox next to Let me use OneDrive to fetch any of my files on this PC.
- Press OK.
- Restart the OneDrive app.
- Go to onedrive.live.com and sign in.
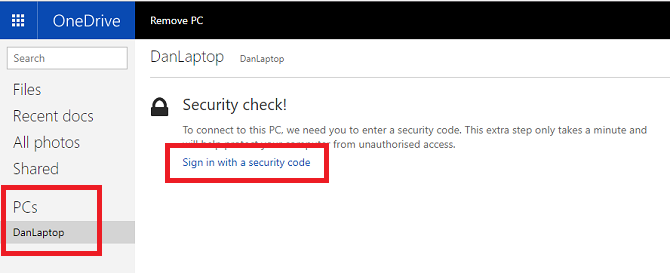
- In the left-hand panel, click on PCs and choose the name of your PC.
- Enter your security credentials.
You should now be able to see the files and folder structure of your PC through the OneDrive web app.
You can use the web app to download content to the machine you're working on and upload files from your remote PC into the OneDrive web app. Your original files are locked to read-only -- make a copy of them if you want to edit them.
Do you use OneDrive to access files and folders remotely? Let us know in the comments below.


