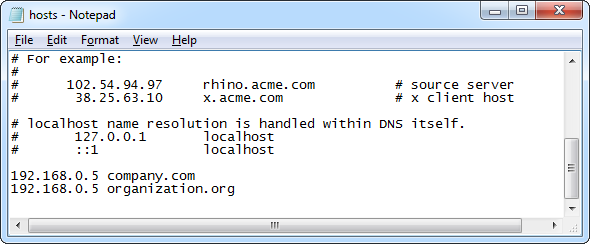
The Windows Hosts file allows you to define which domain names (websites) are linked to which IP addresses. It takes precedence over your DNS servers, so your DNS servers may say facebook.com is linked to a specific IP address, but you can have facebook.com go anywhere you want. The Windows Hosts file can be used to block websites, redirect them, create shortcuts to websites, create your own local domains, and more.
We’ve previously covered using the Windows Hosts file to block websites without installing any other software on your computer – it’s often used for quick website blocking by geeks in the know.
Editing the Windows Hosts File
To edit your Hosts file, you’ll need to open Notepad (or any other text editor you like, such as Notepad++) as Administrator. To do so, click Start, type Notepad into the Start menu, right-click the Notepad shortcut and select Run as Administrator.
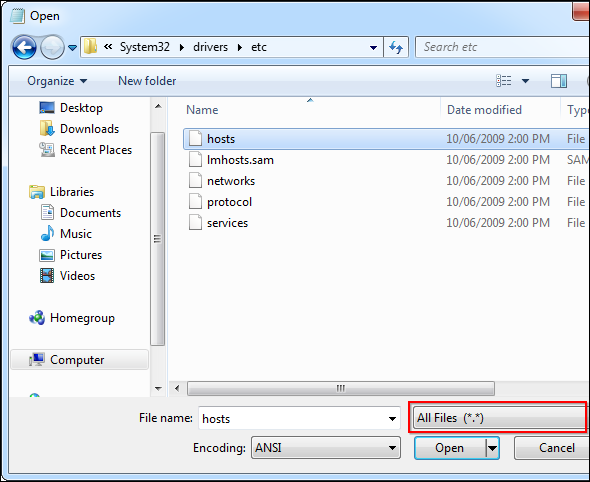
After you have, click File and Open in the Notepad window, then browse to the C:\Windows\System32\drivers\etc folder. Click the Text Files box at the bottom right corner of the window, select All Files, and double-click the hosts file.
Changes you make to the hosts file will take effect immediately after you save the file – you don’t have to reboot. If you’re adding multiple entries to your hosts file, ensure each is on its own line.
Block a Website
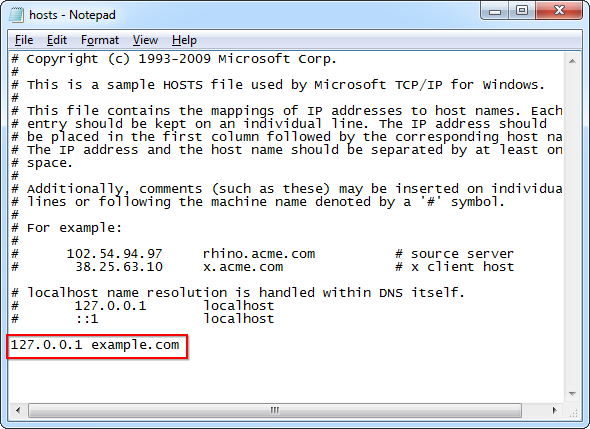
To block a website, add a line like the following one to the bottom of the hosts file:
127.0.0.1 example.com
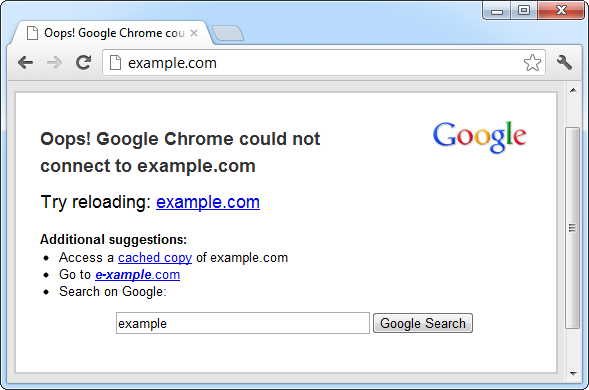
What this does is simple – 127.0.0.1 is the IP address’ of your local computer. When you navigate to example.com, your computer will try to connect to itself (127.0.0.1). Your computer probably won’t find a web server running on itself, so the connection will fail immediately, effectively blocking the website from loading.
Redirect a Website
You can also use this trick to redirect a website to another website. For example, let’s say we want to redirect facebook.com to twitter.com – so when we type facebook.com into our address bars, we’ll end up at Twitter.
First, we’ll need Twitter’s IP address. To find it, we can use the ping command in a Command Prompt window (click Start, type Command Prompt, and press Enter to open one). Type ping twitter.com into the command prompt window and you’ll see Twitter’s numerical IP address.
Now we can add the following line to our hosts file:
199.59.150.39 facebook.com
This line tells our computer to connect facebook.com to Twitter’s IP address. Type facebook.com and you’ll end up at Twitter!
Create Website Shortcuts
You can also use this trick to create “shortcuts” that quickly access websites from any program on your computer. For example, if you’re a Twitter addict, you can associate “t” with Twitter – type t in any web browser’s address bar and you’ll instantly end up at Twitter. You can also create shortcuts with multiple letters, such as twit. You don’t need a .com, .net, .org, or any other type of extension. However, you can't use spaces.
To do this, just add the following line to the hosts file and save it:
199.59.150.39 t
You can get the exact IP address you’ll need by using the ping command mentioned above.
Now you can type t into any program’s address bar and you’ll end up at twitter.com.
Assign Local Domain Names
You can also create local domain names for your computers. For example, if you have a local server that you use, you can name it server and quickly access it by typing server as the URL into any program. If you frequently access your router’s configuration page, you can associate the word router with your router’s IP address and type router into your web browser’s address bar to access your router.
Note that you’ll need the computer or router’s IP address before doing this. After you have it, enter a line like the following – the following line associates 192.168.0.1, an IP address commonly used by routers, with the domain name router:
192.168.0.1 router
You can replace the IP address and domain name here with anything you like.
Test a Web Server That Uses Host Headers
If you’re running a web server on your local network, you may want to make sure it’s working properly before exposing it live on the Internet. Some web servers run multiple websites at the same IP address – the website you get depends on the host name you’re accessing. In cases like this, it’s not helpful to simply access the web server at its local IP address – you need to access it at its website addresses.
For example, if you have a web server with the local IP address 192.168.0.5 that hosts websites for company.com and organization.org, you can add the following lines to your local computer’s hosts file:
192.168.0.5 company.com
192.168.0.5 organization.org
After saving the file, try to access both company.com and organization.org in your web browser – if everything is working properly, you should see the different websites. The server notices your headers specify company.com or organization.org and serves the correct website. If this doesn’t work, you have some troubleshooting to do before deploying the server on the Internet!
Block Lists of Websites
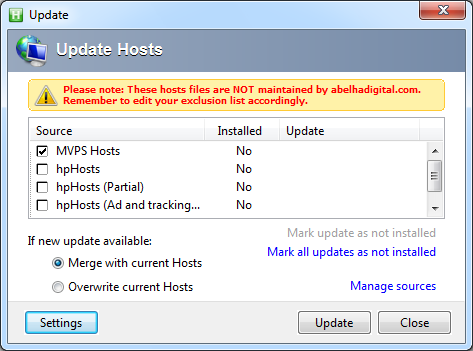
Some people create their own lists of websites they want to block and publish them online. You can block these lists of websites by copying one of these lists into your hosts file.
Check out the following article for some recommended lists you can use, along with a graphical tool that makes downloading these hosts files to your computer and using them easy:
If you want to revert any changes you’ve made, simply delete the lines you added to the bottom of the file, then save the file.
What do you use your Windows hosts file for? Leave a comment and share any tricks you have!
Image Credit: Network Cables via Shutterstock

