If your family is anything like mine, making a family portrait is almost as hard as winning the lottery. We manage to get a portrait done once a year, and it's usually a few days before or after the Christmas holiday. Here are a few of my portrait photography tips from my recent session.
First, let's talk a little about the set up. If you're looking to make a formal portrait, try to do so when when you and your family are all dressed for a formal occasion. This way, family members don't whine about having to dress up just to take pictures.
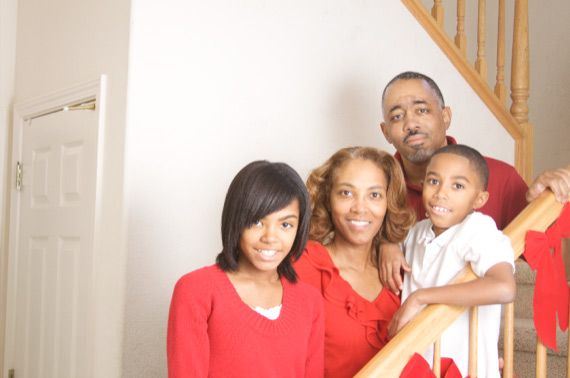
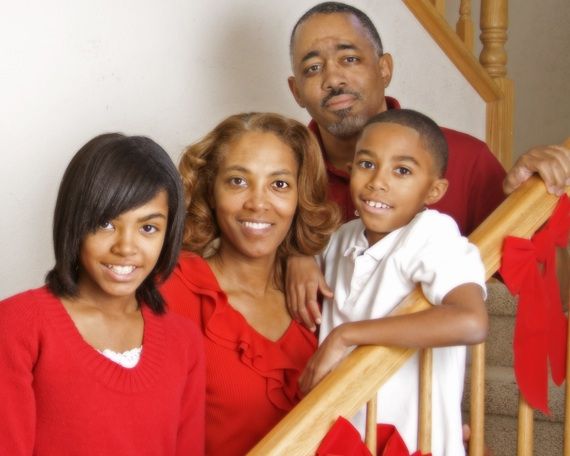
Everyone should not wear the exact same color of clothing, but colors should be complementary. In my experience, plaids and really dark colors don't always work well. And sometimes, as you notice in the photo below, details can be lost in bright red clothing when a flash is your main light source.
1. Lighting
If you can make the family portrait outdoors (early morning or late afternoon) you can get away with not using an external flash, or perhaps use it for fill light outdoors. If you"˜re shooting indoors, using an external flash on your camera is highly recommended. Shooting the flash through an umbrella will help with softening the light on the subjects. But don't let the lack of this equipment keep you from trying indoor portrait shoots. If you can arrange to make photos with your family positioned near a well-lit window (shooting at say 400-800 ISO) that might also get you effective shots.
2. Preparing for the Shoot
Your family is probably no different than most people when it comes to taking photos; they're generally not patient. They want to look great in the photo, but they may not have patience while you fumble around with the camera. So set up your equipment and do a few test shots before you assemble everyone.
By all means, shoot your portraits with your camera on a tripod. If you plan on being in the photo, you will need to use the self-timer on your camera or a remote device that triggers your camera's shutter.
The challenge with flash photography is that photos can come out too bright or too dark. Reviewing images on the back of your camera's LCD screen will not always give you an accurate picture of how well exposed your photo is. Images typically always look okay on the LCD screen. So my suggestion is use your camera's histogram and take several shots at different exposure and light settings.
Fixing Photos in Photoshop
Photoshop is great to make changes to portraits. Though I took several family photos during the session, the one we liked most, as you can see, was over exposed. The off-camera flash was too strong. In other shots the exposure settings were better, but the content of the photo was not to our liking. This is the nature and challenge of photography. So here are a few suggestions for fixing the problem.
I used a relatively wide angle lens and an off-camera flash positioned behind a white umbrella to soften the lighting. I would have preferred a dark background instead of the white wall with its numerous smudges, but that's the limitations I had to work within.
As we can see, the photo is over exposed, particularly on our faces. The distance between the camera and subjects made it difficult to crop the photo in-camera. Thus I intentionally shot wide so I could have room for cropping later.
I actually shot the photo in RAW mode, but I'm going to assume that many readers of this article shoot in traditional JPEG mode.
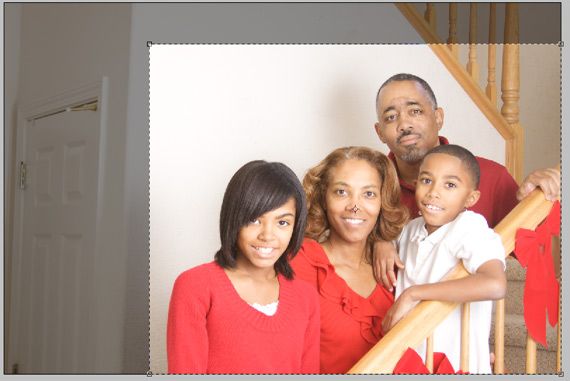
3. Crop the Photo
Opening a duplicate of the original photo in Photoshop, I first cropped for an 8 x 10 size. This of course also cropped out unwanted background areas. Making a specific size crop also makes it better for printing.
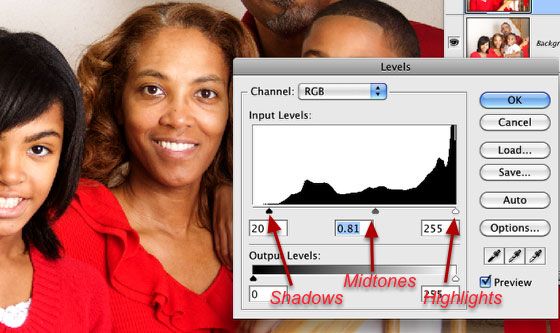
4. Fix the Exposure
There are many ways to address exposure problems in Photoshop. In this approach, I used the Levels Adjustment layer (Image>Adjustments>Layers.) There's a lot that can be done with this tool, but in general, the sliders control the shadow, midtones, and highlights of an image. You move these sliders to get the desired exposure. You want to be careful not to lose detail in the shadow or highlight areas of the image. Every image is different, so just move the sliders back and forth until you get your desired results.
5. Detailing Shadow and Highlight
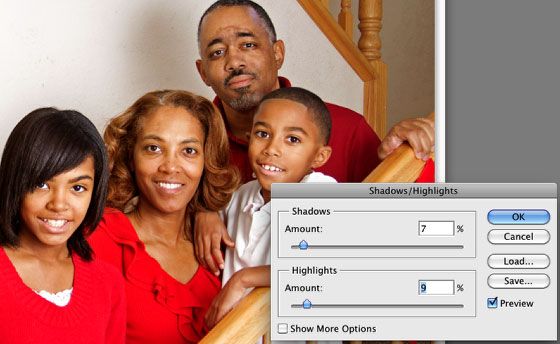
Another useful tool in Photoshop for dealing with over exposed (or underexposed) images is the Shadow and Highlight tool. A similar tool exist and works better in RAW image editors like Adobe Camera RAW or Adobe Lightroom. But it can often work with JPEG images in Photoshop.
Shadow and Highlight is found in the menu bar, Image>Adjustments>Shadow Highlight. Be sure to duplicate the Layers Adjustment layer because Shadow and Highlight is destructive. If you have never used the tool, when it opens the default settings of 50% will be set for lightening the shadows. But don't worry, you're in control.
Simply move the Shadow and Highlights sliders to make the adjustments you need. Each photo is different, but you can start by taking the sliders all the way to the left and then slowly pulling them to the right. As you can see, this tool helped bring back detail in the over exposed highlight areas. I made sure to maintain the detail of the shadow areas, especially with my daughter's hair. This and the Levels Adjustment tool also helps increase contrast in the image.
6. Retouching
This image didn't need sharpening. The major retouching I did involved smoothing out and softening our skin tones. Here's one popular approach:
- Duplicate the top layer of the image.
- Go to Filers menu and select Gaussian Blur and move the slider to 8-12 pixels, for a relatively strong blur.
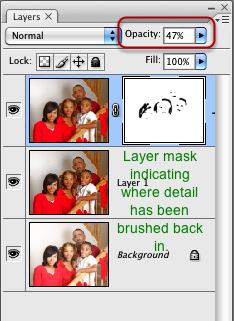
- Reduce the opacity of the filter by 50% or to the level of smoothness you desire.
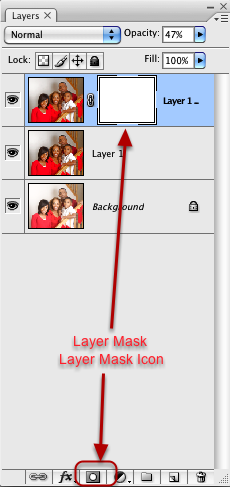
- Now add a layers mask to the layer, by clicking on Layer Mask icon at the bottom of the Layers panel. This puts a black mask over your blurred layer. Change the Foreground color in Tools to white.
- Select the Brush tool and decrease the size of the brush to say 52% and the Hardness kept at 0. (You can right or control-click on the image to make changes in the diameter and hardness of the brush.
- Use the brush to bring back (or paint) the detail in the eyes, eyebrows, and hair of the subject.
For a quick portrait session, I'm pretty pleased with the adjustments made to the photo. As with any photo shoot, I strongly suggest that you take as many shots possible so that you can have more photos to work with.
Are you the family photographer in your household? How often do get portraits made, and what challenges if any do you face? Share your own opinion in the comments section below!


