A desktop email client has several advantages over webmail. First of all, you don't rely on the availability of an online service. You can work on your emails without being connected to the Internet. You can set up several email accounts and there is no limit on how many gigabytes you can store for free. Thunderbird of course also comes with support for extensions, which makes it especially interesting.
The disadvantage is that you don't have access to your emails when you're on a different computer. So if your favorite email client is Thunderbird and this is precisely the issue you need to solve, hang on!
This article shows how you can sync Thunderbird emails across multiple computers and always have access to all of your emails no matter which computer you're using.
In principle, these instructions may also work for other desktop email clients. However, the single steps outlined here are specific to sync Thunderbird email.
1. Enable IMAP
If you're currently downloading your email using POP3, you could possibly switch to IMAP, which meanwhile is supported by most email providers.
What is the difference between IMAP and POP3? With POP3 the emails that reach your mailserver are eventually downloaded to your computer and deleted from the server. With IMAP a copy of the emails are kept on the server. Moreover, all folders, including ones you create, are re-created on the server and all computers that access this IMAP account. Hence, your emails, including trash and sent mails, are always in sync.
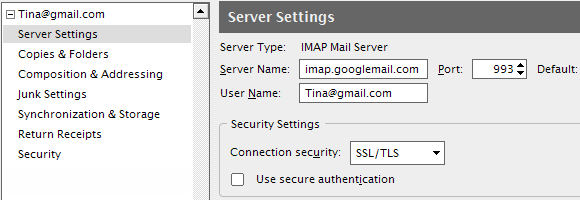
To enable IMAP, log into your email service provider account and look for the respective settings. Then go to Thunderbird and adjust the settings there.
If you're switching from POP3 to IMAP, you'll have to start over and re-create the account. Backup your email folders first! Then open > Tools > Account Settings... in Thunderbird, switch to the account and click > Account Actions > Remove Account to delete the account.
Now you can re-create it. Thunderbird 3 automatically detects the right IMAP settings for your provider when you create a new email account. Go to > File > New > Mail Account... or within > Account Settings... click on > Account Actions > Add Mail Account... and enter your details. If the settings are not detected, click > Edit or > Manual Setup... and enter the details provided by your provider.
Within your Thunderbird > Account Settings also have a look at the > Synchronization & Storage options.
2. Move Profile To A Mobile Drive
This option is easier to set up, but more difficult to maintain. Technically, you're not syncing Thunderbird emails across computers when you use this method. Instead you take your entire Thunderbird profile with you and access it on any computer you use.
Since an external source will have a different drive letter on different computers, we're not going to move the profile. We will just tell Thunderbird the path of the profile using the -profile "path" command line argument.
The command line argument looks like this:
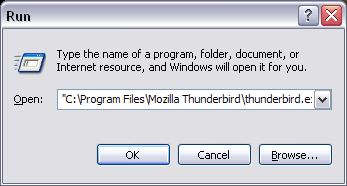
"C:\Program Files\Mozilla Thunderbird\thunderbird.exe" -profile "F:\My TB profile"
In Windows XP, you go to > Start > Run and type this command, replacing "F:\My TB profile" with the exact path to your profile.
To make this a little easier, you can create a shortcut on your removable drive using a small program called TBLaunch. You can download TBLaunch here. The INSTALL.txt file explains how to use the tool, which was designed many years ago to make a "portable hack" for Thunderbird 0.7 a little more comfortable. You can replace "tbpath" in the .ini file with the path to your program files folder like this: "C:\Program Files\Mozilla Thunderbird\"
And of course you always have to carry the mobile drive with you.
3. Move Profile To A Network Drive
This last method to sync Thunderbird email requires that you have access to a shared / network drive. This is the most convenient method in the long run. However, it involves moving your existing profile to that drive, which can be tricky.
First, close Thunderbird. Now move the profile folder to the desired location. In Windows XP you will find your Thunderbird profile under > "C:\Documents and Settings\[username]\Application Data\Thunderbird\Profiles\xxxxxxx.default"
If you do not see the "Application Data" folder, that's because it's hidden. Go to > Tools > Folder Options... > View tab and under > Hidden files and folders select > Show hidden files and folders.
Once the profile has arrived in its new location, go to > "C:\Documents and Settings\[username]\Application Data\Thunderbird\" and open the > profiles.ini file in a text editor.
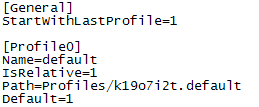
This file lists all profiles registered with your installed Thunderbird. Locate the one you just moved and change the > Path= line to the new location, for example > Path="E:\Thunderbird Profile/xxxxxxx.default"
Make sure to change > IsRelative=1 to > IsRelative=0 in case you switch from a relative to a non-relative path. Also, the direction of slashes in the path will change from "/" (relative) to "\" (non-relative).
You can also use this method to move your Thunderbird profile to another hard drive partition or an external hard drive.
Finally, if you realized that this is quite complicated, you should consider switching to Gmail, as it has most of the advantages listed for desktop email clients above.
The present article was written before this question came up on MakeUseOf Answers. Check out the comments to that question for more suggestions.


