Microsoft Word continues to matter.
It is being challenged left and right by competing office suites, but so far it has parried all the punches to stay on as the king of productivity apps. You might be happier today on a different productivity suite, but can you deny the superiority of Microsoft Word in many areas? For those of us who haven't jumped ship – every productivity trick on Word matters. Every second shaved adds to the comfort of using it for our daily needs.
Life can be made easier with the right tip and trick. Here are ten common (but essential) Microsoft Word routines to prove it.
Change The Theme
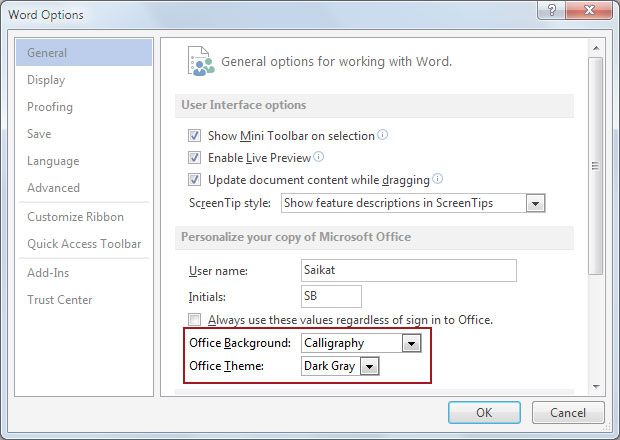
Let's start with a common complaint. Changing the appearance of Word 2013 is a subjective choice of course, but I have found that using a dark theme helps offset the "whiteness" of the software. And the relative flatness of the Ribbon. Word 2013 gives you two things to tweak and change the appearance to your liking. I find the Dark Theme better for focus.
1. Go to File > Options > General.
2. Change the Office Background and the Office Theme to reflect your preferences.
(You can also go to Account > Office Background | Office Themes.)
When you are working on a document for the whole day, adjust your monitor's brightness and contrast settings for lesser strain on the eyes.
Use Tab Selectors to Align Text
Setting indents and tab stops is one of the more essential routines for professional looking documents. I am often surprised at the lack of awareness about this simple yet powerful feature. Indents and tab stops have been a feature of typewriters, Word has made it just easier to implement.
I am stealing this excellent video from GCFLearnFree that shows you how to set indents and tab stops in a Word document.
Instead of pressing the Tab key multiple times, a single tab press will make it easier to align dates the next time you design your resume. Thanks to tab stops, it is easier to align the elements of a letterhead. Usually, the name and designation is left aligned and the address is aligned on the right.
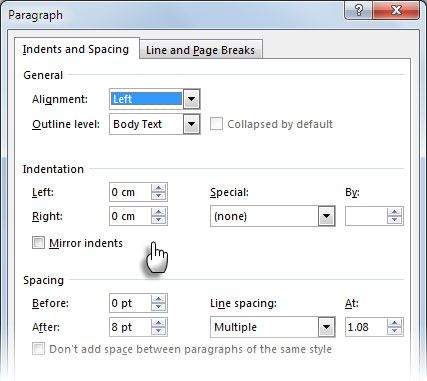
For more precise tab positions, use the Tab dialog box. Double click the ruler to display the Paragraph alignment dialog. Or, Ribbon > Page Layout > Paragraph.
Note: The bar tab stop isn't one in the technical sense because it does not help position text. It inserts a vertical line at the location of the tab – usually on the center of a page and extends the whole length of the text block.
Use Extend Mode to Select Without a Hiccup
Here's a common everyday problem when selecting large blocks of text. There's a large document and a huge text block needs to be selected. You do your usual selection stuff with a mouse scroll. But wait – the pages scroll by so fast making you miss the point where you needed to stop.
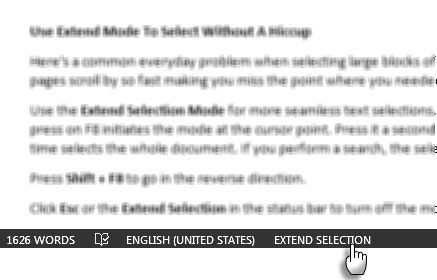
Use the Extend Selection Mode for more seamless text selections. Press F8 to invoke the Extend Mode. Now, you can select the first word and then use the arrow keys to "extend" your selection. The first press on F8 initiates the mode at the cursor point. Press it a second time, and the current word is selected. A third press selects the current sentence. A fourth press on F8 selects the current paragraph, and a fifth time selects the whole document. If you perform a search, the selection will extend to include the instance of the word.
Press Shift + F8 to go in the reverse direction.
Click Esc or the Extend Selection in the status bar to turn off the mode.
Count Your Words on the Go
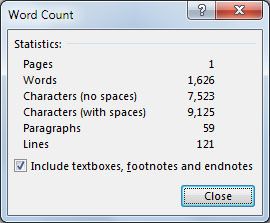
Pay attention to the word count. If you are writing a professional report, keeping score not only helps you plan your output, but also your productivity. Word shows you how many pages, words, characters, paragraphs, and lines are in your document. There are two ways to bring up the screen below:
1. Go to Ribbon > Review > Word Count.
2. Single click on the word count in status bar.
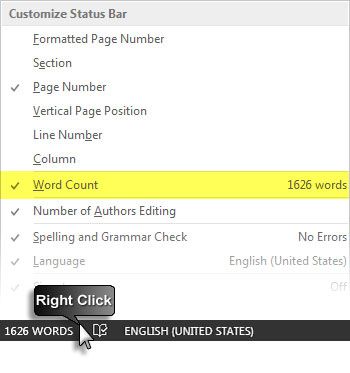
If you don't see the word count in the status bar, right-click the status bar, then and click Word Count.
You can also count the total number of words in selections which are not next to each other. Select the first section, and then hold down CTRL and select additional sections.
Use AutoCorrect for Text Substitution
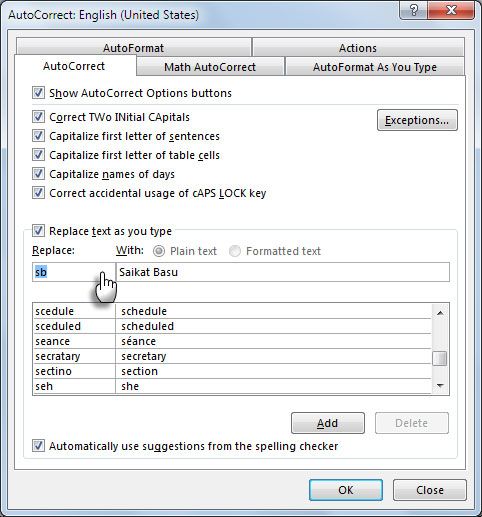
AutoCorrect is meant for the typos you make. But you can use the autocorrect table for your own custom text expander system within Word. A simple example: you can use your initials with your name. When you type the initials, Word automatically will replace it with the full name.
Use the shortcut key – ALT + T, then another press on A to bring up the autocorrect table on the go. Build up your own library of "shortcut keywords". I prefer to use keywords that I wouldn't normally mistype. For instance, typing "phN" substitutes my phone number.
Turn Off Smart Quotes and Be More Web Friendly
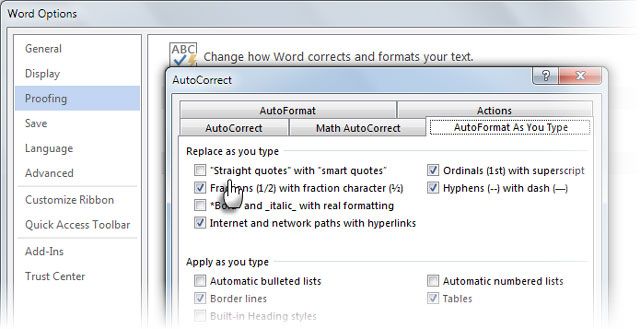
Microsoft Office uses a curly version of quotes called "Smart Quotes" which is a feature for physical printing. As you type in any Office program, straight quotes are replaced automatically by the smart quotes. It looks nice but smart quotes don't play well with HTML and web content publishing tools like WordPress. Turn them off if they bother you.
Go to File > Options > Proofing > AutoCorrect Options > AutoFormat As You Type > Replace as you type > Uncheck the "Straight quotes" with "smart quotes" check box.
Simple.
Pick Up Where You Left off with Resume Reading
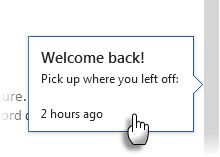
The Resume Reading feature in Word and PowerPoint 2013 remembers your last three positions where you made changes. When you open a document, a tiny bookmark icon helps you pick up and resume work from where you left off last time. It is displayed as a pop-up on the right.
Click it and go to the last editing location. The feature is synced across locations and devices if you sign in with a Microsoft account.
Use "Save All" to Close All Open Documents at Once
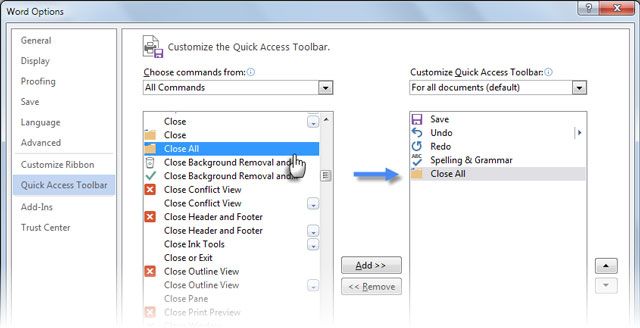
Microsoft has a few solutions for all multitaskers out there. You can open and work on multiple documents, but closing them one at a time could be a chore. The Save All and Close All commands are two of several "hidden" commands available in Office. Add them to the Quick Access Toolbar with these steps:
1. Use the dropdown arrow on the Quick Access Toolbar and go to More Commands.
2. On the Word Options dialog box, select All Commands from the Choose commands from drop-down list.
3. Scroll down the alphabetical list until you find the Close All command, select it, and click Add to include it on the right.
Similarly, scroll down and also add the Save All command to the Quick Access Toolbar commands list.
Always Create a Backup Copy Automatically
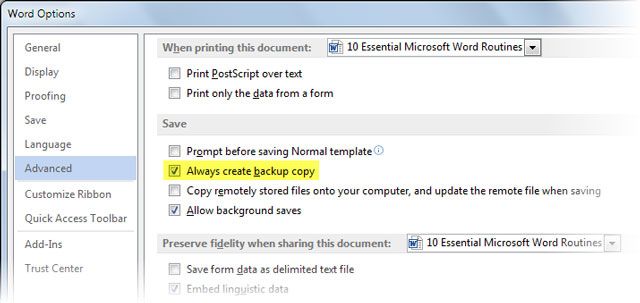
A glance at the comments we got in our article on how to recover Microsoft Word documents reveals the importance of preserving one's hard work. Unsaved articles are one problem you can solve. But why let things come to that state when you not only save your documents with a quick shortcut (CTRL + S) but also create backup copies automatically?
Train your muscle memory for the shortcut. Follow these steps to set up automatic backups:
1. Click File > Options > Advanced > Scroll down to the section called Save.
2. Select Always create backup copy. Click OK.
Now when you save a document after selecting this setting, Word keeps a backup of the original in the same directory you store the original. This is more helpful in collaborative teams for retrieving the previous version of a document.
You can use a macro to transfer the backup copy to another location and safeguard it further. Alternatively, the Save the current document in two locations add-in for Word 2007 to 2013 looks like a good bet. It is designed as a one-click solution for saving a true backup of your current document, to a second location of your choice.
Print It on One Page
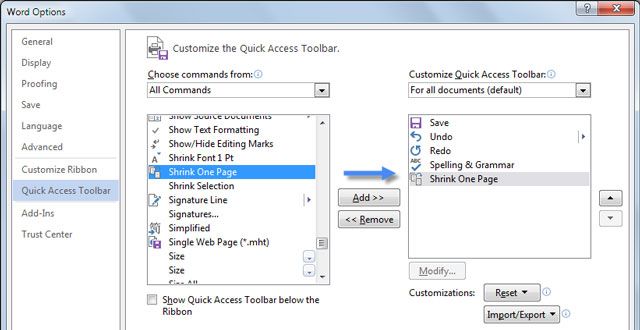
This handy printing tip isn't only for the environmental friendly among us. It is also for those irritating times when the last few lines of a document spill over to the next page. You don't want them to. Turn to the hidden feature which helps you shrink it down to one page. The Shrink to Fit command was available as a default in versions before Word 2010. In Word 2010 and 2013, you have to resurface it by customizing the Quick Access Toolbar.
1. Click the dropdown arrow on the Quick Access Toolbar area and choose More Commands.
2. In the Choose commands drop-down list, select All Commands.
3. Scroll through the list to the Shrink One Page command.
4. Click the Add button, and then click OK.
You should now see the command on the Quick Access Toolbar. Shrink One Page decreases the font size of the document to the point where it can fit on one less page than it would use.
Tell Us Your Routines to Make Life Easier
Imagine – I haven't even touched the little things which make using tables easier. Or the ones which make you work with image inserts. That's in a nutshell the story of our daily lives spent with Microsoft Word. It is the Samson of office productivity apps and we are nowhere close to dealing with it.
Let's get better. Tell us your everyday Word routines. Which are the features and shortcuts you use almost as a habit?


