Learn to use the ultimate writing software: Scrivener. Allowing you to combine the various elements that make up your writing project, from outlines to research to note, Scrivener helped author Nicole Dionisio write two novels in a single year.
This guide to Scrivener outlines how to use Scrivener to make your writing better, and is useful for writers of all stripes – which includes you.
Table of Contents
Introduction
In the past year I wrote two novels, and it wasn’t by chance. Two life-changing things happened to me in the last year:
- I graduated college.
- A friend recommended Scrivener to me.
This extra time and effective technology allowed my writing more room to breathe, and to become more organizational and effective.
A word processor is a computer application designated for the production of a text-based product. Microsoft Word, TextEdit, and Pages are some examples of word processors. Though these applications have a long array of features, which allow a writer to customize a document to their heart’s content, they lack features that help the writer who is working on a project that involves multiple documents.
Scrivener fills this hole; it is what the typewriter was to the 19th century: revolutionary.
Picture this…
It is 48 hours before your dissertation is due and, despite the chaos, you are trying to complete the final edits, because it’s the only choice you have.
There is one problem — and it isn’t the pile of unclean dishes housing sea-green mold and chatty-vermin that has become your sink — it is your computer and it is time. You should be going faster then this, you put your blood-shot pounding head in your hands and groan, “Why am I going so slow? This computer is brand new… what is the problem?”
It isn’t your computer’s specs. It is your writing process. It is because you have not yet started using Scrivener.
It is opening up a new webpage or PDF every 15 minutes to fact-check research. It is switching back and forth between this research, your outline, your bibliography, and your draft. It is waiting for your files to load, bouncing between them, and getting lost in the quantity of windows on your computer screen or document.
Scrivener has two key features: it loads all documents at once and it has many visual organizational tools. Scrivener has optimum productivity, thus it gives writers more time to actually write and accomplish their goals.
Though I have used Scrivener for fiction writing (and this guide to Scrivener is written from that perspective) this application can be used for many other projects
I.E.:
- Marketing and Business Plans
- Non-fiction Essays and Books
- Undergraduate/Graduate Thesis and Academic Reports
- Organizing and Editing an Anthology
- Collection of Articles, Speeches, or Blog Posts
|
Writing Tip |
These killer prompts will help those with writer’s block. |
1. Planning Your Manuscript
1.1 Importing documents into Scrivener
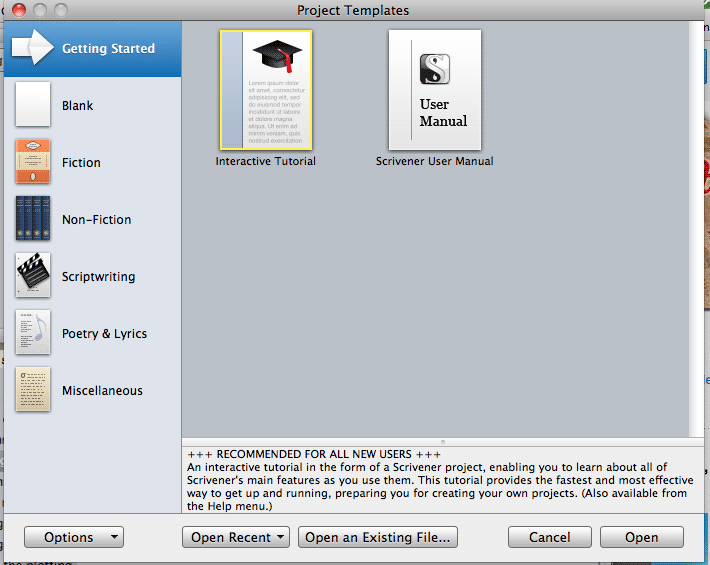
The Getting Started/Project Templates window.
When opening Scrivener for the first time, the ‘Getting Started’ screen will greet you. To start a project, select a designated pre-made template or the ‘Blank’ template. Then let’s get started, together.
Note: Some sections of this guide to Scrivener will discuss features that are only available in the ‘Fiction-Novel’ or the ‘Fiction-Short Story’ templates.
|
Writing Tip |
Though I want to revolutionize your lives RIGHT NOW by telling you to buy Scrivener, I do have to admit that there are special NaNoWriMo deals only available during November. |
1.2 Navigating the Scrivener Interface
What’s Going on Here?
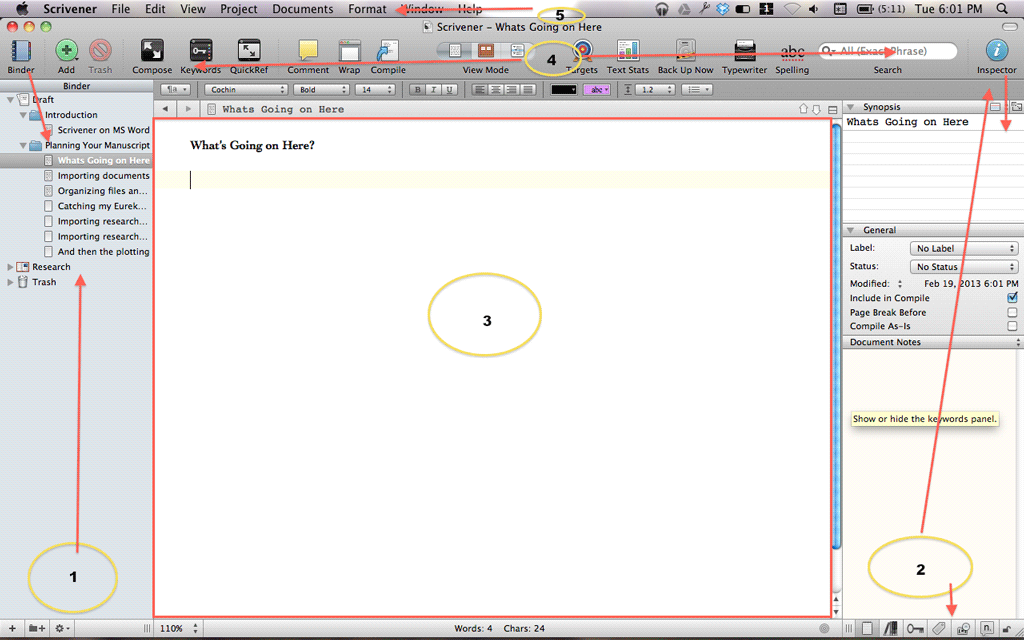
Let’s take a look at the main interface together, before jumping into features.
An example of a Scrivener document.
- Binder: This tool contains all the files in your Project in one location: the left bar.
- Inspector: The right bar in the screen contains a file’s adjustable properties. (They will individually be explored throughout this guide to Scrivener.)
- The Editor: The digital white paper that you write in is the editor.
- The Toolbar: Above the editor is a series of icons called the toolbar. These icons are shortcuts to different tools in the application.
- The Menu Bar: Anything you can possibly do with this program is accessible by going through the menu bar. It isn’t usually the fastest way to do something; it is like the sitemap of Scrivener.
1.3 Importing Documents into Scrivener
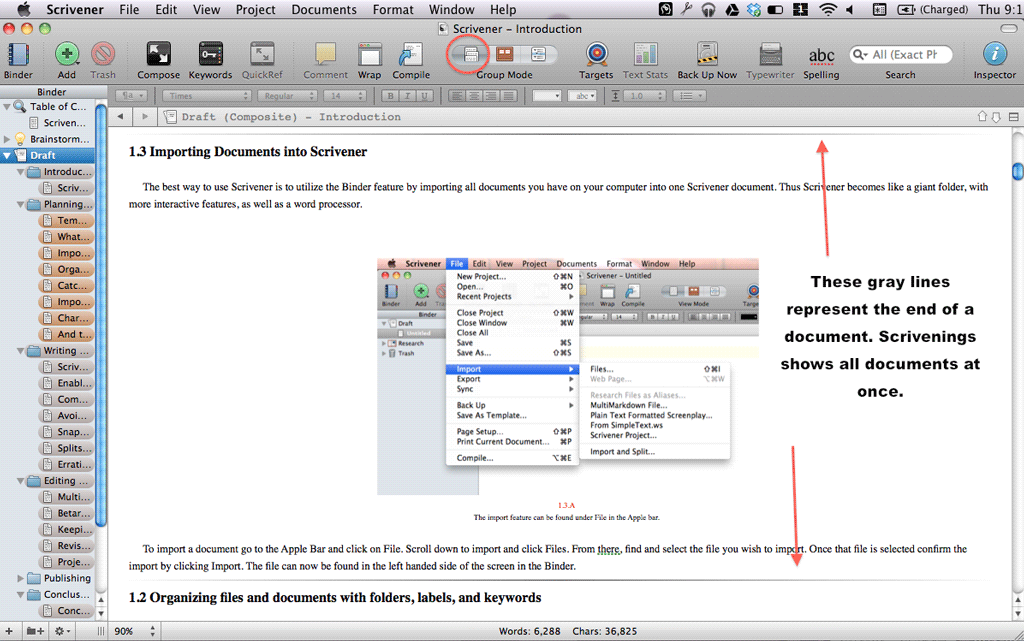
The best way to use Scrivener is to utilize the Binder feature by importing all files pertaining to a single project into one Scrivener document. Thus Scrivener becomes like a giant folder as well as a word processor.
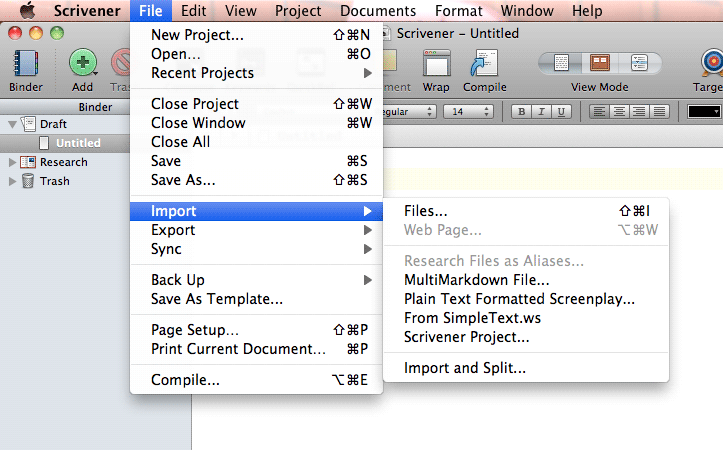
The import feature can be found under File in the Apple bar.
To import a document go to the menu bar and click on ‘File’. Scroll down to import and click ‘File’s. From there, find and select the file you wish to import. Confirm the import by clicking ‘Import’. The file can now be found on the left side of the screen in the Binder.
1.4 Catching my Eureka Moment
1.4.1 Catching my Eureka Moment: Impulsive Note Taking
To keep thoughts fresh, write them down. If ideas are scattered in many places, or worst, not written down at all, there is a high risk that they’ll be forgotten.
Scrivener’s built-in notepad is perfect for impulsive note taking. You’ll act on these ideas later.
1.4.1.1 Project Notepad
Each Scrivener project has an individual notepad called the Project Notepad. This notepad is easy to access and can have many different sub-notepads inside it, allowing it to be a great place to organize ideas.
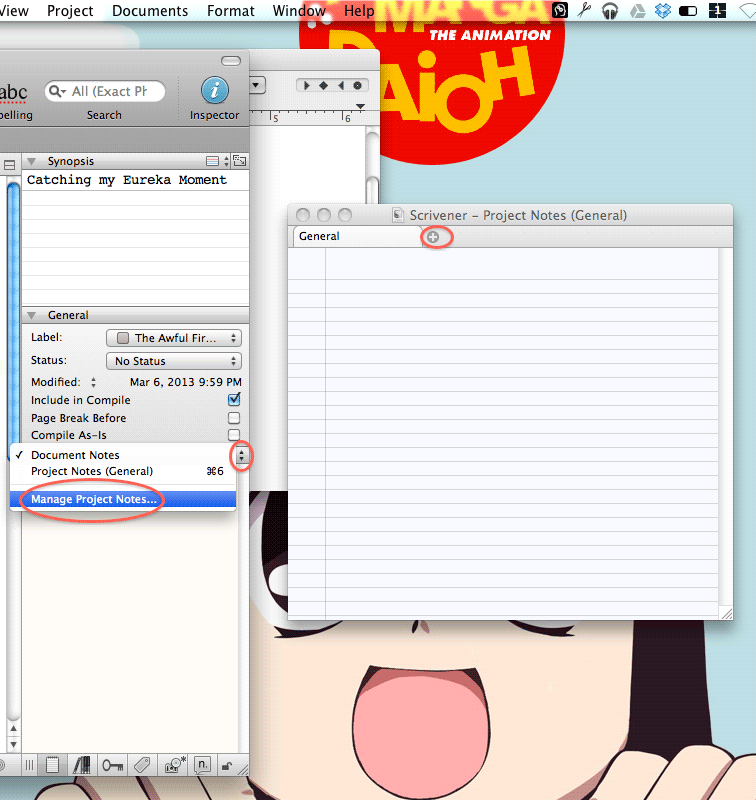
To use the project notepad go to the Inspector (if the Inspector is not shown, open it by clicking the blue icon on the toolbar with the text ‘Inspector’ underneath). Make sure the Notes tab is open in the Inspector. The bottom of the Inspector contains seven icons (notepad, books, key, tag, camera, speech-bubble, lock). Click the first icon (the notepad), and when selected it’ll be highlighted in gray. Once in the notepad, click on the arrows next to ‘Document Notes’. Then click into ‘Manage Project Notes.’ This will open a notepad about the project.
To add sections to the notepad, click the arrow. Type your wild brainstorms on the lined paper.
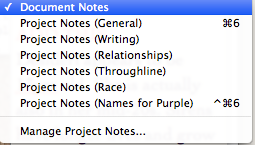
This is what many sections look like in your Project Notepad.
If you click back on those double arrows you can allow a section of your project notebook to display in the Inspector.
1.4.1.2 Scratch Pad
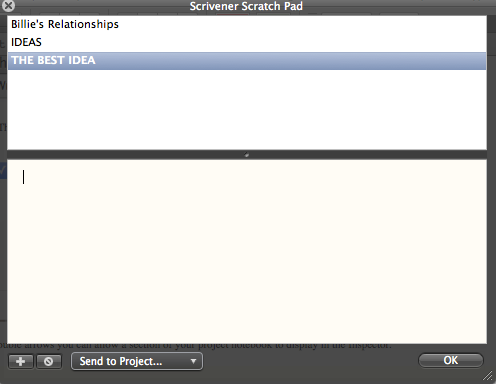
Scrivener Scratch Pad: One notepad shared between all projects.
Creativity works in strange ways; it wouldn’t be surprising if new projects start springing at you as you become immersed with the project at hand. Scrivener knows how creative minds work and comes with a scratch pad that is shared between all projects. So go ahead, get inspired.
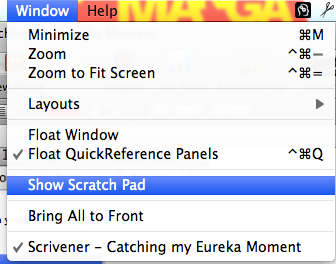
To access the Scrivener Scratch Pad go up to the Apple Bar and click Window—> Show Sketch Pad. This one scratch pad, and all its notes, is available when any project is opened.
On Windows it is Tools à Scratch Pad.
1.4.2 Catching my Eureka Moment: Brainstorming with the Corkboard
Something that really stuck with me in Patti Smith’s memoir Just Kids was the way that room-mates Patti Smith and Robert Manthenthrope turned their apartment into a live-in art installation, which revolved around their inspiration of the season. At one point the apartment was covered with a combination of photos of freaks, fishing nets, and seashells, resembling a now-vintage Coney Island.
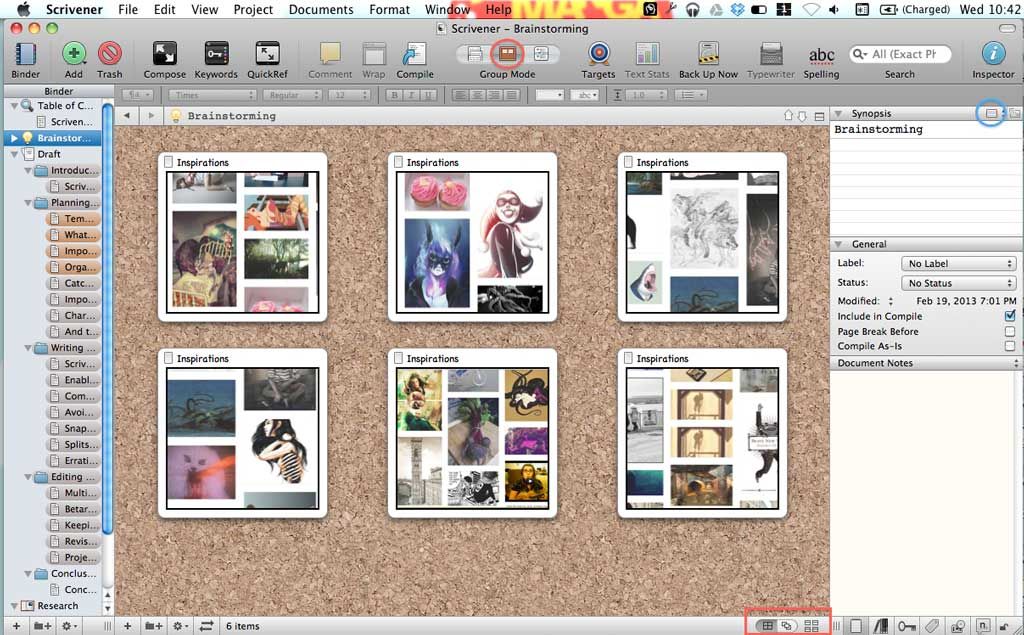
Scrivener’s visual tools can replicate this poignant concept of an artist surrounding themselves with their inspiration. I use the Corkboard feature to create a collection of inspirations, brainstorms, and a breathing mind-map.
An example of a brainstorm folder.
- Create a folder called ‘Brainstorming’.
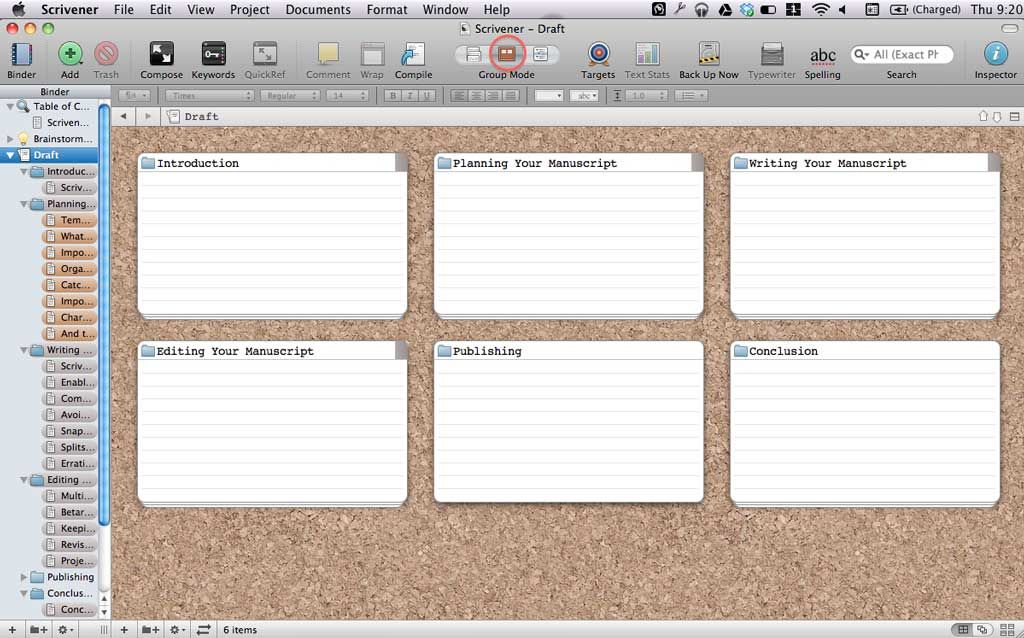
- Open up the folder and switch the ‘View Mode’ to see the Corkboard. Do this by going to the topcenter of the screen where the words ‘View Mode’ are. You will see three icons; click the brown one in the middle. This will enable the corkboard view mode.
- Stuff this folder with inspirations. Create and Import documents, photographs, articles, original writings, quotes, etc.
- The Corkboard’s default layout is very rigid. To customize this, click on the set of four spaced out squares on the lower-right side of the page. This will allow the size of cards, the quantity of rows and columns, and the spacing between cards to be customized.
- To create a more fluid display, click the middle icon. This will allow the index cards to be dragged around the screen.
- I use this fluid layout to create mind maps by grabbing one card/idea and clumping it with another. This creates a connection between ideas that can help new ideas form and can be a way to start doing some serious plotting. This technique will allow the story to present itself to the writer.
- To enhance the visual component create a synopsis or a graphic for the index cards. To fill out the synopsis click on an index card. Then go to the ‘Notes’ tab of the Inspector. The first tool in the Inspector is now a squat index card called ‘Synopsis’. Click into it and type up a description. To use a photo instead, click on the mini-index card and select the orange icon. Then grab a photo and drag it to where it says, ‘Drag in an image file.’
|
Writing Tip |
Brainstorm loudly and freely and forget about rules. |
1.5 Organizing files and documents
1.5.1 Folders:
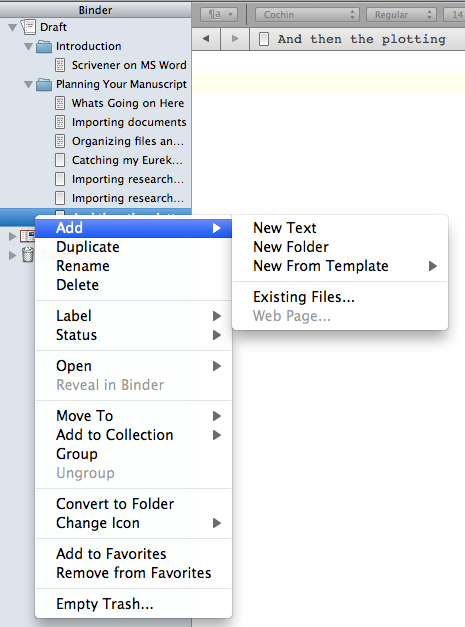
To create a folder, move the mouse to the binder and then right-click. (If you do not see the Binder, then click the blue book on the upper left hand side to enable.) Click on Add and then click New Folder.
Creating a new folder.
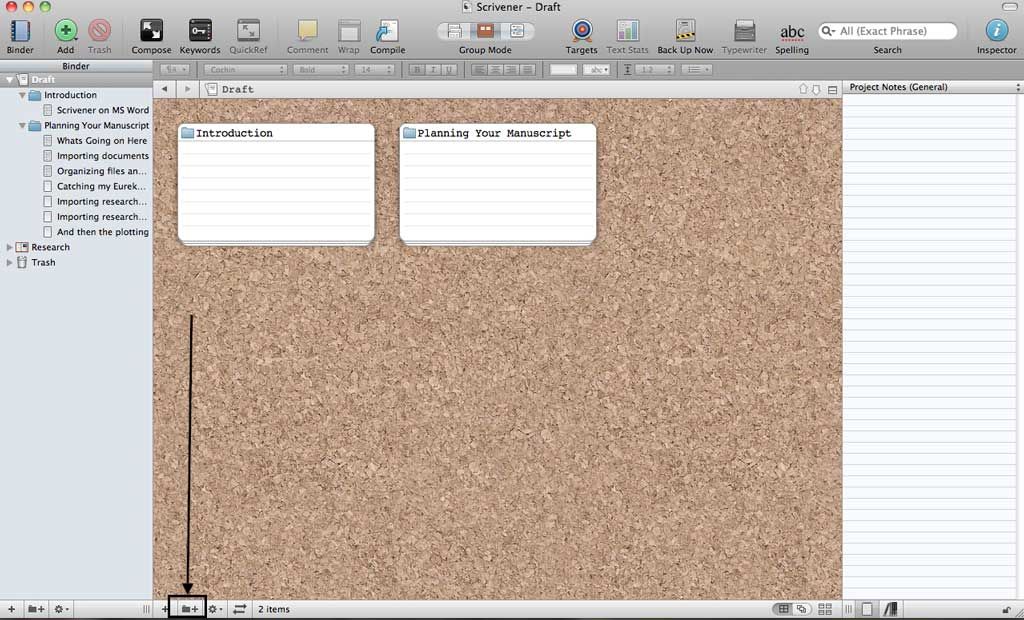
Another way to create a folder is to open up a folder. Then scroll to the bottom of the screen and click the black rectangular shape on the bottom toolbar. This will create a new folder.
Creating a folder inside of a folder.
All files and folders in the binder can be re-ordered or placed inside each other by clicking and dragging.
1.5.2 Files in Files:
Other word processors, like Microsoft Word or Pages, lack the foresight of Scrivener because they don’t have organizational tools (like the Binder) for multiple-file projects. Scrivener’s innovative logic is that anything can be a folder and thus a home to many files— I.E.: files inside a project can hold files, which can hold files, etc.
For example, my character sketches are biographical portraits of a character but are also a folder. And inside this folder is other information about the character.
To allow a file to have this folder complexity, drag one document on top of another.
Then in the binder, click the triangle next to the file, to see all the files that are inside of it.
An example of how to use a documents file-storing capabilities.
1.5.3 Labels:
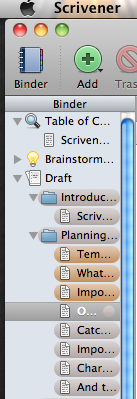
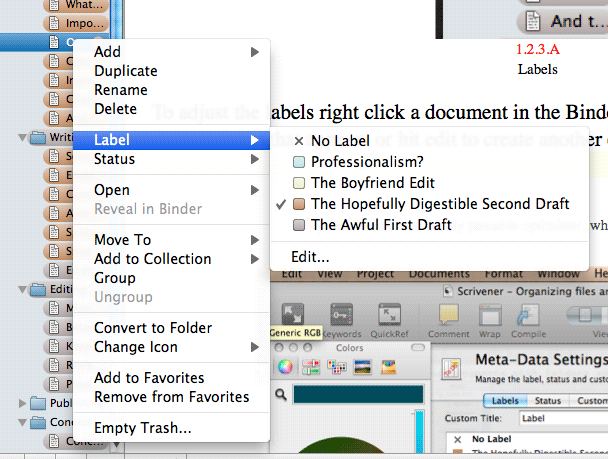
Another way to organize files is to create labels. I use labels because they create a highlight in the binder, as illustrated below.
To adjust the labels, right-click a document in the Binder and highlight the Label option. Select a label or hit edit to create another option.
My label names are barely passable optimistic, which is as optimistic as I get.
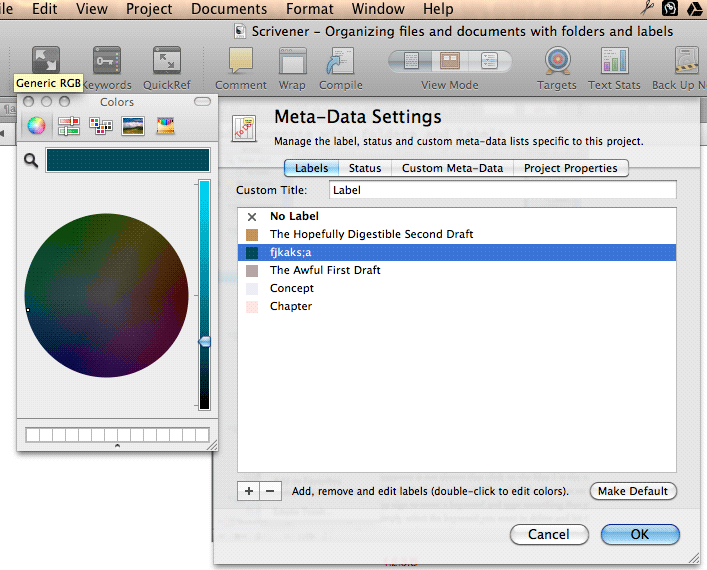
Creating your own label.
After hitting edit, the Meta-Data Settings will open up with more information about labels. To create a new label hit the plus side on the bottom of the pop-up. Then type in the name of your new label. To adjust the color, double-click on the colored box and choose a color you prefer. Confirm your label choices by clicking okay.
Though the suggested labels describe different kinds of writing (scene, concept, chapter), I use it to describe different statuses of the writing (first draft, second draft). There is a ‘Status’ tool created for this information, but because it does not create a highlight for the document I do not use it.
1.5.4 Keywords:
Each file can be given keywords, which is similar to giving a blog post tags. I use keywords in my fiction manuscripts in the following ways:
- Character names as a way to keep track of each character’s plot.
- Relationship scenes as a way to see the involvement of each friendship, enemy, or romantic storyline.
- Themes that are demonstrated in a scene to ensure they are consistent through my story.
- Imagery that I notice (i.e.: ‘scene w/ bugs’, ‘scene w/ eggs’, ‘scene w/ monsters’). At the end of my first draft, I go through these keywords and see what motifs I made.
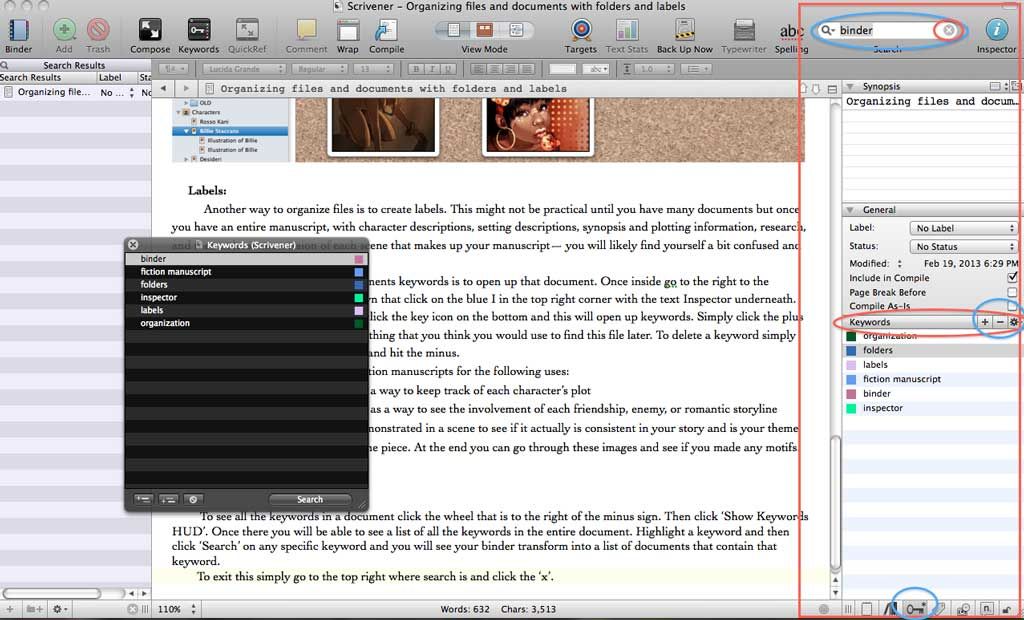
To give a document keywords first open up that document. Once inside, scroll to the Inspector and click the key icon on the bottom-right. This will open up keywords. Click the plus sign to enter a keyword. To delete a keyword select the keyword you want to delete and hit the minus.
To see all the keywords in a document click the screw that is to the right of the minus sign. Then click ‘Show Keywords HUD’. This opens up a list of all the keywords in the entire document. By highlighting a keyword and then clicking ‘Search’ you will see your binder transform into a list of documents that contain that keyword.
To exit this click the ‘X’ in the top right, where the search is.
Keywords.
1.6 Importing research into Scrivener
1.6.1.1 Import Web Page
I store online webpages that I collect for research inside my Scrivener document. To import research…
- Click the Research folder, located in the Binder.
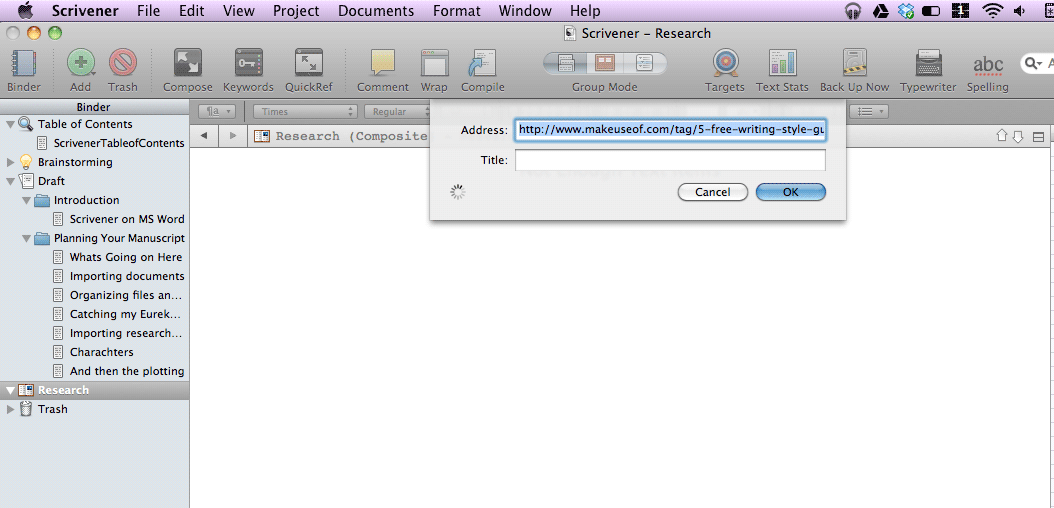
- Once the Research folder is selected, go up to the Apple Bar and click File —> Import —> Import Web Page.
- Paste the designated webpage’s URL in the appropriate field.
- This isn’t an instant process and can take a few minutes; as Scrivener imports the webpage check your procrastination-of-choice.
These webpages are downloaded into your project; once downloaded they no longer need the Internet to be viewed.
1.6.1.2 But I Want To Edit It!
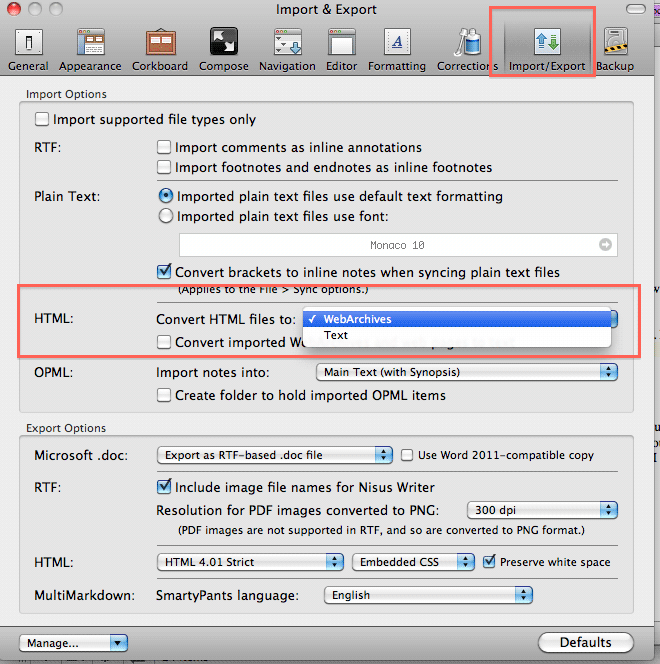
The default setting is to import webpages as a Web archive— this disables writing tools, making Scrivener nothing more then an Offline Browser. This is frustrating if you want to cut some of the document, highlight, add comments or text, etc.
To adjust this, go to Preferences by clicking ‘Scrivener’ in the Apple bar and selecting ‘Preferences’. Then click the Import/Export icon and glance down to the HTML component. Simply click the ‘WebArchives’ box and reselect the Text option.
To edit imported web pages, they must be converted to Text.
1.6.2 Clippings (Mac Only)
To import a selection of a webpage, instead of the entirety, enable the Clipping feature. Note: Listen carefully, because this is an advanced tool.
1.6.2.1 Enable Clippings
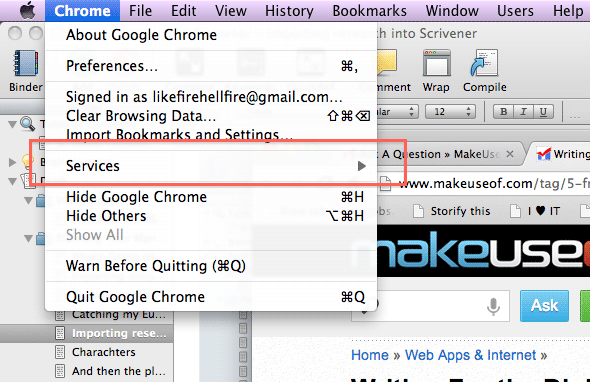
First, open up any Web browser application on your computer (I.E.: Safari). Click on the browser name, located in the Apple Bar, and click Services.
Open up Chrome. While in Chrome click Chrome—> Services.
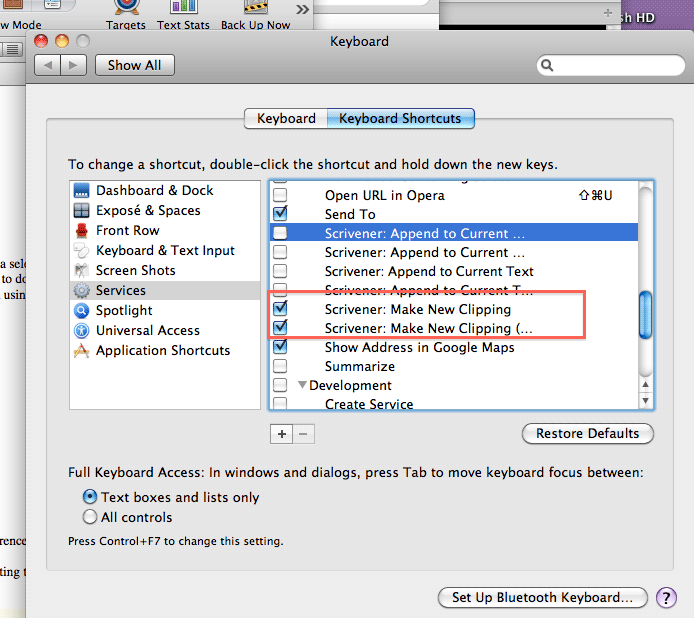
The bottom option to show up in the Services window will be Services Preferences . . . , click on this. This will open the System Preferences application to the exact window that deals with cross-application services. Scroll down the right-hand column box of potential-services, until Scrivener is found, under the Text section. Enable ‘Scrivener: Make New Clipping’ by clicking on the gray box to the left.
Clippings are now enabled.
Enable Services by clicking on the gray checkboxes.
Bonus Tip:
To create a keyboard shortcut, double-click the empty white space that’s next to ‘Scrivener: Make New Clipping’. A text box will open up. From there, hold down at least two keys to create a shortcut.
1.6.2.2 Using Clippings
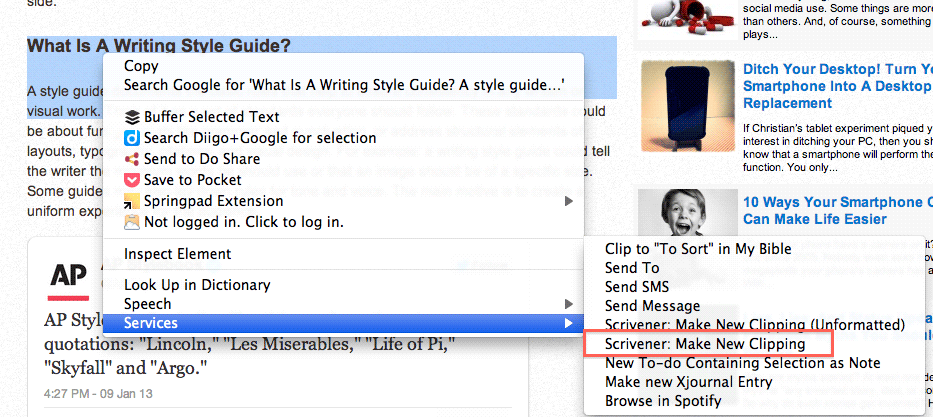
Right click —> Services —> Scrivener: Make New Clipping
- Open up a webpage in any Web browser.
- Make a selection.
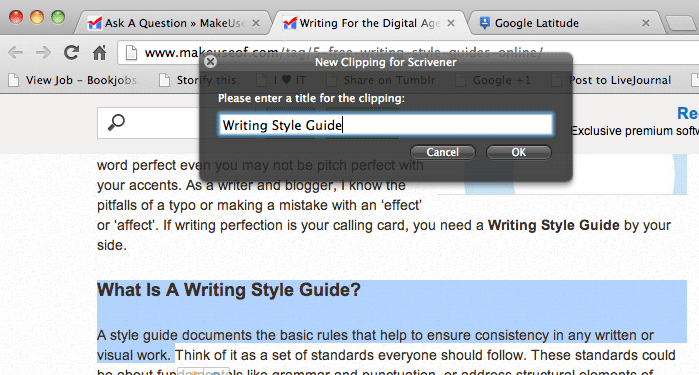
- Right-click, hover over services, and click Scrivener —> Make New Clipping. (If you created a keyboard shortcut for this service you can hold that down instead.)
- Insert the name of your Clipping and hit OK.
The New Clipping confirmation window will pop up inside the Browser.
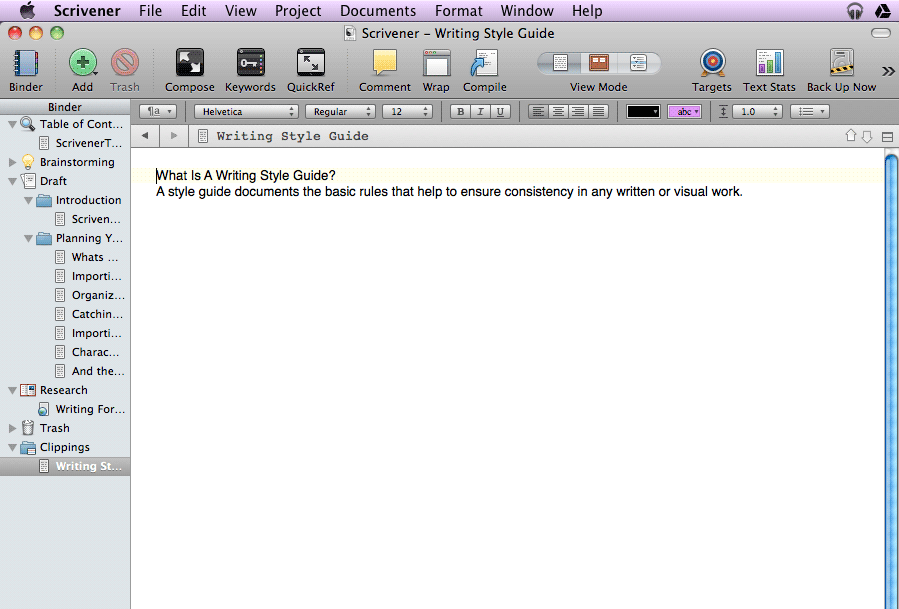
- This instantly created a new folder called ‘Clippings’ where all Clippings will be stored.
Clippings are not WebArchives, thus they can be edited.
1.7 Characters
Note: Here I will be discussing a feature that is only available in the Fiction template.
1.7.1 Creating and Using Character/Setting Sketches
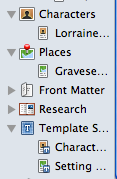
Located in the Binder is a folder called Characters where you can create Character Sketch.
To create a Character Sketch, find the folder titled ‘Characters’, which is in the Binder.
What is a Character Sketch?
A character sketch is a fill-in-the-blank document authors use to create and learn more about the characters in their fiction. Character sketches contain questions for the authors to answer about the character’s physical appearance, origin, quest, and weaknesses.
How do I customize a Character Sketch?
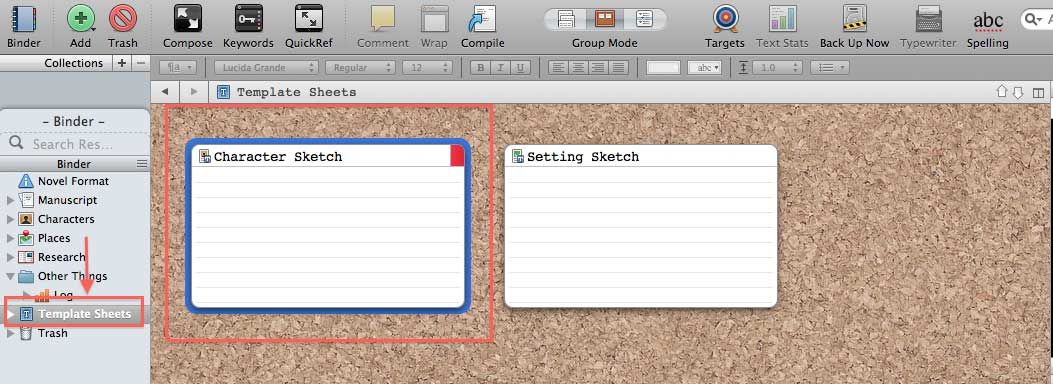
Open up the document called Character Sketch, located in the folder Template Sheets, to edit the preset.
- Access a different folder located in the binder called Template Sketches. Here are the presets for Character Sketch and Setting Sketch documents.
- Once inside Template Sketches open the ‘Character Sketch’ document.
- Customize this document. All future character sketches in this project will then imitate this document’s text, font, and layout. This will not alter already created character sketches.
- Here is my suggestion for general fiction:
Character Name
Role in Story:
Desire:
Occupation:
Age:
Physical Description:
Personality:
Zodiac:
Background:
Internal Conflicts:
External Conflicts:
Strengths:
Weaknesses:
Epiphany:
Notes:
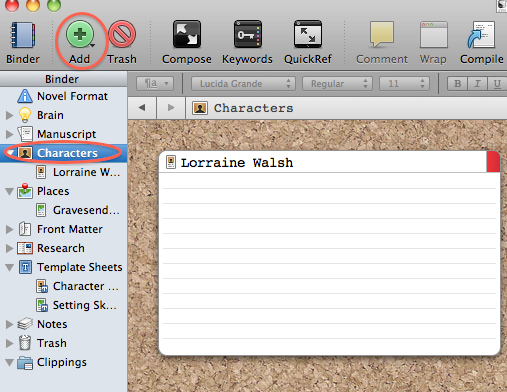
Click ‘Add’ while inside the Character folder to create a Character sketch.
How do I create a Character sketch?
As illustrated above, click the green Add icon in the Tool Bar, while in the character folder.
1.7.2 Name Generator
For some writers, the most daunting task in character creation is coming up with the perfect name; I know this because I’m one of those writers. That’s why I praise the Scrivener Lords for the ‘Name Generator’ tool. I was once like some sort of pregnant lunatic, spending hours on baby name websites looking for the perfect fit. Now, I don’t have to go on the Internet to start brainstorming character names, which has been great because I always end up getting distracted when I go on the Internet.
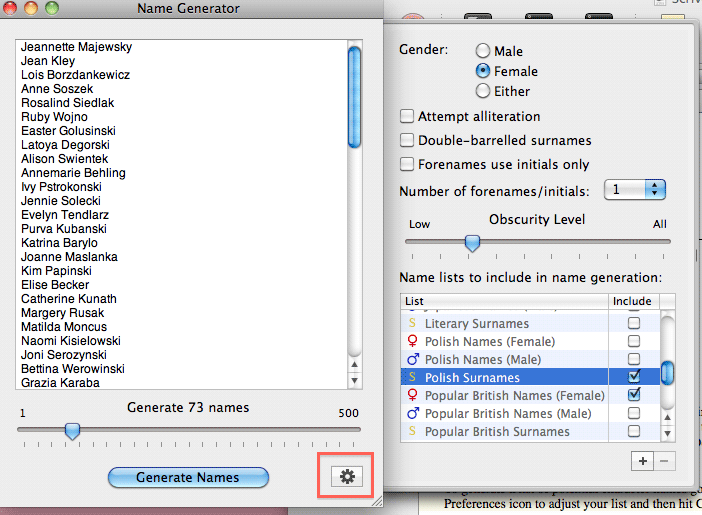
To use the ‘Name Generator’ go up to the Apple Bar and select Edit—> Writing Tools—> Name Generator. Hit ‘Generate Names’ for a list. To customize this list hit the screw icon that is highlighted below.
Name Generator
|
Writing Tip |
Before I start writing my story I create a document of names. This document contains a list of: character names, bar names, city names, magical spell names — whatever is related to the piece I am working on. When I need a name I can grab it from this list without a) being derailed with finding a name and b) not have the flat INSERT_NAME_LATER captions all over my story, which really does nothing for its development |
1.8.1 And then the plotting
I planned my first novel on Scrivener, and I remember at this point in the processe my Project Document was already stuffed with brainstorming. I felt lost, like I was falling into a directionless universe. But then I started my first plot outline, and with a map in hand, I was able to find my story.
The technical advice is to create a separate folder for documents pertaining to the plot outline. Otherwise, get plotting. My friend and writing partner suggested the plotting device called the Snowflake Method, which is what I recommend. I use this plotting device because the steps teach the writer how to outline with a sense of purpose.
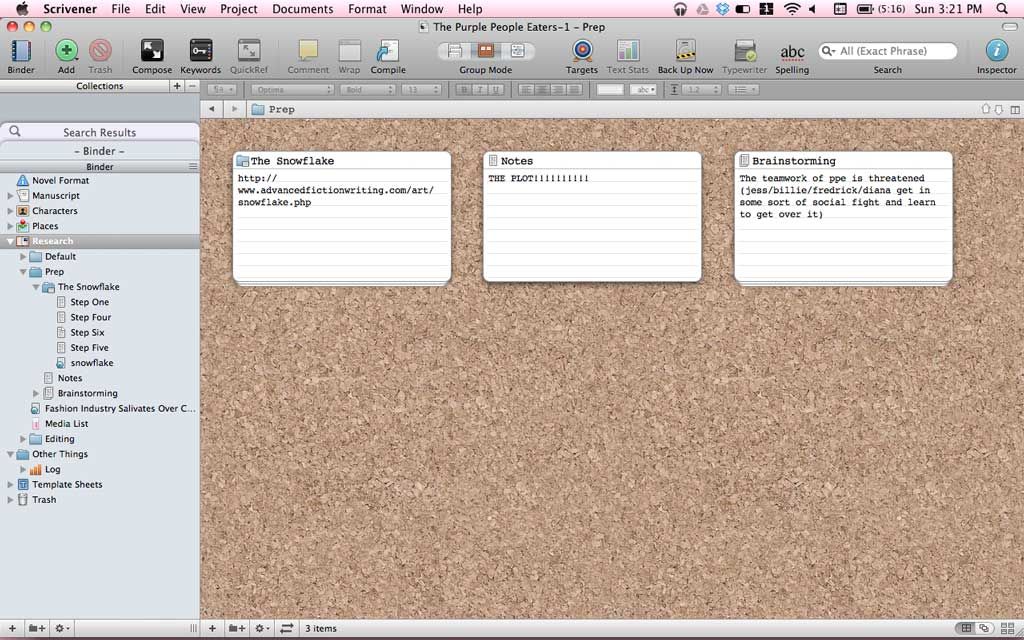
My first novel’s preparation folder.
I create a new folder for Plotting. That contains different stages in my plot outlining. A sub-folder is created for the Snowflake.
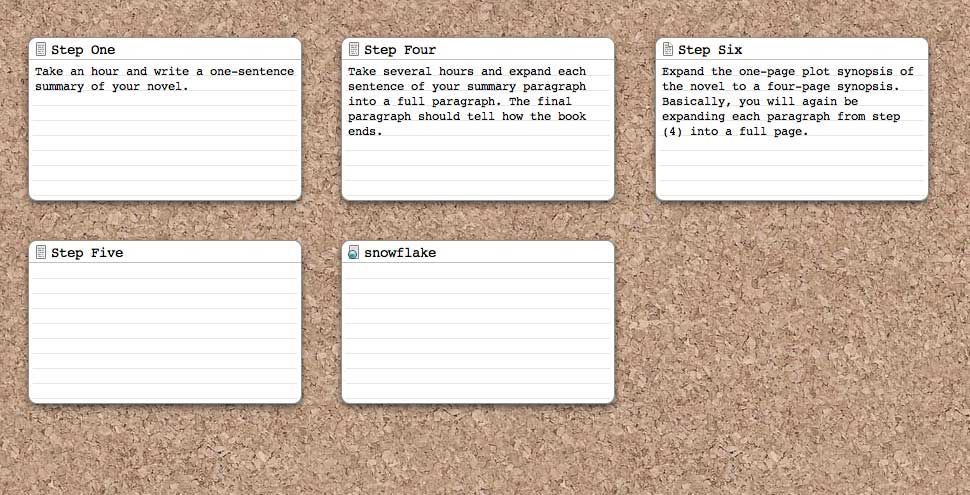
My first novel’s Snowflake folder.
- My Snowflake folder contains individual files for each step of the Snowflake.
- I fill out the synopsis of each of these files with a description of the step.
- import a Web clipping of the Snowflake.
2. Writing Your Manuscript
We’ve got our outline. We’ve done our research. It’s time to actually write.
2.1.1 View Mode
There are three different view modes — that is, ways to display the project — and each has a different organizational lens.
Select one of these three icons to change the view mode
2.1.2 Scrivenings/Corkboard/Outline
- Scrivenings: Creates one long document out of all the contents inside a folder.
- Corkboard: Creates index cards out of each document in a folder.
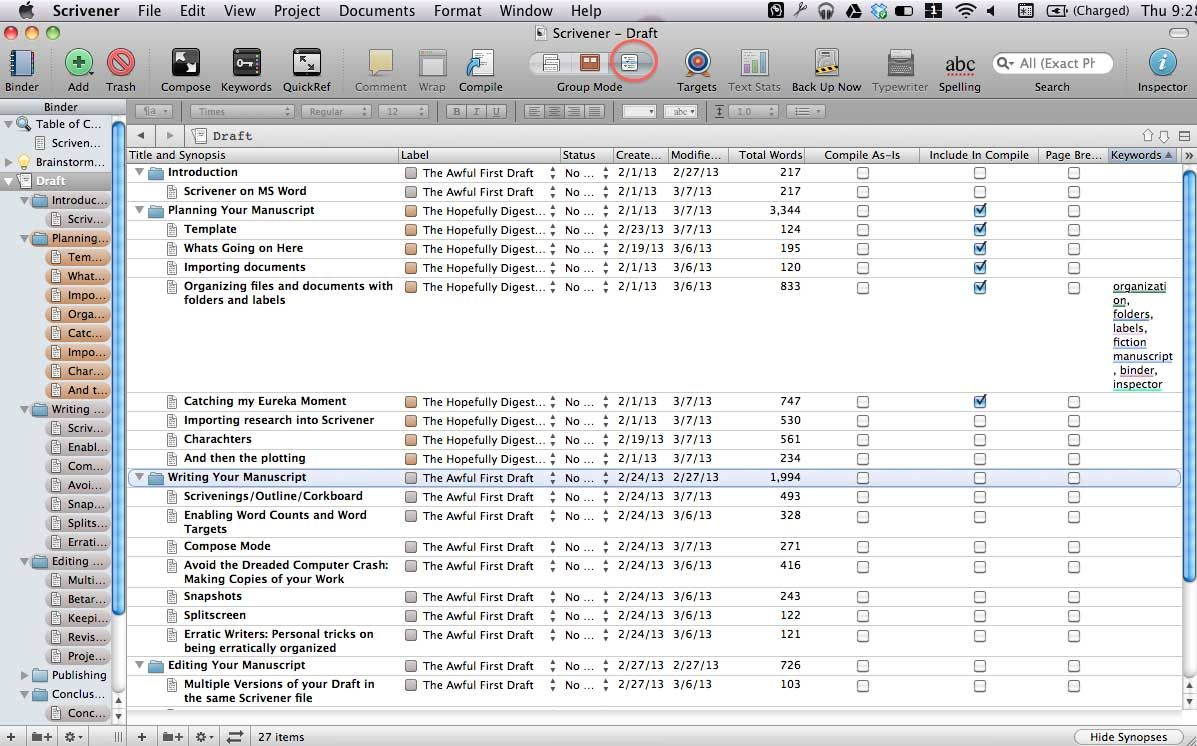
- Outline: Creates an outline of a folder that displays the meta-info of the documents.
2.1.3 More About Outline
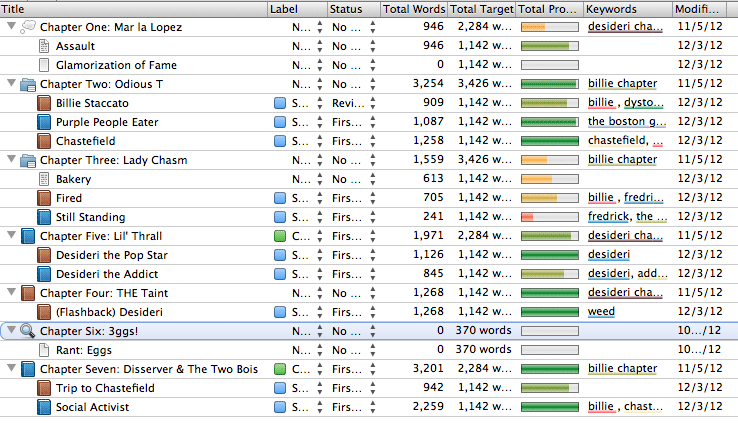
The Essential Outline Columns
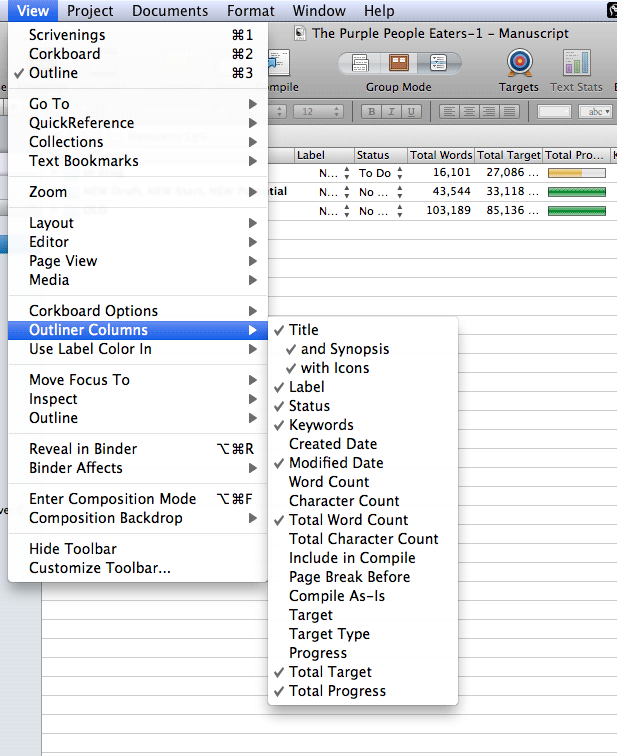
To customize what meta-data properties show up in Outline, go to the menu bar and click View—> Outline Columns. Then individually check features to be displayed.
The Essential Outline Columns:
- Total Target: The word count target for the document. Or the total word count for a folder holding multiple documents.
- Total Word Count: The actual number of words in the document.
- Total Progress: A bar that visually shows how close you are to hitting the word count.
- Modified Date: A date that shows you the last time the document was edited.
- Keywords: A list of keywords, colored, that shows which documents contain which keywords.
- Status: Shows whether a document is on its First Draft or Second Draft or 55th draft.
- Label: Shows the kind of document a file is. e.g.: scenes/chapters.
- Title and Synopsis with Icons: The documents label, the icon you chose with it, and the synopsis you wrote up for the document. This is essential unless you like getting lost and being unproductive.
Here is how it looks without synopsis enabled, for my own safety.
|
Writing Tip |
Create a different document for each scene.Create a new folder for each chapter to contain those scenes.Create a text-based synopsis for each scene and chapter. |
2.2 Enabling Word Counts and Word Targets
Scrivener keeps track of word counts visually with the Outline and with notifications by working with Growl (if you use a Mac). This can help you set goals for yourself, and encourage you to actually reach them.
2.2.1 Daily Word Counts
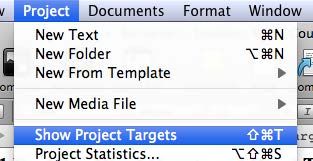
Project—> Show Project Targets
- Access the Project targets by going to ‘Project’ in the menu bar and then clicking ‘Show Project Targets’.
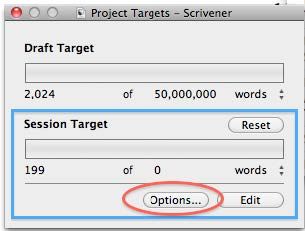
Session Target
- The number below Session Target is customizable. Click on the zero, which is the default, and then insert the number of words you want to hit in a day.
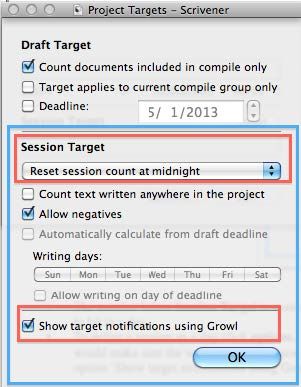
- To define a session as a day click ‘Options’. Change the setting to ‘Reset session count at midnight’. To enable Growl notifications, click the checkbox next to the option ‘Show target notifications using Growl’.
- Click OK and then click apply.
Session Target Preferences
2.2.2 Document Word Counts
- Document word counts must be individually enabled.
- Open up a scene.
- Once the scene is open, click on the swirl-target icon on the status bar that’s highlighted below.
- Insert the word count goal for that document. Check the box saying, ‘Show target notifications using Growl’.
Highlighted is the icon that enables document word counts.
2.2.3 Project Word Count
- To create a word count target for your entire project go back to Show Project Targets. (Project—>Show Project Targets)
- Click on the default project target, 50k, and insert the goal.
Another feature located here is project deadlines.
- Open up options and click on the checkbox next to Deadline.
- Insert the deadline, click OK, and then click apply.
2.3 Compose Mode
|
Writing Tip |
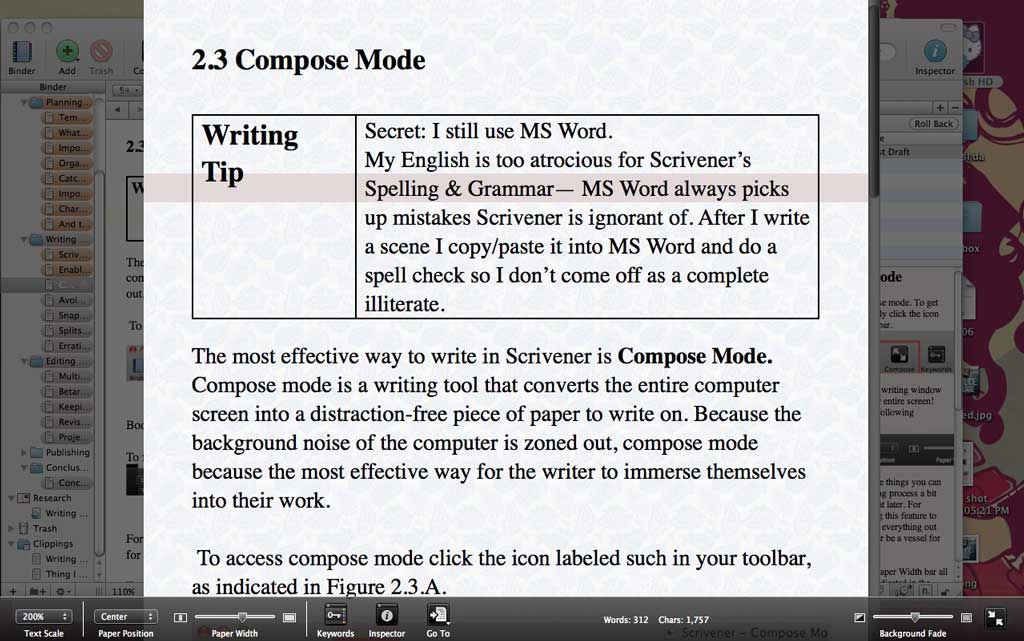
Secret: I still use MS Word.My English is too atrocious for Scrivener’s Spelling & Grammar; Word always picks up mistakes Scrivener is ignorant of. After I write a scene I copy/paste it into MS Word and do a spell check so I don’t come off as completely illiterate. |
The most effective way to write in Scrivener is Compose Mode. Compose mode is a writing tool that converts the entire computer screen into a distraction-free piece of paper to write on, thus allowing the writer to immerse themselves into their work.
To access compose mode click the icon labeled such in your toolbar, as indicated below.
Accessing Compose Mode
Boom! Scrivener’s editor is now expanded and highlighted.
Compose Mode
To fully optimize Compose Mode follow these customizations:
Customizing Compose Mode
To blow Compose Mode to the entire screen, drag the ‘Paper Width Bar’ all the way to the right, as indicated above. This will block everything out and suck you in.
Experiment with Text Size. I blow up my text size to at least 150%; it is easier for me to read what I’m writing this way.
To exit Compose mode, hit the Esc key on your keyboard.
2.4 Split Screen
To view two documents at the same time enable Split Screen mode. This is convenient for side-by-side viewing:
- Character Profiles and Current Draft.
- Inspirational Images and Current Draft.
- Plot Outline and Current Draft.
- List of Names and Current Draft.
- Two correlating scenes.
To enter split screen mode: click the double rectangle that is indicated below.
Now there are two horizontal windows on the Scrivener screen. To change the content of one of these windows click inside that window, then click on a file in the Binder that you want to display. It will open in the selected window.
To change the horizontal split screen to vertical split screen go to View (Menu Bar) —> Layout —> Split Vertically.
2.5 Snapshots
The Snapshots tool allows users to compare/contrast a file’s history by storing multiple versions of a file in the Inspector.
To create a Snapshot, open up the Inspector. Click the Icon on the bottom tool bar that is shaped as a camera, as indicated below. Once the Camera tool is open click the plus side, located in the top-right, to take a Snapshot.

