Scene Cut Detection is one of Davinci Resolve's most user-friendly features. It gives the artist a direct path into the program, with their project packaged neatly in tow.
Something that trips editor up all the time, though, is file transport and sharing—especially when working between programs that operate differently.
After all, few things will leave a beginner lost like not being able to get what they need where it needs to go. This is what makes Scene Cut Detection such an inviting hand to hold for those just starting out.
Here's everything you need to know about the tool, and how to use it.
How Does Scene Cut Detection Work?
When producing a video from the ground up, you start with the live version of your project in Premiere or another arena of your choice. When coloring footage after the cut has been finalized, you generally want to be working with the freshest copy of each asset, one that has been copied as few times as possible since being acquired, logged, and put to use.
When an image is copied, the color gamut will always be reduced to some extent. You start with the fullest possible spectrum, and where the renderer decides to make those little compromises, the values within the image may become less faithful to the original.
Picture a really noisy JPEG image. Somebody looking to grade this image would likely be much better off doing their work before compressing it, if at all possible.
This way, you can deliver the highest quality grade after the fact. This superior image can then be compressed without worry, including the added enhancement of what you were able to accomplish before tamping things down.
We mention these things because grading a rendered piece of media should always be regarded as a last resort. Ideally, you are coloring the original, full-res version of each piece of footage, even if these versions of your media were not the ones that you actually cut the project with.
If all you have on-hand is your final cut, rendered and complete, however, there is still hope for you. Scene Cut Detection is a living embodiment of that very hope.
Wait... Isn't There A Better Way to Do This?
When grading a project in Resolve, bridging the gaps between your assets, your cut, and the integrity of this configuration will spell the difference between a smooth transition and a frustrating uphill struggle.
There are many ways to get yourself through to the other side. For example, using an edit decision list (EDL) of your cut allows you to draw directly from the original source material without a round of compression baked in.
Doing this will not always be possible, however. The demands of production may leave you in a pickle, but this will rarely be the end of you. If a totally locked-in file to color lands on your desk, Scene Cut Detection is the best way to dive in without retracing steps unnecessarily.
How to Use Scene Cut Detection in DaVinci Resolve
To begin, fire up Resolve and create a new project. Open it up and hit Shift + 2 to call up the Media workspace.
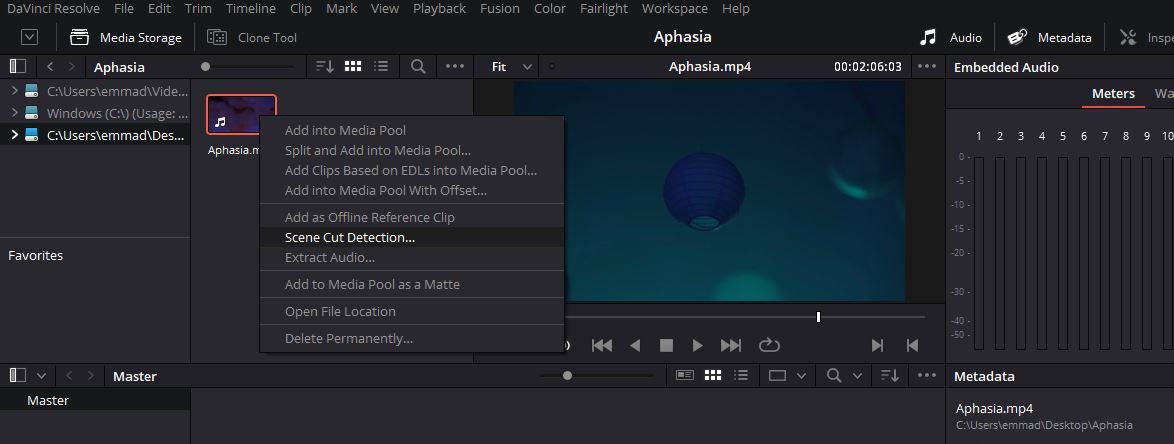
Locate your file through Resolve's file browser. Right-click it, and select Scene Cut Detection.
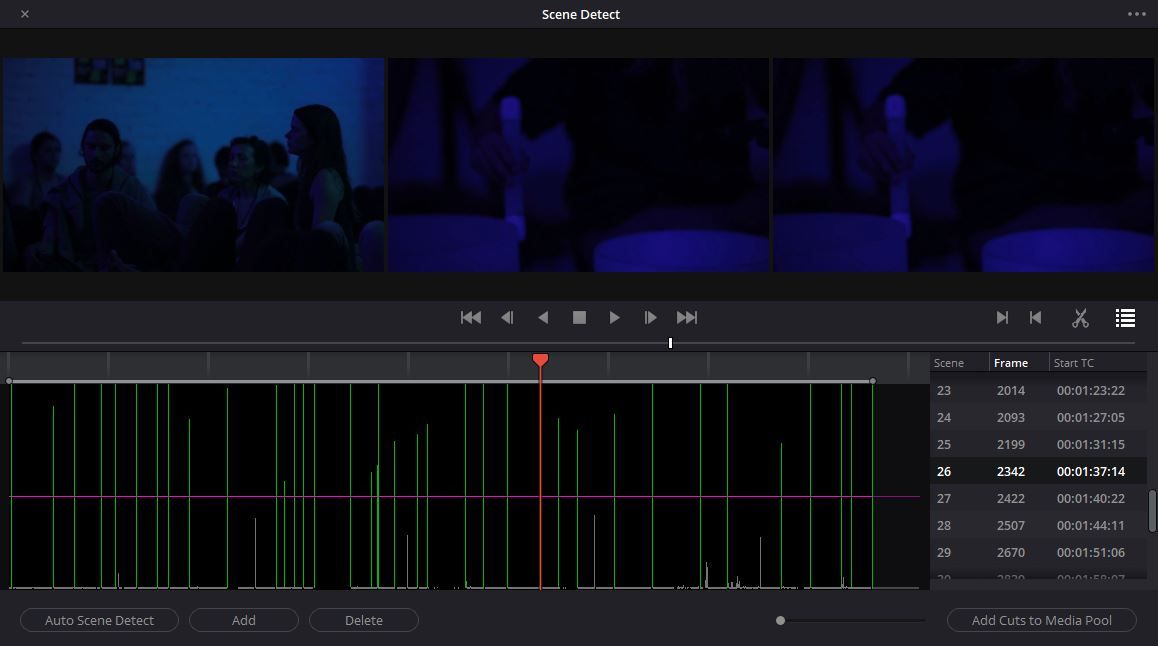
You will be met with a new window that consists of three monitors and a suspiciously empty timeline below. Hit Auto Scene Detect at the bottom to give the program an initial first stab at things. The file will be taken out of your hands and analyzed. As Resolve detects each break in continuity, a vertical line will be added to this timeline.
The height of each line indicates how sure Resolve is that the detection is an actual cut, and not something else. The horizontal pink line that pierces them all allows you to specify the threshold that the majority of your real shots meet.
A list of each detected cut will be found to the right. The frame number and timecode that it starts on are provided on the right as well. You can add or delete cuts yourself once most of them have been found; the on-screen transport controls are simple and nothing out of the ordinary.
Pruning is a tool used to pare away at a tightly-clustered area of false positives within an In and an Out. This is generally useful for dark scenes or ones where things are moving quickly across the screen.
Clicking through each listed shot will give you a good idea of whether you're ready to go. The first monitor shows the last frame of the preceding shot. The second shows the frame that the cut landed on, and your final monitor will present the first frame of the next shot. A correctly-detected cut will look like one image followed by two that are very similar.
Once you're satisfied, click the Add Cuts to Media Pool button to make things official. Close the Scene Cut Detection window using the X at the upper left-hand corner to return to your newly-populated Media Pool.
Other Options in the Scene Detect Window
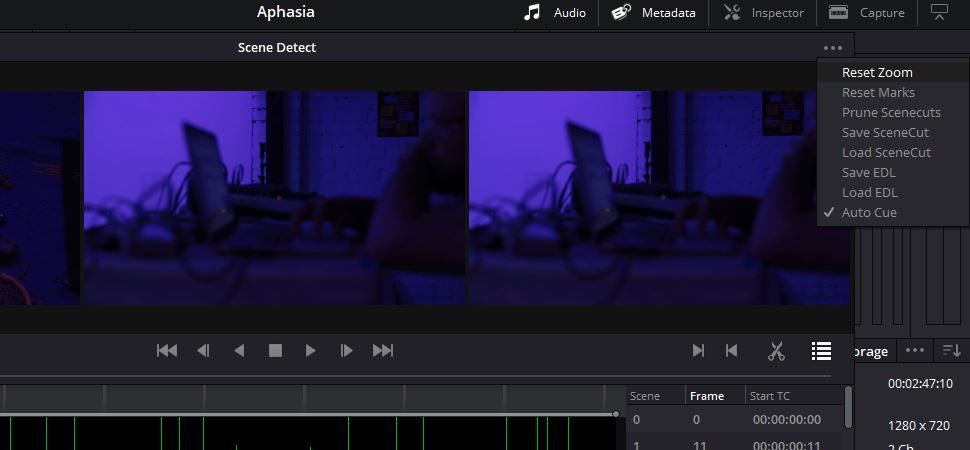
The ellipsis in the upper-right corner of the Scene Detect window brings forth a couple of extra options. Many of these will be self-explanatory, such as those allowing you to reset the zoom level of the timeline or to reset your Ins and Outs.
You can save scene cut data once it has been acquired using the Save SceneCut option. This information is converted to something called a CS file that can be called up later using Load SceneCut right below.
You can also do something similar—only with an EDL instead of a CS file—by selecting Save EDL. Resolve gives you the ability to bring an EDL straight into Scene Cut Detection as well.
At the bottom, Auto Cue lets you watch live as the program works, giving you some means of quality control as the playhead follows the action with each jump. You can disable this if your project is long and you plan on letting Resolve run in the background as you do something else.
Taking the Next Steps
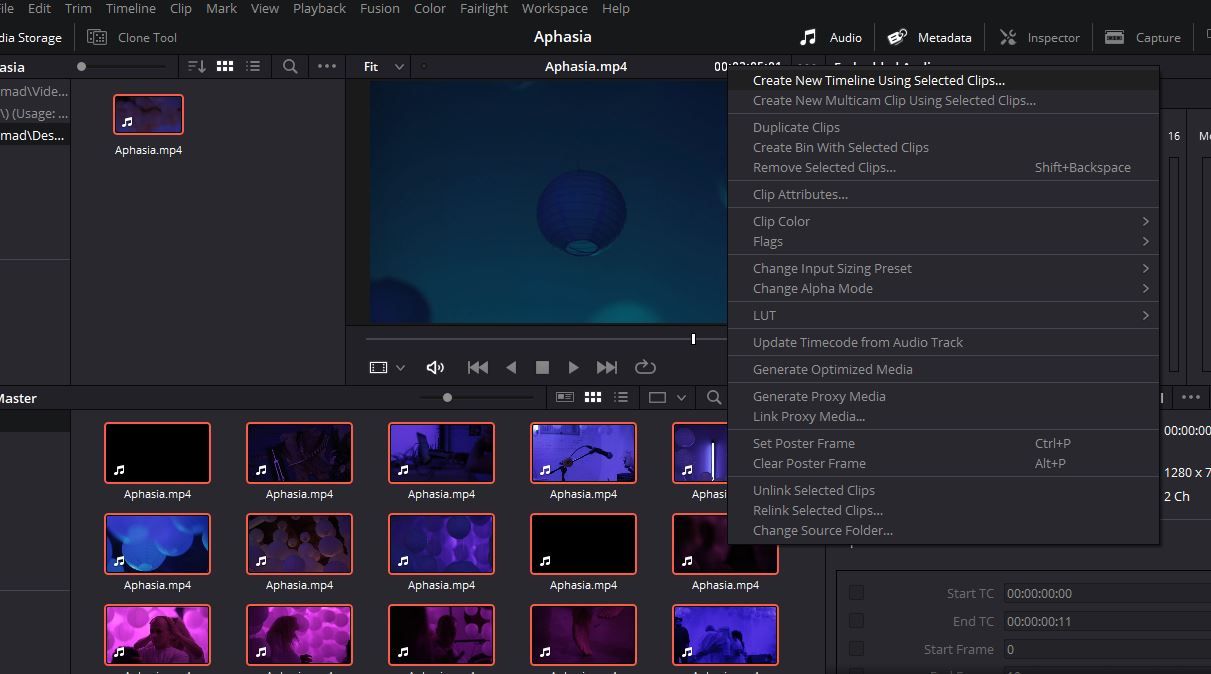
There are several ways that you can proceed from your Media Pool. One of them: select all of your sub-clips, right-click, and select Create New Timeline Using Selected Clips. You can check out your new cut in Resolve's Edit workspace or any of the others that it offers. Doing so may allow you to catch any errors that were not immediately obvious before.
We recommend that you skip straight to it, if you can. Shift + 6 will drop you directly into the Color workspace, and your work can truly begin.
Scene Cut Detection Makes It Easy
Now, nothing is out-of-reach when you're looking to turn a grade around quickly and your means forward are limited. As long as the rendered media in question is of the highest possible quality, Scene Cut Detection will be more than sufficient.


