DaVinci Resolve has established itself as something of a powerhouse for editors. Its formidable color tools, joined by a robust non-linear editing system, audio suite, and node-based image compositing make it worth using.
Resolve offers a free version with some restricted tools and resolution limitations, but it still opens up the software to more users. If you've got a video project that needs a pop of color, Resolve may be just what you need.
This article will show you how to import a timeline from another editing system, and how to use the color tools within Resolve to match up your clips.
Preparing To Color Grade
When loading up Resolve, you are greeted with seven workflows, represented by the icons at the very bottom of the window.

Here's a quick rundown of each feature:
- Media deals with sourcing the footage, sound files, and whatever other assets you need in your timeline.
- Cut is a simplified editing workflow for quick and easy clip editing.
- Edit is a standard, timeline-based editing system similar to that found in Adobe Premiere Pro and Final Cut Pro.
- Fusion is a node-based compositing tool for VFX and graphics.
- Color deals with color correction and image adjustment.
- Fairlight is a sound suite for audio mixing.
- Deliver allows you to create your final video file.
We are going to examine the Color workflow, but we need to combine that with Media (to source the files needed), and Edit (to place them in a timeline ready to color-correct).
You can build an edit from scratch to color-correct within Resolve using these workflows. To do this, you can either drag and drop your footage into the Master window in the Media workflow, or you can use the File > Import function.
Importing Your Work
If you are planning to use Resolve solely to color-correct an existing edit you've been working on, you can Import your timeline from another software.
Make sure you've exported your timeline from the other software as an AAF, EDL, or XML file. In the Media workflow, navigate to File > Import Timeline, and select your exported timeline file.
In this case, we imported an XML file from Premiere Pro.

You'll now see a window that allows you to adjust your project settings. Once you're content with what you've chosen, hit the OK button.
If any media is missing, another dialogue box allows you to relink anything not accounted for.
After this has concluded, you should now have your timeline imported into Resolve. That means it's time to look at playing around with the Color workflow.
Getting Started With Color
If you want to practice color work in Resolve, but don't have any footage on hand, you might want to take advantage of the many websites that have copyright-free stock videos.
In this example, we've sourced our footage from Pexels.

Now that the footage is imported and in the timeline via the Edit tab, it's time to switch to the Color workflow.
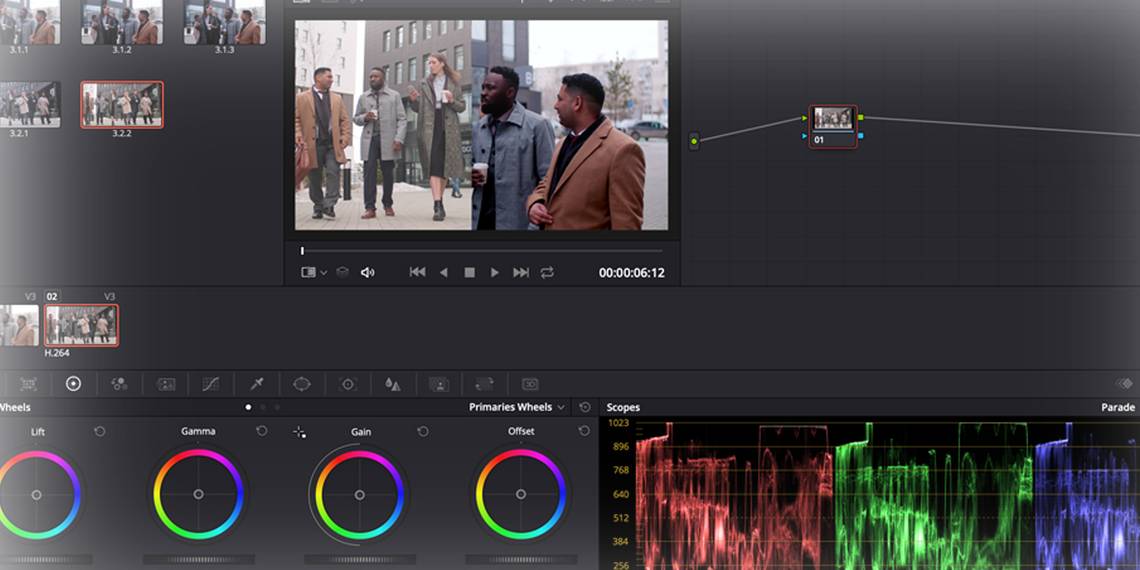
In the standard one-screen layout, the screen is divided into six windows: a Viewer, a Color Timeline, a Node system for applying grades and corrections, an Effects window, Scopes, and Color Wheels.
Scopes, the panels resembling graphs in the bottom right of the corner of the screen, display different color data in the clip depending on the need of the user.

The panels in the above image show us how much Red, Green, or Blue color data there is in the selected clip. Using Scopes becomes crucial when Shot Matching clips.
The Color Wheels in the bottom left of the window allow you to adjust the amount of color and luminance data in the image.
Lift adjusts color and luminance in the dark tones of the image, while Gamma adjusts the mid-tones, and Gain adjusts the highlights (the brighter parts of the image). Offset raises or lowers everything.
The sliders under each wheel adjust the levels of luminance data in the image. Clicking and dragging within the color wheel allows you to increase or decrease the levels of color data along the spectrum within the wheel.
In this case, the image on the left is the original, while the right has been graded. In the original, the Lift color wheel slider was pulled down to -0.17 to decrease the amount of luminance in the darker part of the images, removing the milky effect.

The scopes showed that there was a little more red data in the mid-tones, so the slider was dragged away from the reds in the color wheel to offset this.

You can see that the adjustments on the wheels were quite minor, but have produced a drastic difference. Note how the Gamma wheel is offset away from the reds and positioned towards the blues to reduce the red data.
These are artistic choices and depend on the effect you want to achieve.
A good first step is to play around with these settings. Simply try out different colors and settings to create a master shot to Shot Match all your clips to.
Using Nodes to Manage Color Grading
The Node window next to the viewer allows you to manage your grading settings. In this case, all of the corrections made are encapsulated within a single node, which can be toggled on and off with Shift + S.

You can add multiple nodes to a clip to play around with grades, and add additional adjustments modularly. To add a second node, simply use Alt + S in the Node window.
Matching Your Shots
One of the most important, if not the most important, elements of color work is ensuring that all of your clips match closely.
Having a set of off-color clips can be jarring if they are meant to be in the same location.
Resolve offers a number of methods to match up your clips, from copying your nodes between shots in the color timeline, to using the automated Shot Match function.
One of the most accurate means of color grading is manually matching your clip with Scopes and Stills.
Stills allow you to take screengrabs of your clips for reference, and match your grading with these. Right-click on your viewer, and select Grab Still.

Double-clicking on the still in your gallery overlays it on your viewer, allowing you to match it up with another clip in your color timeline.
Best of all, the still's scope data is also displayed. Not only can you Shot Match by eye, but also by comparing the color data in the Scopes window.
As you see from the image below, the data in the Scopes window matches up to the split-screen video clip. The scope data on the right has more color data in the darker tones when compared to the scope data on the left.

Using these tools, you can color correct to very minute levels, allowing you to get shots that look similar, even if they've been shot on different cameras or in different parts of the world.
Once you've color-corrected your clips, you can then export your graded footage with the Deliver workflow.
Exploring Other Color Correction Tools
This was an overview of the Color tools and capabilities in Resolve. There is still a lot more functionality that wasn't covered, such as masking, keying colors, and adding effects.
DaVinci Resolve isn't the only color correction tool out there. It's worth taking a look at the options available in other video editing tools to see which works best for you.