Blender is a free and open-source program for 3D modeling, 3D animation, texturing, rigging, lighting, and even 2D illustration and animation with Grease Pencil. One of the fundamentals involves moving the camera and navigating the viewport. In this article, we take a dive into the process.
The Viewport

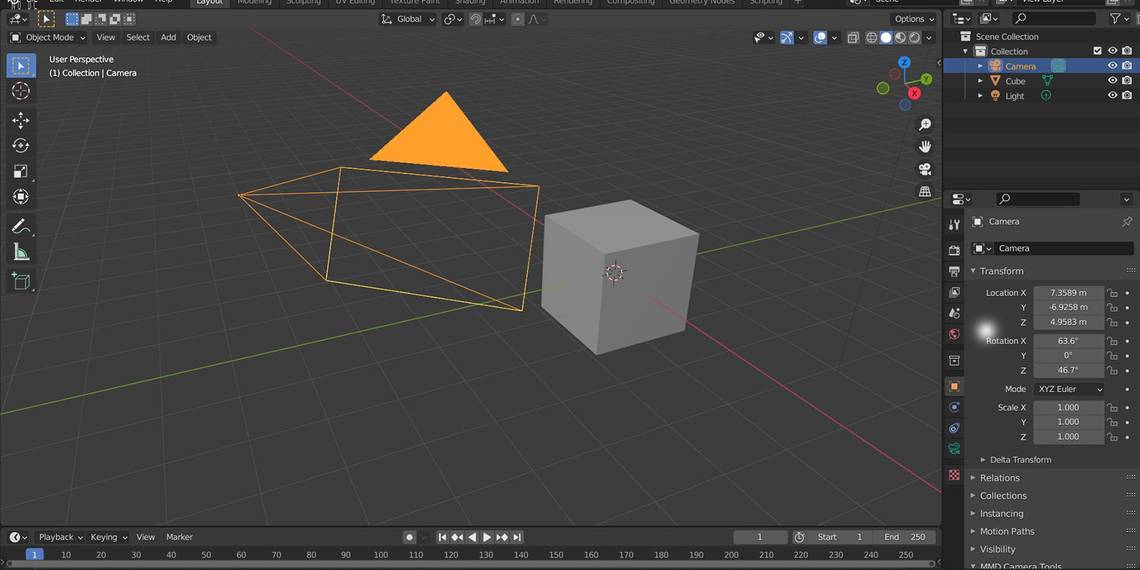
First things first, there is the camera object in Blender and then there's the viewport. What you see when you start Blender is the viewport, as shown in the image above. Rather than an object, it is simply a window in which you can look around the scene that contains your 3D model, and in this case, the default cube is shown.
It's there for creating and viewing a 3D model, and it doesn't have much to do with rendering.
The Camera
On the other hand, the camera is an object that is responsible for the rendering of your model. It renders whatever it is pointed at. However, it is not as easily moved as the viewport, so if you want to learn to navigate your model, then you should learn how to properly navigate the viewport.
For rendering an image of a 3D model, you need to position the camera. Let's take a closer look at how you can use the camera versus the viewport.
How to Add a Camera

Notice the pyramid-like object in the image above? That is the camera object. Just like a real-world camera, these objects define the location and perspective from which you will be rendering your scene.
It's got an arrow pointing away from its base, and the point of the pyramid is the rear of the camera. The base is its lens, and the arrow indicates which edge of the lens is the top edge.
To create a camera, follow these steps:
- Press Shift + A on your keyboard to open the Add Menu.
- Move your mouse and hover over Camera, then left-click.
- With Camera highlighted, hit the Enter key.
Now you should have a new camera object where the 3D cursor is. Press 0 to switch to camera view. To recenter your 3D cursor, press Shift + C. The 3D cursor appears as a target and defines where new objects are placed.
The Viewport Controls

While 3D modeling, or even simpler tasks like merging and rigging, you'll want to navigate around your model as you work. You're going to need to know how to zoom, pan, and orbit the viewport to get the best view possible. Let's show you how to do that.
- To zoom further or closer to the center, simply use the scroll wheel on your mouse.
- To orbit, hold down the middle mouse button and move your cursor around the viewport. Don't have a scroll wheel? Simply press Alt on your keyboard while dragging the left mouse button around the viewport.
- To pan, hold the Shift key followed by the middle mouse button, then move your mouse across the viewport. Again, if you do not have a scroll wheel on your mouse, press Shift + Alt on your keyboard and move the left mouse button around the viewport while your cursor is within it.
How to Control the Camera

Direct controls only work with a camera object, so don’t try to use them for navigating the viewport. Though not the preferred method of moving a camera, it’s still very useful.
To get started, go ahead and select your camera object by left-clicking on it either in the viewport or in the outliner editor. Now you can rotate or translate it. Translating means you can zoom, rotate, or pan the camera. Let's have a look at how to do that.
- To pan the camera, simply press G on your keyboard, then move your mouse cursor around. You can also limit it to move along a certain axis by pressing G and then followed by X, Y, or Z. This toggles the axis lock. In the above example, the camera object moves along the Z-axis.
- To rotate, with the camera object selected, press R and move the mouse cursor around. You can rotate it clockwise or counterclockwise.
- These movements are easier to make while in the camera view; to enter it, simply press 0. Want to align the camera to the current viewport view? Press Ctrl + Alt + 0 on the number pad.
How to Navigate First-Person View

Sometimes, you want to navigate with first-person controls as it is preferable in some scenarios such as architectural models. The walk navigation or fly navigation allows you to navigate around a scene where rotation is performed from the camera's location.
To get started and see this in action for yourself, press Shift + F, and to then move up or down press W or S respectively. Make sure to hold onto the keys, as a single keypress does nothing. Likewise, to move left or right, press and hold onto A or D respectively. Then, to move up or down in first-person, press E for up or Q for down.
You may find that the speed isn't fast enough for you. To change the speed, you can simply use the scroll wheel on your mouse to speed up or slow down the motion. Once you are finished, simply hit the Enter key to exit walk navigation mode, and now the current view will be saved as is, so you can start moving around using any of the two abovementioned methods.
Move It Around in Blender
Moving the camera and navigating your way with the viewport in Blender are fundamental tasks when modeling and rendering your models. In this overview, we have gone in-depth about the process.
Now that we've taken a closer look at the viewport, camera object, as well as how to navigate your scene in Blender with the two, you are ready to move on to the next fundamentals. There are tons of tutorials to help.